


mga
-
Posts
116 -
Joined
-
Last visited
-
Days Won
2
Content Type
Profiles
Forum
Gallery
ATV Magazine
Events Calendar
Downloads
Store
Community Map
Posts posted by mga
-
-
On 8/28/2023 at 4:50 PM, Mech said:
If this is the 2000 BB400 then this is what you need I think.. As always, if the wire colours don't seem right let us know.. Yamaha love to change their wiring.
One thing to note is that the wire going to the temp light changes from R/w to Br at a splice in the main power wire from the fuses. Those splices(shown as dots on the wires) are sometimes just crimped joins and can get dirty when they are old.
fixed! a couple of bad connections i found following your diagrams. light works now
thanks a million!!!!
-
On 8/27/2023 at 9:05 PM, Gwbarm said:
I like the hand shifter idea, but how does it attach, the foot shifter is still there.
it simply attaches to the shift shaft same as the foot linkage. I left the foot linkage just in case i didn't like it. but, i'll remove it.
with the hand shifter it takes little effort, however, i could see a problem if you're into fast rough terrain riding and you need to shift gears and hold on.
-
i tried looking at many manuals for this issue, they all seem different. But, i saw on a diagram when i followed the wires supposedly for my year and make, there is something called a "oil temperature indicator light checker" near or in the main switch on the handle bar.
I jumped the oil temp switch earlier and the fans turned on, but the light never did. supposedly it's supposed to light up when the fan goes on.
Is that oil temperature light checker a real thing? i can't seem to find any info on that
-
thanks...that makes sense...i'll be playing with it tomorrow
-
is there any way to test these? i know the fan works if i jump it, and i believe i heard it turn on once when driving, but the light has never come on. the bulb is good ( i checked it on the bench)
is there a way to test the sending unit for the oil temp?
-
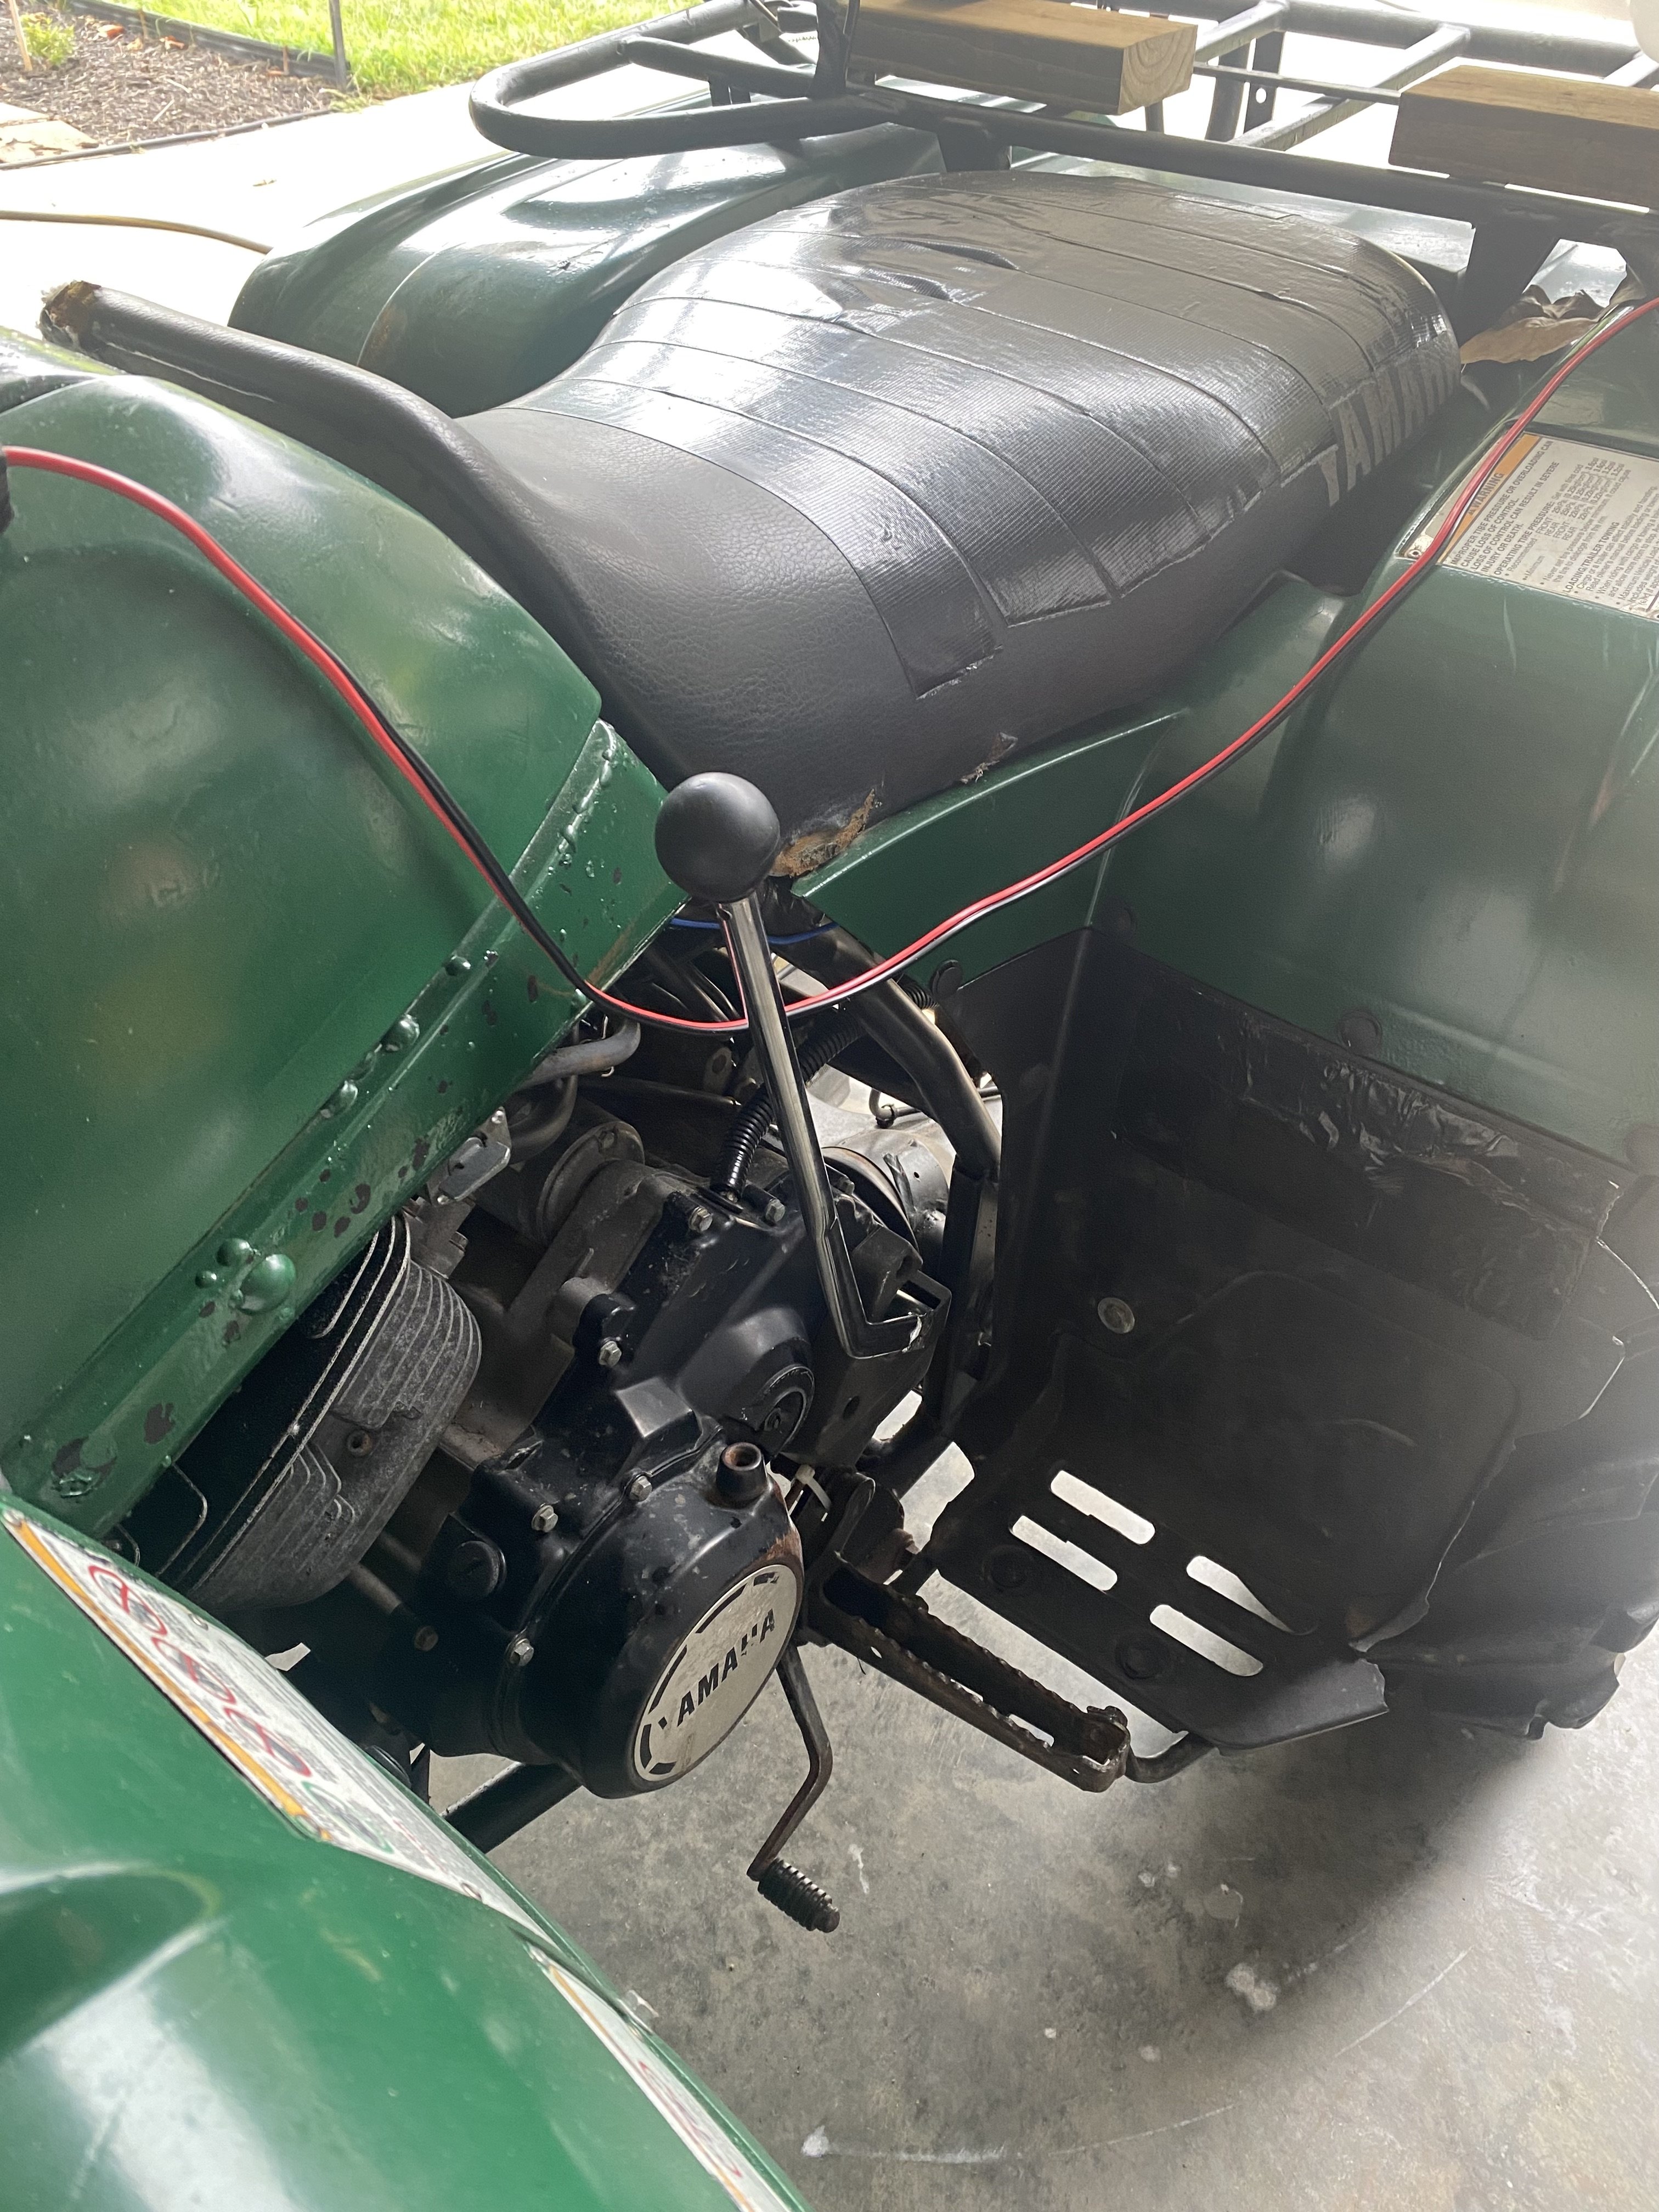
so, i bought this cheap hand shifter from amazon and it actually works much better than the foot shifter. I'll upgrade it to a much better one in the near future.
(the wires you see are for my 15 gallon sprayer mounted on the back)
don't pay attention to my seat...lol..atv is used as a work horse only....not going in the auto show

-
clutch adjustment. I loosened that nut, but if i loosen it too much the screw turns a lot. If i just loosen the nut a little, the screw hardly turns.
So, i guess my question would be what's a good starting point? Should i turn the screw in all the way then back out a little, then tighten the nut? Or, should i back it out all the way, and tighten it slightly, then tighten the nut?
I guess what i'm asking is where is the "sweet spot" for that screw?
-
i took a measurement from the rear axle nut to the front axle nut. The Right side measured something like 47", the left side (the bad side) was about 45 3/4". So, that bend in the frame pushed the wheel back maybe that far. If i can make up at least 1 inch of that i'll be happy. I still have to figure out why the right wheel's camber is so far off. (maybe the frame twisted?)
But, i also feel the lower A frame mounts might be off a little too. So far by playing with the idler arm, i got it to run fairly straight and it's not pulling to the left as hard.
This will be my winter project when i can strip it down, stand it up on it's rear and take some measurements before i pull on the frame.
-
so, what exactly does that screw do with the clutch? I'm trying to get a visual as to what it's doing inside the cover.
And, how much do you loosen that nut up? I can turn the nut out a lot and that screw will turn out with it. It seems like the nut is holding the adjustment screw at whatever setting i make it. If i removed it and put the adjustment screw back in, what harm will it do?
dumb questions, i know, but, like i said, if i had a visual in my mind..i'd feel better knowing what i'm doing
-
it'll be a while before i tackle that project. I don't really use it much right now, so, i'll let it be.
When i do i'll post back and let you guys know how it turned out
-
seems like i'm not the only one. I searched Youtube and watched a few videos of fixing bent ATV frames. The best one was they stood it up on it's rear, cut the frame and pushed the front side upwards until it would be in the correct position, then they welded a piece of tubing to the frame to make up the difference. Nice idea, but, i'll have to get a welder first, or someone around here who knows how to weld.
My other option is a porta-power to force it back out.
My last option is the tree idea....which is what i'd probably do anyways with a 4 ton come-along. ha ha
-
16 hours ago, Mech said:
Chain it to a tree and use a chain block to haul the bend out. Blocks of wood under it and big levers.. It'll bend.
To fix camber you need to move the bottom arm out, not forward.. Moving it forwards' going to effect the caster.
i was thinking of doing that. i've done that with trailer frames that were bent. I think i'd need two trees. One to hold the good side and one to pull the bad side out. At this point, what do i have to lose...right?
-
8 hours ago, Gwbarm said:
That really took a massive hit, it appears to be pushed up on the right side
it might be the way i was holding my phone...i was on my back upside down taking that picture. But, i'll double check and see if it is higher. I'm getting frustrated with this damn machine!
-
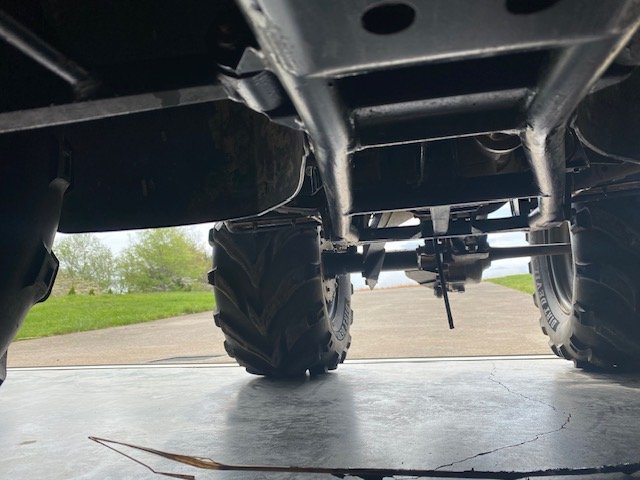
i believe i found the problem....ugh...the frame has a slight bend to it on the side that was hit. I took measurements from the rear of the frame on both sides, using the lower A frame as my focal point. I found the left side is off by a little over 1/2" to less than 3/4". That's telling me the bend in the frame is what's throwing my camber off.
I took a picture of the bend. The normal bend is on the left side of the picture, the right side shows a sharper bend, which makes sense since that was the side that was struck.
I'm not sure how it would even be possible to straighten that out. I don't have the tools for that kind of work. You can see the right side is bent in. I'd hate to sell it because I'd have to tell any buyers the frame is bent. Somehow i'll have to deal with it.
I'm wondering if i could make different mounting brackets for the lower A arm so that it would be in the correct position...(.thinking out loud here) I need to move it forward about 3/4". That theoretically should solve my camber problem.
-
Brought it in the garage yesterday because i was bored. Jacked the front end up and removed the left wheel. I checked everything i could see to find why that camber is off so much.
I posted the wrong angle of the wheel, it's actually out at the top, not the bottom. I compared the old A arm to the one i replaced, they're the same. I compared the hub to the one i replaced, they're the same...$160 for nothing. I looked at the frame from underneath, i could not find any significant bending. It's like either tho top A arm need to be shorter, or the bottom A arm longer. I know i'm missing something.....
the wheel sits like this: "/". not that extreme, but you get the picture. This is really taxing my OCD to fix this! Being a former toolmaker and machine repairman, this bothers me. 🙂 The damn thing starts and runs great, except for that wheel. I'll have to look at how the impact of what they hit changed something there. So, i'll bring it back in and continue to look for a cause. It has to be something with the frame, since i replaced everything else.
-
i replaced the A arm and i replaced the hub, put it all back together and. that left front wheel is still off like this: "\" it's not that bad but its the only symbol i can find to show how much the camber is off.
Since i replaced just about everything on the left front side, I'm going to take a closer look at the frame. The lower frame looks OK, but the upper frame part seems like it's higher than the opposite side. My theory is if i could somehow pull that down to a near normal position, it will kick the upper A arm out, thereby pushing the top part of the wheel out to a more normal position.
I'll pull it in the garage tomorrow and take some frame measurements to see if i'm correct. I can drive this as it is, but i can feel it pulling slightly to the left because of the camber being off. I'll post back to let you guys know what i find. If i'm right about the frame my next issue is going to be how to fix it. lol
-
unfortunately for me, i believe it's bent. I spent a lot of time taking measurements and comparing the right and left. The left one in question, for example, the tie rod part is almost an inch higher (upwards) than the right side one. Other measurements tell me it's kinda twisted. I'm afraid it might be putting stress on the bearings on that side.
so, i'll just buy a used one and hopefully this corrects the issue.
-
On 3/10/2023 at 2:07 PM, Mech said:
It's probably the kingpin/hub.. the cast bit between the top and bottom arms.. If the frame was bent you'd probably have spotted that.
judging from the impact on that lower A arm, do you think the hub might be bent as well? I've tried everything and i thought i fixed the problem of it not tracking straight, but, it still wants to drift left. So, now i'm considering what you suggested about the steering hub being bent. I've look for a replacement, but "no longer available" and i saw one on ebay for $175. used.
so, my question is, since they're probably ductile cast, i might be able to heat it and possibly get it close to original shape? It seems like the lower part of the knuckle is the culprit. I'm thinking that is was bent back when the A arm was struck. I know trying to bend it back is like "backwoods" stuff, but i doubt my old lady will let me spend $175..lol A man's gotta do what he can.
-
I put that missing spacer in today, seemed to help a lot with making the wheel straight vertically, still slightly off, but i'm not going to let my OCD get the better of me on that issue. I can live with it not being perfect.
I did play with the Toe-in, Toe-out and it seems to be like 90% better! When i push it in the garage it goes straight and it handles much better driving it. But, i'll go back to the Toe adjustment when i get the time and see if i can adjust it to the exact specs.
Before when i pushed it, the handle bars would move to the left. Now, it seems OK. For what i intend to use it for it should be OK. I have a steep hill out back and i needed this to get up and down it and carry stuff like saws or other tools. It's about 200 ft long and it's a killer to walk up it. That little 400 has some balls when i give full throttle.
thanks again for the help!
-
On 3/11/2023 at 9:39 AM, QuadMan49 said:
Would a Kodiak 400 CDI work on a Big Bear 400? The connectors seem to be the same.
what i do is look at the parts diagrams for the model i have, write down the part number on the item i'm looking for, then compare that to a parts diagram for another model. Often they are the same part numbers. If not, i do a google search.
-
i found a few people on facebook selling parts from yamaha big bears. I'm in kentucky, and i've bought a few parts from a person who will ship and accepts paypal. They're parting out a 400 kodiak and very reasonable too.
-
once i correct that issue, i'm going to take your advice on adjusting the "toe-in" with the boards. Sounds easy enuff....(famous last words)
i do appreciate the feed back..brainstorming is the best teacher.
-
2 minutes ago, Mech said:
It's probably the kingpin/hub.. the cast bit between the top and bottom arms.. If the frame was bent you'd probably have spotted that.
well.....i think it's mostly "pilot error" on my part. I removed everything again and I re-tightened the ball joints and made sure they were seated, which they were. I removed the wheel and the plate were the lugs are on, and i noticed ( according to parts drawings ) there's a spacer ( washer) missing. It goes between the lug plate and bearing seal. It was never there to begin with! Thats why i had a little play in the wheel and i could rock it top to bottom. Without the wheel on it was very little movement, but, add a 26" wheel and the movement increases a lot.
To show my wheel issue, the right wheel is "I" and the left wheel was "\" when on the ground. ( only symbols i could find to show how the wheels sat...lol)
So, i ordered that part and there's a small "O" ring for that too. Hopefully when that spacer solves my mystery . I checked the frame closely and there were no bends and all the mounts for the A arms were good.
it's this part: collar 90387-281v8-00
-
here's where i'm at: the front wheel camber is off. This is the side where some damage was to the lower A arm, which i replaced. The wheel is leaning in at the top, where the other wheel is "almost" level veritcally. So, i jacked it up and removed both wheels and took measurements off the frame to each ball joint and several other points. The problem is they are all equal.
So, now i have to figure out what else was bent when they crashed this thing. The level i pl;ace on the hubs shows I have to somehow move the left wheel out about 3/8" to make it even with the right side. Since everything measured the same, i'm thinking that maybe the welded mounts on the frame might have moved (?)
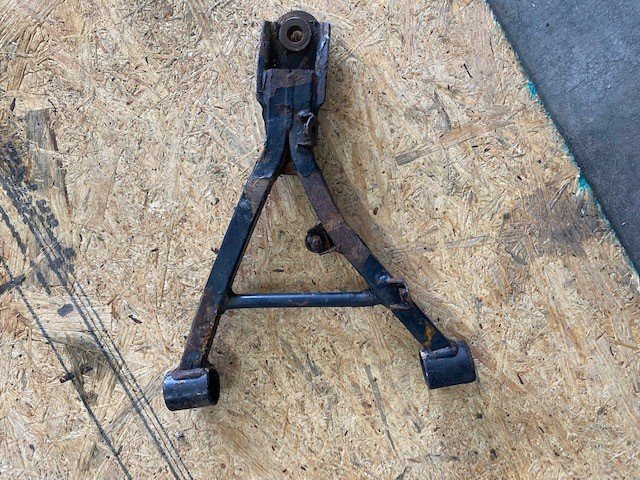
I also compared both lower A arms...the bad one and the one i bought. They were both the same. Upper A arms had the same measurements on both sides.
the attached picture shows how bad the original A arm was bent


clutch adjustment question....
in Yamaha ATV Forum
Posted
amazon....$13. i bought a cheap one to try it out.
ugh..hard tail. we did a fund raising ride..500 miles round trip....i rode a sportster on the way down, then a custom bike that was hard tail on the way back....never again!