cfauvel
-
Posts
52 -
Joined
-
Last visited
-
Days Won
1
Content Type
Profiles
Forum
Gallery
ATV Magazine
Events Calendar
Downloads
Store
Community Map
Everything posted by cfauvel
-
NEW Voltage Regulator burning up - 2000-2001 quadmaster 500 LT-A500
cfauvel replied to cfauvel's topic in Suzuki ATV Forum
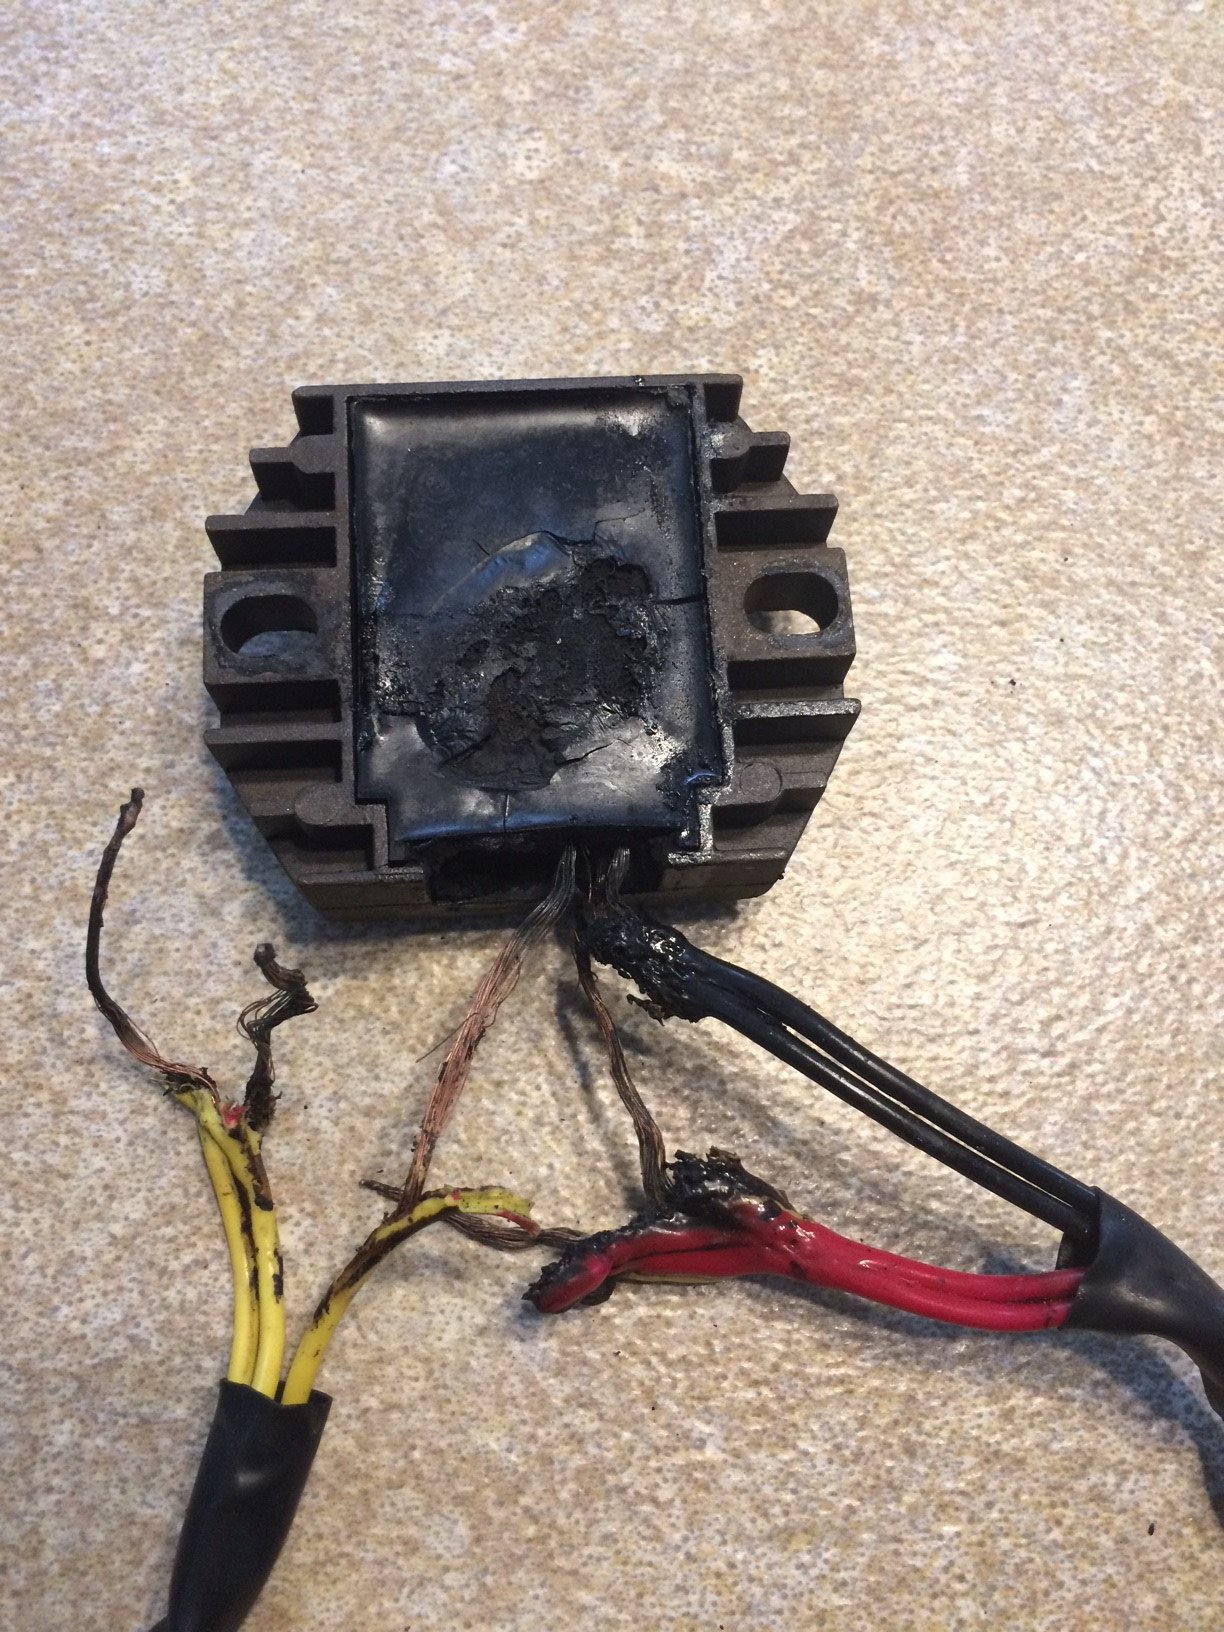
Ok...at idle the AC voltage is as follows (the three yellow wires) Outside to outside = 30+ outside to middle = 30+ other outside to middle = 30+ at some unknown RPM where the throttle is half way down (don't have a tach) outside to outside = 70+ volts Outside to middle = 65V other outside to middle = 65V I think the stator is actually ok. oh and I tested the ground on the plug that had two black wires and two red wires, with probe on each black wire to ground, they both shown continuity..did it to the frame as well as battery ground wire. Got an offer from the ebay seller to refund me the cost of the original as may have been defective...we'll see.- 14 replies
-
- 1
-

-
- rectifier
- voltage regulator
- (and 1 more)
-
NEW Voltage Regulator burning up - 2000-2001 quadmaster 500 LT-A500
cfauvel replied to cfauvel's topic in Suzuki ATV Forum
Just checked the service manual and it states the ohms should be .1 - and 1.0...so I'm within specs for that, maybe simply a bad NEW regulator. -
NEW Voltage Regulator burning up - 2000-2001 quadmaster 500 LT-A500
cfauvel replied to cfauvel's topic in Suzuki ATV Forum
Ok did some preliminary tests. Continuity tests between yellow wires and ground.....all three wires show OPEN, which is what I would expect OMH test between all three yellow wires. Outside to outside = starts off at .6 then drops down to .4 after a bit. Outside to middle = starts off at .6 then drops down to .4 after a bit. second outside to middle = starts off at .6 then drops down to .4 after a bit. I don't think the resistance of the stator is right....will do AC volt check at lunch.
-
NEW Voltage Regulator burning up - 2000-2001 quadmaster 500 LT-A500
cfauvel replied to cfauvel's topic in Suzuki ATV Forum
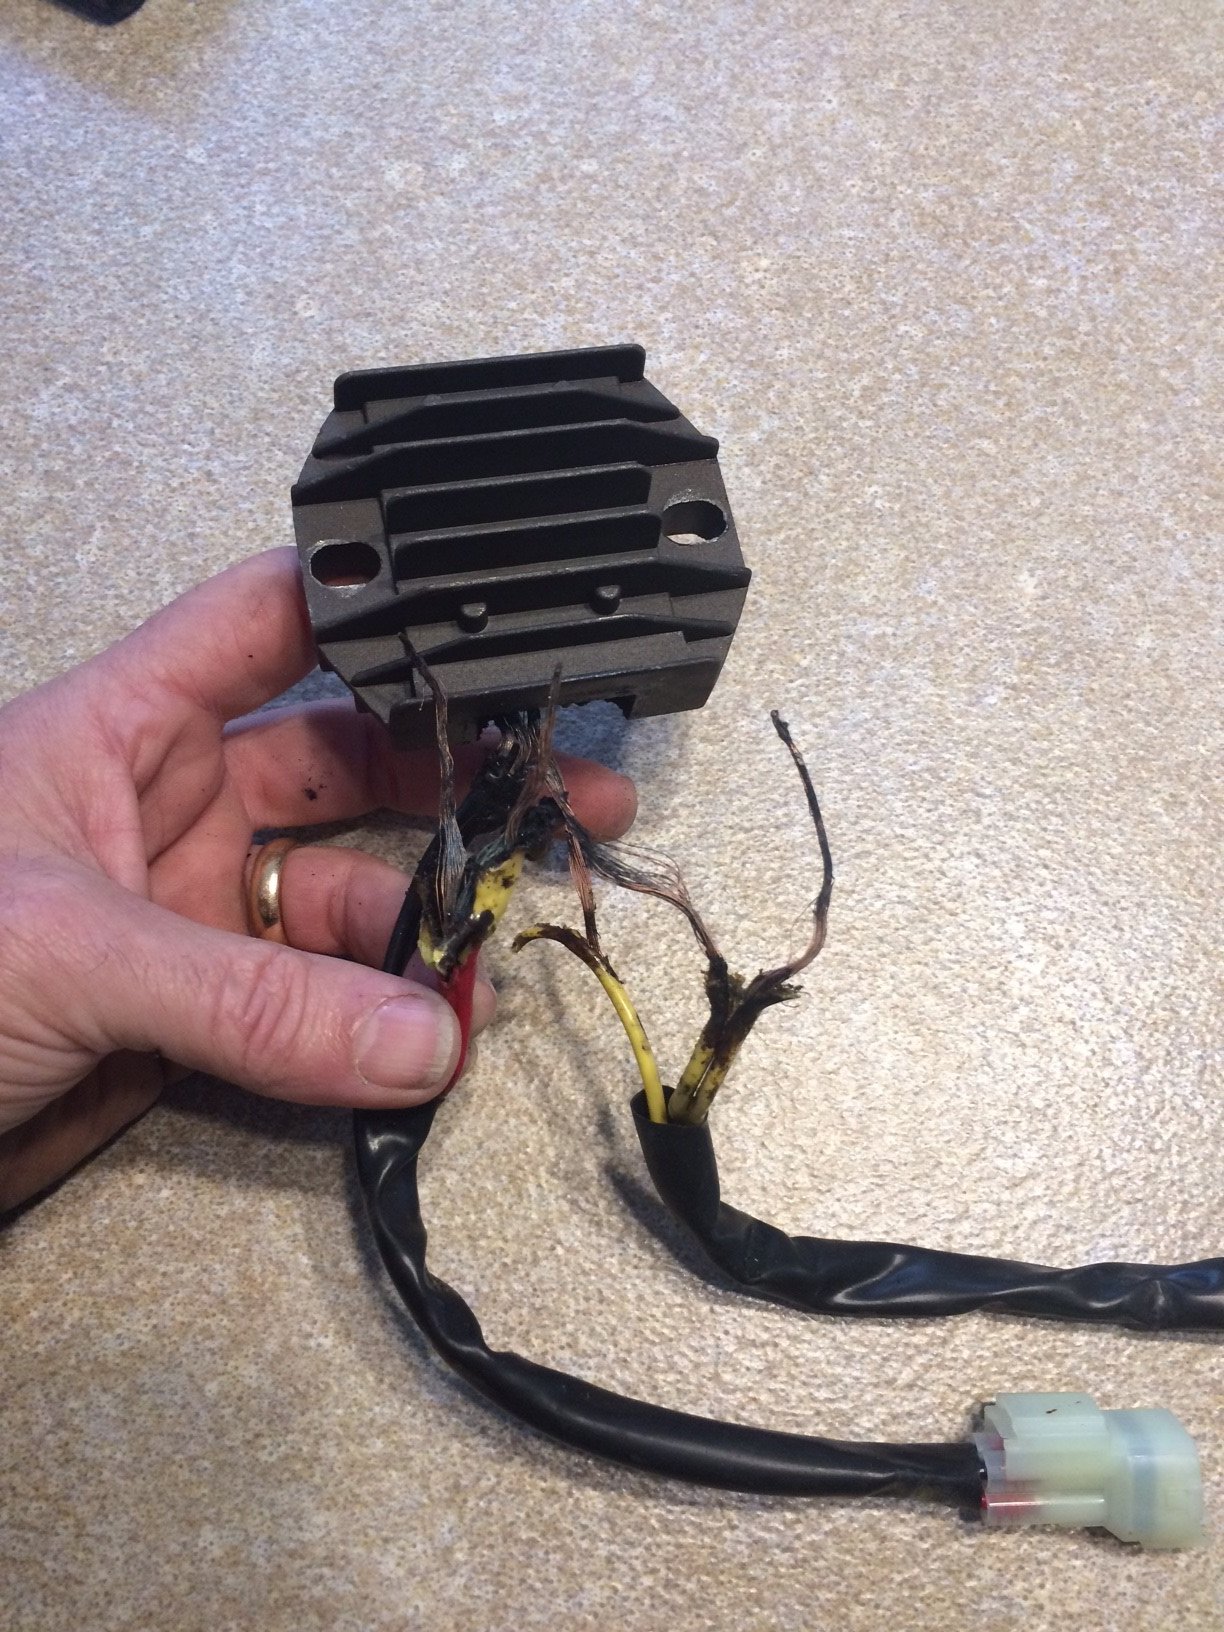
I'll get a pic this lunch time....I had to pull the yellow wires and red wires apart because withthe insulation burnt off (and motor off) the short circuit was still draining the battery....it is SO bad. -
2000-2001 quadmaster 500 LT-A500 ohoh....bought a a new voltage regulator from ebay and it solved a hard start problem. I have only been starting it and not riding it as it was a fixer upper for bro-in-law. Today he came down to pick it up and we went riding up and down the street to find the thing smoking so bad that it nearly caught fire. Do you guys think it is just a cheap voltage regulator and should use the true OEm regulator OR is there is something else that could be cooking these? The original burnt up too. What could be causing these regs to fry? UGH
-
2000-2001 lta500 quadmaster - Idle jet adjustment
cfauvel replied to cfauvel's topic in Suzuki ATV Forum
I know I would have NEVER thought of that, I guess 'thankfully' the regulator was smoking as being the clue. I went with a $17 after market unit from amazon...I could buy 4.5 of these for the price of OEM, we'll see how long it lasts. Now for new tires and reupholstery of one more seat and then I'll be able to hand both ATVs back to my bro-in-law. -
2000-2001 lta500 quadmaster - Idle jet adjustment
cfauvel replied to cfauvel's topic in Suzuki ATV Forum
OMG - UPDATED Put in the new voltage regulator in today, the motor started quickly with the right amount of choke/enricher employed....took maybe 5 cranks or less. The motor had been sitting for several days, so it was as cold as possible...let it warm up for a minute and played with the throttle and once warmed it didn't hesitate . It kind of makes sense I guess....if the magneto is giving the voltage to the regulator, the regulator in turn feeds the coil (or goes to some CDI component elsewhere), then having a bad regulator would affect the spark. -
2000-2001 lta500 quadmaster - Idle jet adjustment
cfauvel replied to cfauvel's topic in Suzuki ATV Forum
A little update. been starting this motor everyday since last update and a slight adjustment to pilot screw after installing the tank in the poper place with short fuel and vacuum line....It has become progressively easier to start, though still quite a few cranks of the engine.... Then yesterday I started seeing smoke come around the air filter box....took the rear fender off and found the voltage regulator smoking....poking around here I found this thread The OP's symptoms are very similar to mine...obviously a new regulator has been ordered...we'll see the outcome around Feb 6.... in the meantime I'll be working on the seat foam and upholstery. -
2000-2001 lta500 quadmaster - Idle jet adjustment
cfauvel replied to cfauvel's topic in Suzuki ATV Forum
Unfortunately this is a Mikuni carb where the choke is actually an enricher and doesn't move the butterfly. Very similar to the Johnson/Evinrude method of 'choking' the engine. The latter is a solenoid that lets fuel behind the carbs into the intake manifold. The choke level when fully on, pulls a needle out of an orifice, and when no choke is on the needle is blocking the orifice. When I do get the motor started and idling, if I employ the choke it kills the motor as one would expect...this tells me the orifice is not clogged (at least not fully) I 've been running with the gas tank away from the carb via longish fuel line and vacuum line...I am thinking that is the issue...normally the fuel line and vacuum line is about 3 inches and 4 inches respectively...with the fuel line I am using being about 3 feet long it might be creating a P-trap...I think I'm going to mount the tank properly and give it another try. -
2000-2001 lta500 quadmaster - Idle jet adjustment
cfauvel replied to cfauvel's topic in Suzuki ATV Forum
GRRR just tried the engine 1 - turned petcock to PRI, waited a few seconds 2- set the enricher to all the way...cranked...nothing 3 - set the petcock to RES and enricher to halfway...cranked....nothing 4 - set the enricher to nothing....cranked ....nothing 5- sprayed starter fluid into the air box, started right up and idled nicely and throttle response was good after warming up a bit. Thoughts? -
2000-2001 lta500 quadmaster - Idle jet adjustment
cfauvel replied to cfauvel's topic in Suzuki ATV Forum
GRRR and YAY.. set the carb to 2.5 turns out and cranked and cranked and cranked until the engine started. It idled pretty well right off the bat, but if you goosed the throttle it would WOMP and almost die....I screw in the pilot screw a little bit at a time and kept trying the throttle. After several adjustments trying the the throttle it would rev nicely without dieng . had to take the classic 69 mustang out to put xmas lights away in the attic and decided to re-test the inductive tach that I had...it worked...So went back to ATV and tried it again...it didn't work...then I saw a protective sleeve over the spark plug wire....cut that back a little to get the pickup directly on the wire...first try nothing, flipped it 180 degrees and got a reading. At first it was pretty accurate then for some reason it started doubling and tripling...I managed to set the RPM at around 1600 when it seemed accurate, then the tool read 4000 - 6000 whilst idling.....ugh. over the course of an hour I turned off the motor and went back where it would start and idle perfectly. let it cool for several hours and it WOULDN'T start after cranking a lot...finally the battery had enough.....put a Battery Tender on last night and will see in a bit how it does. If these are like outboards, you need a good battery to turn the magneto fast enough to produce the right amount of starting spark for the CDi ignition to charge up the capacitors to discharge. I'll keep you posted. -
2000-2001 lta500 quadmaster - Idle jet adjustment
cfauvel replied to cfauvel's topic in Suzuki ATV Forum
Thanks Dave and no worries, you've been a great sounding board. I hear ya about trying to diagnose from afar. I don't know these carbs either so get confused as to whether this Pilot Screw is an idle air bleed or idle fuel jet....on my 225 evinrude the idle circuit is controlled by idle air bleed, meaning they let in air, so larger orifice means more air not more fuel....Sounds like the pilot screw is an idle air limiter based on your suggestion of screwing it in more... Thanks again...I'll keep ya posted. BTW My flex shaft screw driver is going to work. -
2000-2001 lta500 quadmaster - Idle jet adjustment
cfauvel replied to cfauvel's topic in Suzuki ATV Forum
Thanks Dave, will try that saturday....off to office tomorrow :-(....I get back in the dark. I was hoping the mentioning of where the choke was when it finally started would be a clue. Any recommendations for a brand/model for inductive tach? -
2000-2001 lta500 quadmaster - Idle jet adjustment
cfauvel replied to cfauvel's topic in Suzuki ATV Forum
Ok put the carb back on with pilot screw set at 3.5 and tried starting it. Put the fuel pet cock to PRI for about 10 seconds and tried...kept cranking , kept cranking, tried the "choke" and only with the choke NOT engaged did it finally start up. once started and idling if I tried the throttle it would hesitate and die. only after a warn up period of several minutes did the throttle behave and not hesitate and die. and once warmed up it seems to idle fine....I don't have a functioning inductive style tachometer to know my true RPM...I am open to suggestions on a brand/model of a inductive tachometer. So what do you all thinK? unscrew the pilot screw a bit more? Screw the pilot screw in more? -
2000-2001 lta500 quadmaster - is this a ignition switch problem
cfauvel replied to cfauvel's topic in Suzuki ATV Forum
FIXED - took out the ignition switch and followed the continuity tests described in the service manual....rather than a KILL, when turning on the lights, the bridge between Red (power) to Orange (ignition) to Grey (lights) skipped the ignition and went to lights solely....took apart the switch and could see crud on the copper contacts, used a brass brush then some 600 grit sandpaper to clean up the contacts and re-did the tests...all good now. whew...although the ignition switch is probably THE cheapest part on this ATV. -
2000-2001 lta500 quadmaster - Idle jet adjustment
cfauvel replied to cfauvel's topic in Suzuki ATV Forum
Just checked the pilot screw # of turns out and it was only 3. I must have turned it in to try to get it to lean out then back out until it sounded better and ended up at 3. I'm going through the carb one more time cleaning out the ports again...and double checking the float level one more time. Looking at the gas I'm seeing a yellow tinge, like the color of cadmium plated parts, so fuel might be an issue too...will get some REC gas once I have the carb back together. Also looking at the idle speed screw and cam under the black plate, it doesn't seem like I screwed in the idle speed screw much at all.. UPDATE:I checked the float level and the setting was a little low, the manual states it should be 13.00 mm +/- .5mm, so I had to raise it about 1.5mm...right now it is at 13.2....When I raise it, it seems to me that it would lower the level of fuel, right? As it is closer to the bottom. We'll see tomorrow how it behaves. -
2000-2001 lta500 quadmaster - Idle jet adjustment
cfauvel replied to cfauvel's topic in Suzuki ATV Forum
Just checked the pilot screw # of turns out and it was only 3. I must have turned it in to try to get it to lean out then back out until it sounded better and ended up at 3. I'm going through the carb one more time cleaning out the ports again...and double checking the float level one more time. Looking at the gas I'm seeing a yellow tinge, like the color of cadmium plated parts, so fuel might be an issue too...will get some REC gas once I have the carb back together. Also looking at the idle speed screw and cam under the black plate, it doesn't seem like I screwed in the idle speed screw much at all.. -
I'm in the same boat....they DO make a screw driver that accepts different bits that is on a flexible shaft, just like the idle speed screw that pushes the butterfly open via a cable that bends 90 degrees under the carb to the right side of the engine (at least it does on 2000 quadmaster 500)
-
2000-2001 lta500 quadmaster - Idle jet adjustment
cfauvel replied to cfauvel's topic in Suzuki ATV Forum
What do you think of the following to adjust the idle mixture (ie pilot screw)? Assuming I find a way to turn the pilot screw without burning myself anymore. 1 - add a T to the vacuum line from the carb to the gas tank's petcock 2 - screw in the idle speed screw (the screw linked to the throttle under the black side cap) so that the motor idles well enough 3 - adjust the idle mix/pilot screw in or our until I get the maximum vacuum 4 - lower the idle speed screw to meet the 1500 +/- 100 rpm range. NOTE: I'm not seeing a fuel pump mentioned in the service manual....I assume there IS NOT one for the quadmaster 500....just gravity fed with the vacuum at the petcock to let fuel run into the carb with selector is on ON or REV. When on PRI just gravity fed. UGH just rethinking the vacuum port on the carb....not sure if it will be a steady vacuum or a pulse...easy enough to test. -
2000-2001 lta500 quadmaster - is this a ignition switch problem
cfauvel replied to cfauvel's topic in Suzuki ATV Forum
got cha...yeah I think it is the switch too(at least I hope so)...since when you turn off the switch it closes the kill contacts, something inside is jacked up that closes the contacts when lights are turned on. We see that often on boat switches. -
2000-2001 lta500 quadmaster - Idle jet adjustment
cfauvel replied to cfauvel's topic in Suzuki ATV Forum
First thank you for the nice detailed response. Yes I thought a good job clearing out all of the passages, but the carb was SO varnished up there could still be crap in the passage... funny story(not really but has a happy ending)...with the carb kit that I bought it came with new jets (main pilot, etc). I put in the new pilot screw and turned it 2.5 out from lightly seated. Installed the carb and worked on gett the motor started, so messed with the pilot screw...apparently went the wrong way and fully seated the plot screw and then once realised turned the screw counterclockwise, but wasn't happy with the results, so let it cool down and took carb off...took out the pilot screw only to find that the tip broke off in the orifice....panic sets in....I see the tip of the pilot screw and figure I'll just push down to get it unstuck from the orifice....that promptly bent the tip so that there was NO WAY it was going to come out from whence it came....MORE PANIC NOW .....dremeled the tip off and used all kinds of picks to try to push the remainder from the orifice.... no luck....look on ebay for used one, none to be found, look at the price of a new one and freak out..... As a last ditch I used an OMC/Johnson/Evinrude orifice cleaning tool (mostly super tiny drill bits, smaller than 1/16") and hand twisted clockwise for 10 minutes to drill through the brass tip that was left. Once I was through, the hole was actually smaller than the orifice, I could see some brass still there...had my daughter with the good eyes use a pin to push the remaining sliver of brass out. Under a bore scope, which magnifies pretty well, I could see the orifice wasn't boogered up. So there HAS been some stuff done to the pilot screw orifice. :-( As far as the 5 turns, it is just a guess as I was doing this with the engine running and getting my hands burned...I'll take off the carb after work to see actually how many turns I'm out currently. I do have a screw driver with a flexi shaft...going to try that, may save me from burns too. Right now it takes a lot of cranking to get it running and messing with choke. When warmed up it revs easy enough (I'm not riding it yet, just neutral) , when i left off the gas and let it idle a bit then turn it off it back fires through the exhaust if that is helpful information. to me any backfire means lean, at least it does on my outboard. Chris -
2000-2001 lta500 quadmaster - is this a ignition switch problem
cfauvel replied to cfauvel's topic in Suzuki ATV Forum
is there a particular color for ignition and other color for lights? Sorry new to this machine, literally a newbie to atv....but pretty mechanical. -
Need help with 2000-2001 quadmaster 500 LT-A500
cfauvel replied to cfauvel's topic in Suzuki ATV Forum
Why am I not getting responses? grrr so the red light issue is fixed...used a multimeter set to continuity and I had continuity on a cold temp sender...bought a new one and the red light is gone...I haven't tested the new one in a pot of boiling water yet, but suspect it is fine. finding that the suzuki parts are bloody expensive...ebay seems to be the cheapest source. -
FIXED - indeed the spacer is pinched between the two bearings. I used a 7/8 deep socket to keep the spacer centered as the second bearing was pressed in. I lightly sanded the hub's outer diameter with 600 grit and used some grease to get the hub back onto the knuckle with some light tapping of a hammer... I've done 4 knuckles since posting the question.
-
I've been working on two 2000 quadmaster and got the second one running. The issue:With the key in the first ON position the engine starts, and once started if I turn the key one more time to the right (to turn on lights) the engine cuts off as if a kill switch was activated. The lights DO turn on.Does that sound like a fault in the ignition switch, or an issue farther down the harness?