1911Neil
-
Posts
21 -
Joined
-
Last visited
Content Type
Profiles
Forum
Gallery
ATV Magazine
Events Calendar
Downloads
Store
Community Map
Everything posted by 1911Neil
-
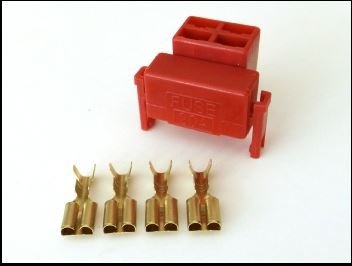
https://cycleterminal.com/ Fast shipping and I think he sent like 7 connectors in case I messed up a couple. I used one to replace a connection on my neutral safety relay. I hope posting links isn’t against the rules.
-
@MarkinAR, thanks for the tool rental idea. I hadn't thought of that. I was able to rent (temporarily buy) a slide hammer and a claw type attachment from the neighborhood O'Reilly auto parts store. I started on the right side bearing and it only took a dozen or so medium pops with the slide hammer and the bearing came right out. I removed the seal and replaced the seal and bearing, no problem. (See my 2nd youtube video above starting at 3:30 to see what I'm talking about here) I moved over to the left side and hooked up the slide hammer just like the other side. I gave it increasingly harder hits with the slide hammer and got zero movement so I ended up taking the left side axle tube off. After removing the seal and cleaning it up a bit, I found the problem. There is a big snap ring there. A better pair of snap ring pliers probably would have made removing that a quick job but I managed to get it out with my cheapies and a small screw driver. Putting in the new bearing and seal and putting everything back together was easy enough. One more job crossed off my list. If anyone is looking at a rear wheel bearing job, I highly recommend the slide hammer trick. All you need is the slide hammer with the three point puller attachment, a 3/4" washer (don't want to mess up your hub nut washer), and a pretty nice pair of snap ring pliers, plus the normal tools you'll need to remove seals and seat bearings and seals. I used a socket to seat the seals, the old bearing to hammer on to seat right side bearing and the bottom of a trailer hitch ball for the left side bearing.
-
I think I'll try the blind puller first. I'll have to borrow one but I know a few people that will probably have something that will work.
-
Thanks Mark. Think this will do the trick? It's the cheapest one I can find on Amazon. https://www.amazon.com/Aluminium-Bearing-Drivers-Removal-Bushing/dp/B00WHHAA90/ref=sr_1_16?dchild=1&keywords=Seal+and+bearing+driver+kit&qid=1592107599&sr=8-16 Also, do I need gaskets or a sealer for putting the axle tubes back on the diff, or do they just mate up?
-
I got the front brake shoes and cables done today. It was almost too easy. The shoes fit perfect with no modifications and the cables were simple enough. I did have to make a trip to Ace Hardware for some replacement cir clips and cotter pins. I got the rear brake cables and drum cleaned up. The rear shoes are going to take some work to get them to fit and I ran out of patience working on it tonight. I'll get back on that tomorrow. My big question at the moment is how I'm going to attack the rear bearings. I've seen two different methods. This guy takes the whole rear end apart. Seems like a lot of work for bearings. https://youtu.be/XnYBaxfCBjs This guy uses a puller/slide hammer and makes it look a whole lot easier. He's working on a Bayou 300 though so I don't know if this method would work on my 220. https://youtu.be/vexbLgLNaXc Anyone here done rear bearings on a Bayou 220 and have any tips or tricks? What about the slide hammer deal from the video? Think that will work?
-
I'm old enough to remember ordering stuff from the back of a magazine or a catalog where it was normal to "allow 4-6 weeks for delivery." Screw that, waiting a week or two for my last parts orders was killing me. But the rest of my parts trickled in this week. I had to spend a little time the last two evenings doing a tune up and valve cover repair on my lawn tractor, but tonight I was able to get back to the Bayou. I got the newly painted exhaust put back on. I sure could have used another set of hands wrasslin' that back on but I managed to get it. Looks much better than the rusty pipe it was when I took it off. I got the new kingpins installed too. That was a fairly easy job but I did manage to bash a knuckle with the hammer driving the old bushings out. The old set hadn't seen fresh grease in a long time and were pretty gritty. There wasn't as much slop in them as I thought, but a little bit is really magnified by the time you get to the outside of the tire. The front end is nice and tight now. Kingpins were the single most expensive part I've bought so far and worth every penny. Tomorrow I plan to work on the front brakes. I have new shoes and cables. I've already had the hubs off so that won't be a problem but the right cam is pretty stiff. It was pretty much locked up when I got it but some oil and a little work I got it moving. I'll spend more time on it tomorrow to get both sides moving right. Depending on how that goes, I may start on the rear bearings and brake.
-
Not a lot to update at the moment. I got the studs for the exhaust clamp straightened out. I pulled the exhaust, cleaned it up and painted it with stove black. Looks a lot better than I thought it would. I have all the carrier racks sanded down and ready for paint. Mostly just piddling with aesthetics while I wait for parts. I have ordered rear seals and bearings, brake shoes all around, a front brake cables set, exhaust pipe gasket and kingpins. While I'm waiting, what's a good way to clean the bearing grease out of my rear drum? I've hit it with brake cleaner but it didn't put much of a dent in it. Soak it in gasoline? Engine degreaser? I have until at least next weekend to let something work on it before I get into the rear bearings and brake job so I'm open to ideas.
-
I got the new exhaust studs and nuts today. I should have my new lefty drills/extractors tomorrow. The intact stud came out really easy even being bent quite a bit. Glad I bought a set. I hope the broken stud comes out as easy. I changed the oil and filter. The oil was very dirty. I changed the rear diff lube again. It was still pretty dirty . I'll keep changing it pretty regularly until it starts to stay clean. I also put slime in the front tires and pulled a nail out of one of the rear tires and plugged it. All are still holding air after a few days. I pulled the rear wheels again. I originally thought I could live without replacing the bearings but I'm going to have to add that to the list. Both sides are pretty sloppy and the seal on the right side is shot, which trashed the brake shoe. Guess I'll go ahead and replace the brake shoes all around. They're cheap enough. Hopefully I can salvage the brake cables. After all that, I'll start on the front end. The kingpins are shot and the alignment is off. This free 4 wheeler is getting kinda spendy.
-
Thanks. I got lucky with my motor. With everything else going on with mine, I probably would have scrapped it if I had engine trouble too @MarkinAR 's advice on lapping the valves sounds like a good plan. I hope it works out. I'm assuming this is in reference to your 2000 220 Bayou cam, valves, timing thread. I'll be watching that thread for updates.
-
Well I just found my next hurdle. I noticed when I first got it that the exhaust pipe holder was loose and missing a stud. I just confirmed it's not missing, it's broken off. I was planning from the beginning to remove the whole pipe, clean it up and paint it, but now I have to deal with the broken stud. I have a new set or order and should have them in a couple days. I'm going to try removing the broken stud with an EZ out, but I'm sure I'll end up having to drill it. After the oil change today, I'm going to start soaking it down with penetrating oil and hope for the best when the new studs show up.
-
Good thing about the starter button, once it hits, it fires right up. Bout half a crank it all it takes. Worse case, I have the rope.
-
I played around on it again this morning. I disconnected/reconnected a bunch of bullet connectors and got my neutral light back. Starter button still didn't work but I was able to get it to crank by jumping the solenoid terminals. I quadruple checked the starter button for continuity and it still tested good. I put the new solenoid back in then went to put the left control housing back on the bars. While doing this, I accidentally bumped the starter button and not only did it turn over, the damn thing started. Kinda freaked me out for a second so I shut it down real quick. I put a few things back together and was able to start it up and shut it down every time. The starter button is kinda tricky, though. Sometimes it hits right off, sometimes I have to move it around a bit. Not sure what do do with that, if anything at this point. Tomorrow I'm going to start it and let it warm up a bit, then change the oil and filter. Probably take it for a test ride. I had dirt bikes as a kid and rode a Harley for about 10 years, but I've never ridden a 4 wheeler.
-
I already had a new relay and a new starter solenoid installed. A couple of the reviews on the solenoid on Amazon said they had faulty units out of the box so I put the original one back in. I must have accidentally shorted it when tightening the bolts, because the started kicked over. Cool! I hit the starter button for a second and it cranked again. Real cool! I pulled the spark plug to check for spark and when I went to hit the starter again, I noticed my neutral light was out. I thought maybe I turned off the ignition switch? Nope, it was still on. Then I realized the neutral light was on, just very, very dim. Crap! I rattled some wires around and got the neutral to get bright for a second but couldn't locate where there might be a short. I checked and got continuity in a few places but was limited on time to play with it. I had to cut grass before it got dark. I did test for spark with the pull cord and got a really good spark, so that's good. So not a whole lot of progress, but in the 30 minutes I had to work on it, I verified I have a good neutral safety switch, I have spark, the starter, starter button, and starter solenoid are all good. As I expected, I'm going to have to spend more time with the multi meter to find any shorts. Over all, I feel better about this project knowing I've eliminated at least a few potential problems. I think I stand a reasonable chance of getting it running this weekend.
-
I installed the new neutral safety relay and starter solenoid and put the battery back in tonight. I turn on the ignition and get a bright green neutral light on the dash. I hit the starter button and get nothing. I took the left switch housing apart and the starter button and kill switch both tested good with my multi meter. I haven't tested jumping the 2 terminals on the starter solenoid yet. I also still don't know for sure yet if I even have spark. I have a helper coming by tomorrow after work to check that. Kinda hard to pull the rope on the left and check the plug on the right at the same time. Any obvious things I should check next? I expect to be spending lots of quality time with my multi meter over the next couple days.
-
Couple quick updates. I haven't tried to start it or test for spark but I have been tinkering on it a bit. I cleaned up the wires to the starter solenoid and neutral safety relay. I got the new starter solenoid plug installed and replaced the bad fuse in it. I got and installed a new neutral safety relay because it was cheap. I have a new starter solenoid coming in a couple days. The thumb throttle wouldn't return on it's own, so I took it apart and found the return spring wasn't hooked up right. I cleaned it all up, lubed appropriately and put it back together right. It operates smoothly and returns nicely now. I took the left handlebar controls apart. Inside was dry and surprisingly clean. I'll revisit this if it becomes a problem down the road. I took all of the body off. The ears that hold the tank cover to the fender were mostly broken off so I have a new one on order. The front fender is in decent shape except the part behind the tank where the rear bolts on. Both sides are broken off and were just drilled and cable-tied in place. I'm trying to figure out a way to fix that since a new front fender is more than I want to pay at the moment. The headlights look good but I haven't tested them yet. I'll probably end up with a small LED bar anyway. The taillight housings are in tact, but the bulb sockets are shot. I'll probably end up with some LED replacements on them too. This weekend I plan to hook the battery back up and see if I can get it to fire and start. I have high hopes that fixing the broken wire to the starter solenoid and replacing the bad fuse will get the starter to work and get me some spark. Once I get it running, I'll feel a little better spending money making it dependable and looking better.
-
Thanks for the link on the clutch trick. I'll look into that if I need to once I get it running. As for the brakes, on the 220, they are completely mechanical. I may have to replace the cables but I'll worry about stopping once I get it to go
-
I ended up just buying this. Should have it by the weekend.

-
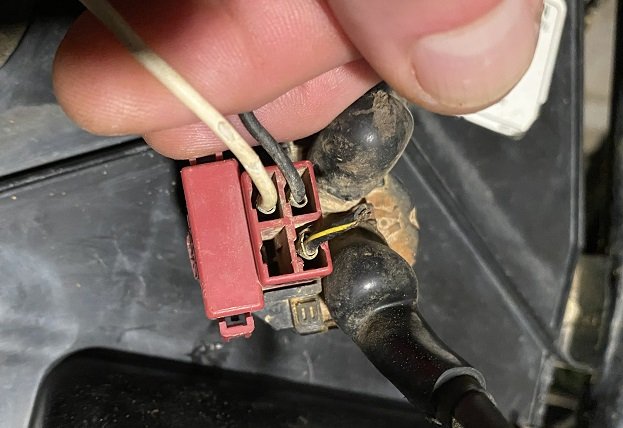
Thanks for the info and pic. I was pretty sure the blk/y wire went back in that plug, but also wondered where the other 2 blk/y wires were supposed to go. I won't worry about them for now. Does anyone know the trick to get the connector out of the plug so I can crimp a new wire in it? I've poked around with a pick trying to release a keeper pin or something but it doesn't want to come out.
-
Here's what it looked like when I first got it home. I took off that shifter lever and pressure washed it. Racks and front and rear fenders are off of it now. Neither front tires hold air for more than a couple hours and there's a nail in one of the back tires, but it still holds air. That will be addressed once I get it running.
-
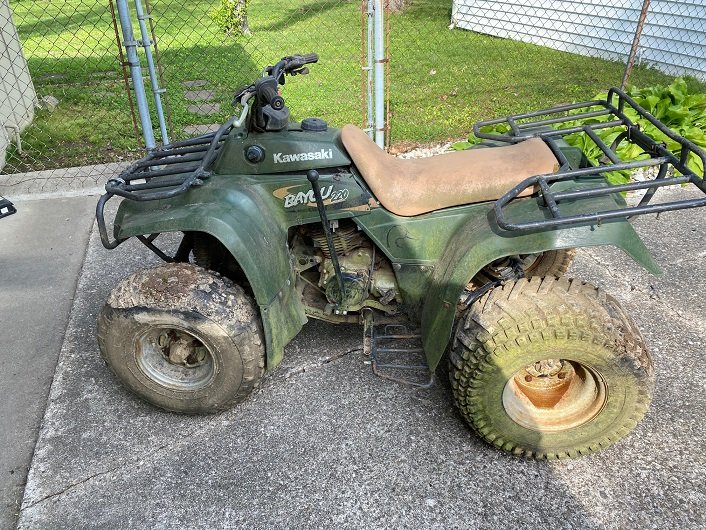
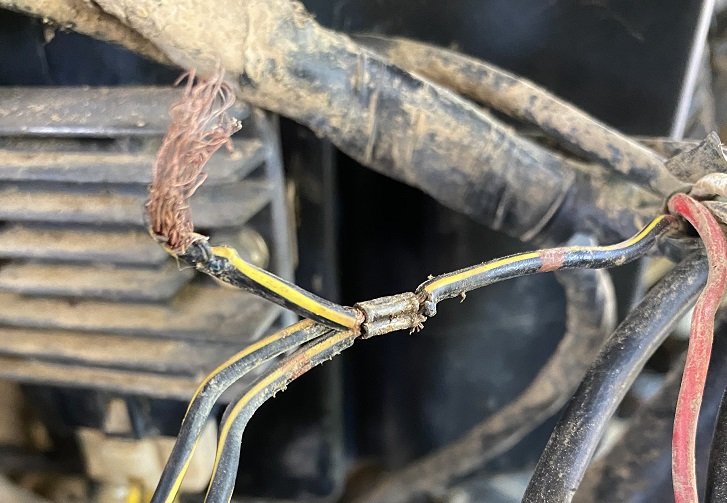
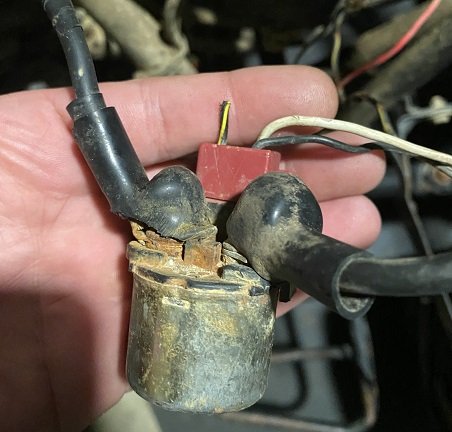
I had a quad fall in my lap a couple weeks ago. The only things I knew about it was it was a Kawasaki Bayou 220, was in pretty rough shape and was free. I couldn't say no to a fun little project. I've been looking a different ATV forums gathering quite a bit of info and decided this was the one I wanted to join. Thanks to this forum, I found the VIN under about an inch of mud and cross referenced it to be a '98. It had been sitting outside for at least 5 years and was told it ran when parked, but had no brakes. Squirrels or mice had been chewing on the handlebar controls and it's generally just kind of beat up. So far, I've gone through the carb (not near as bad as I expected), freed up the brakes (will probably need new cables), replaced the spark plug, air filter, petcock and put a new battery in it. The gas tank had been empty and looked clean so I put some fresh gas in it and tried to crank it today. I got a neutral light, but the starter button did nothing. I tried pull-starting it and it wouldn't fire. I checked the plug and wasn't getting a spark. I started digging and found some potential issues and some definite problems. I have a wiring diagram I found on here but it's just a picture or scan out of a book and hard to read. I don't see a reference to a black/yellow wire, which is my first problem. First, it that a factory crimp? One of those wired looks like it goes to the connector in the 2nd pic. Is that just a spade lug type connector? I pulled on it with some needle nose pliers but it didn't seem to want to come off. In the 3rd pic, should there be a fourth wire? I've read through and bookmarked the threads Andrew Baker and Arizona have going but I figured I needed to start with these obvious issues first. I have lots of pictures, so if there is something else you want to see, just ask. If I don't already have a pic, I'll take one.
-
Hello everyone. Another new guy here. I stumbled across this forum while looking for info on a '98 Bayou 220 I recently picked up. It's pretty rough and has some wiring issues, but I'm willing to work through it since it was free. I'll start a thread on it.