Krazo
-
Posts
56 -
Joined
-
Last visited
Content Type
Profiles
Forum
Gallery
ATV Magazine
Events Calendar
Downloads
Store
Community Map
Everything posted by Krazo
-
Impressive. i like the diy. turned out my issue was the ECM. no way for me to DIY that one. I paid $450 on ebay for a nib and it was plug n play. Dealer wanted like $800 for part and labor. crazy.
-
wealth of info Mech. appreciate your contributions.
-
02 was a typo. mine is an 05. great idea though i should be looking into other years to find what fits those and I bet your right, i'll find what i'm looking for.
-
that may be, but i just cant seem to find one that specifically states its for my make/model
-
this model def had both wheel well liners. I lost the right side somewhere on the highway when I was trailering. i've seen one on ebay, but just havnt found it at the right price.
-
Looking for a part number for right side front inner wheel well liner/mud flap. Found the left side on a parts diagram but cant seem to find right. any help? https://www.partzilla.com/catalog/suzuki/atv/2005/kingquad-lt-a700x/front-fender #2 on the list, FENDER MUD FLAP part # 53421-31G01 but cant find the right side on any of the diagrams.
-
2005 King quad 700-OEM -ECM on **Ebay** with Full-Power Reverse
Krazo replied to 2003hondaatv's topic in Suzuki ATV Forum
I bought a new ECM for my 05 700 KQ last summer. it came from a suzuki dealer. got it for about $150 less than what my local dealer wanted and local dealer wanted to install. I did pay them to diagnose the issue but not hard to plug a new one in. anyway, Ive had some success with buying electronics online. but ymmv. -
was it an aftermarket or oe Polaris branded stator? what's been your experience with it? if aftermarket, any issues installing it? any issues with how its operated since install?
-
Any suggestions for electrical components? I think my Stator got burned up. got a 2005 kingquad 700. pulling a harrow on a hot day and I think it was just too much for it. anyway, I've found used OE stators on ebay, cheap aftermarket stators on ebay (caltric and others) and both of these are going in the 100-150 range. but a new OE stator is nearly 600. This is a job I dont want to do twice but man thats at least 4x the price of an aftermarket or used OE. I'm sure the aftermarket isnt the same quality and I'm very reluctant to get a used stator even if it is OE. I'm tempted to bite the built and spend the cash for a new OE. any one with experience here?
-
2005 King Quad 700 Took off the front plastic and pressure washed it. unfortunately while doing this I lost the metal insert of a rubber grommet. There are 2 rubber grommets with inserts on the front, Left and Right. The screw that goes through here holds the front cargo rack on. Any ideas where I can find a replacement? id take the metal insert or a whole new rubber grommet with insert if I can find it. Pics are front and back of both grommets, one with the insert, one without the insert.

-
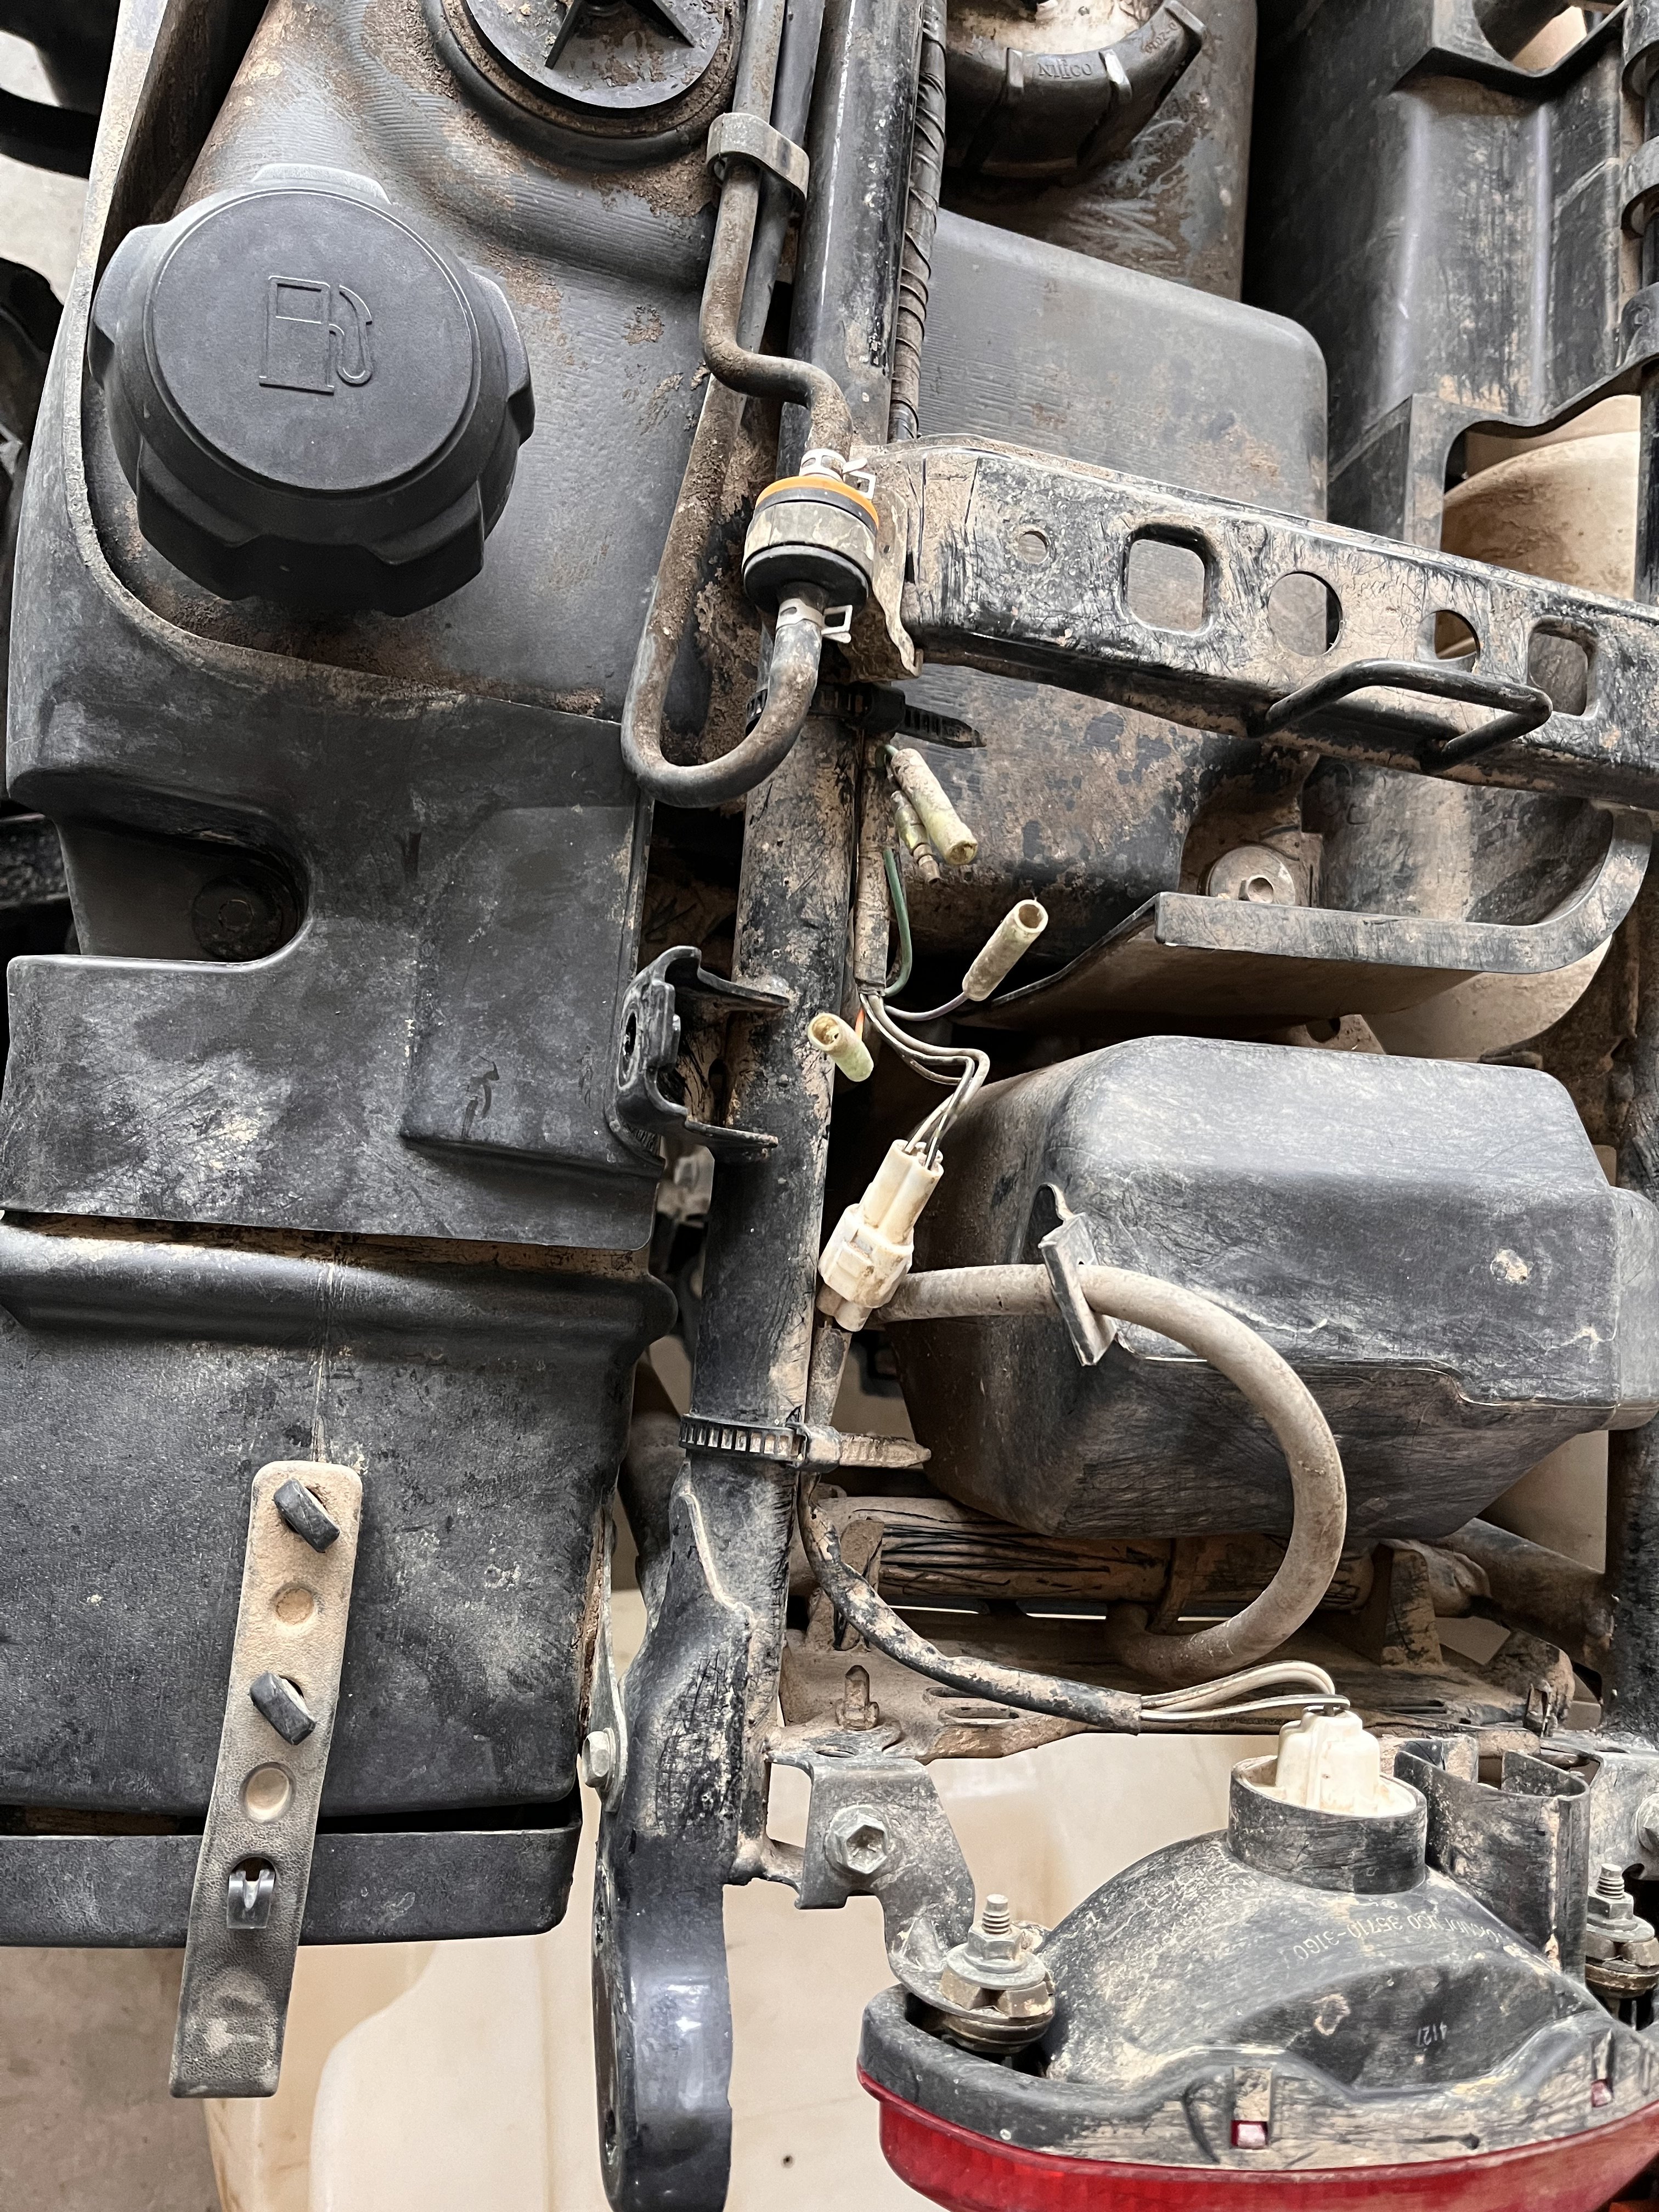
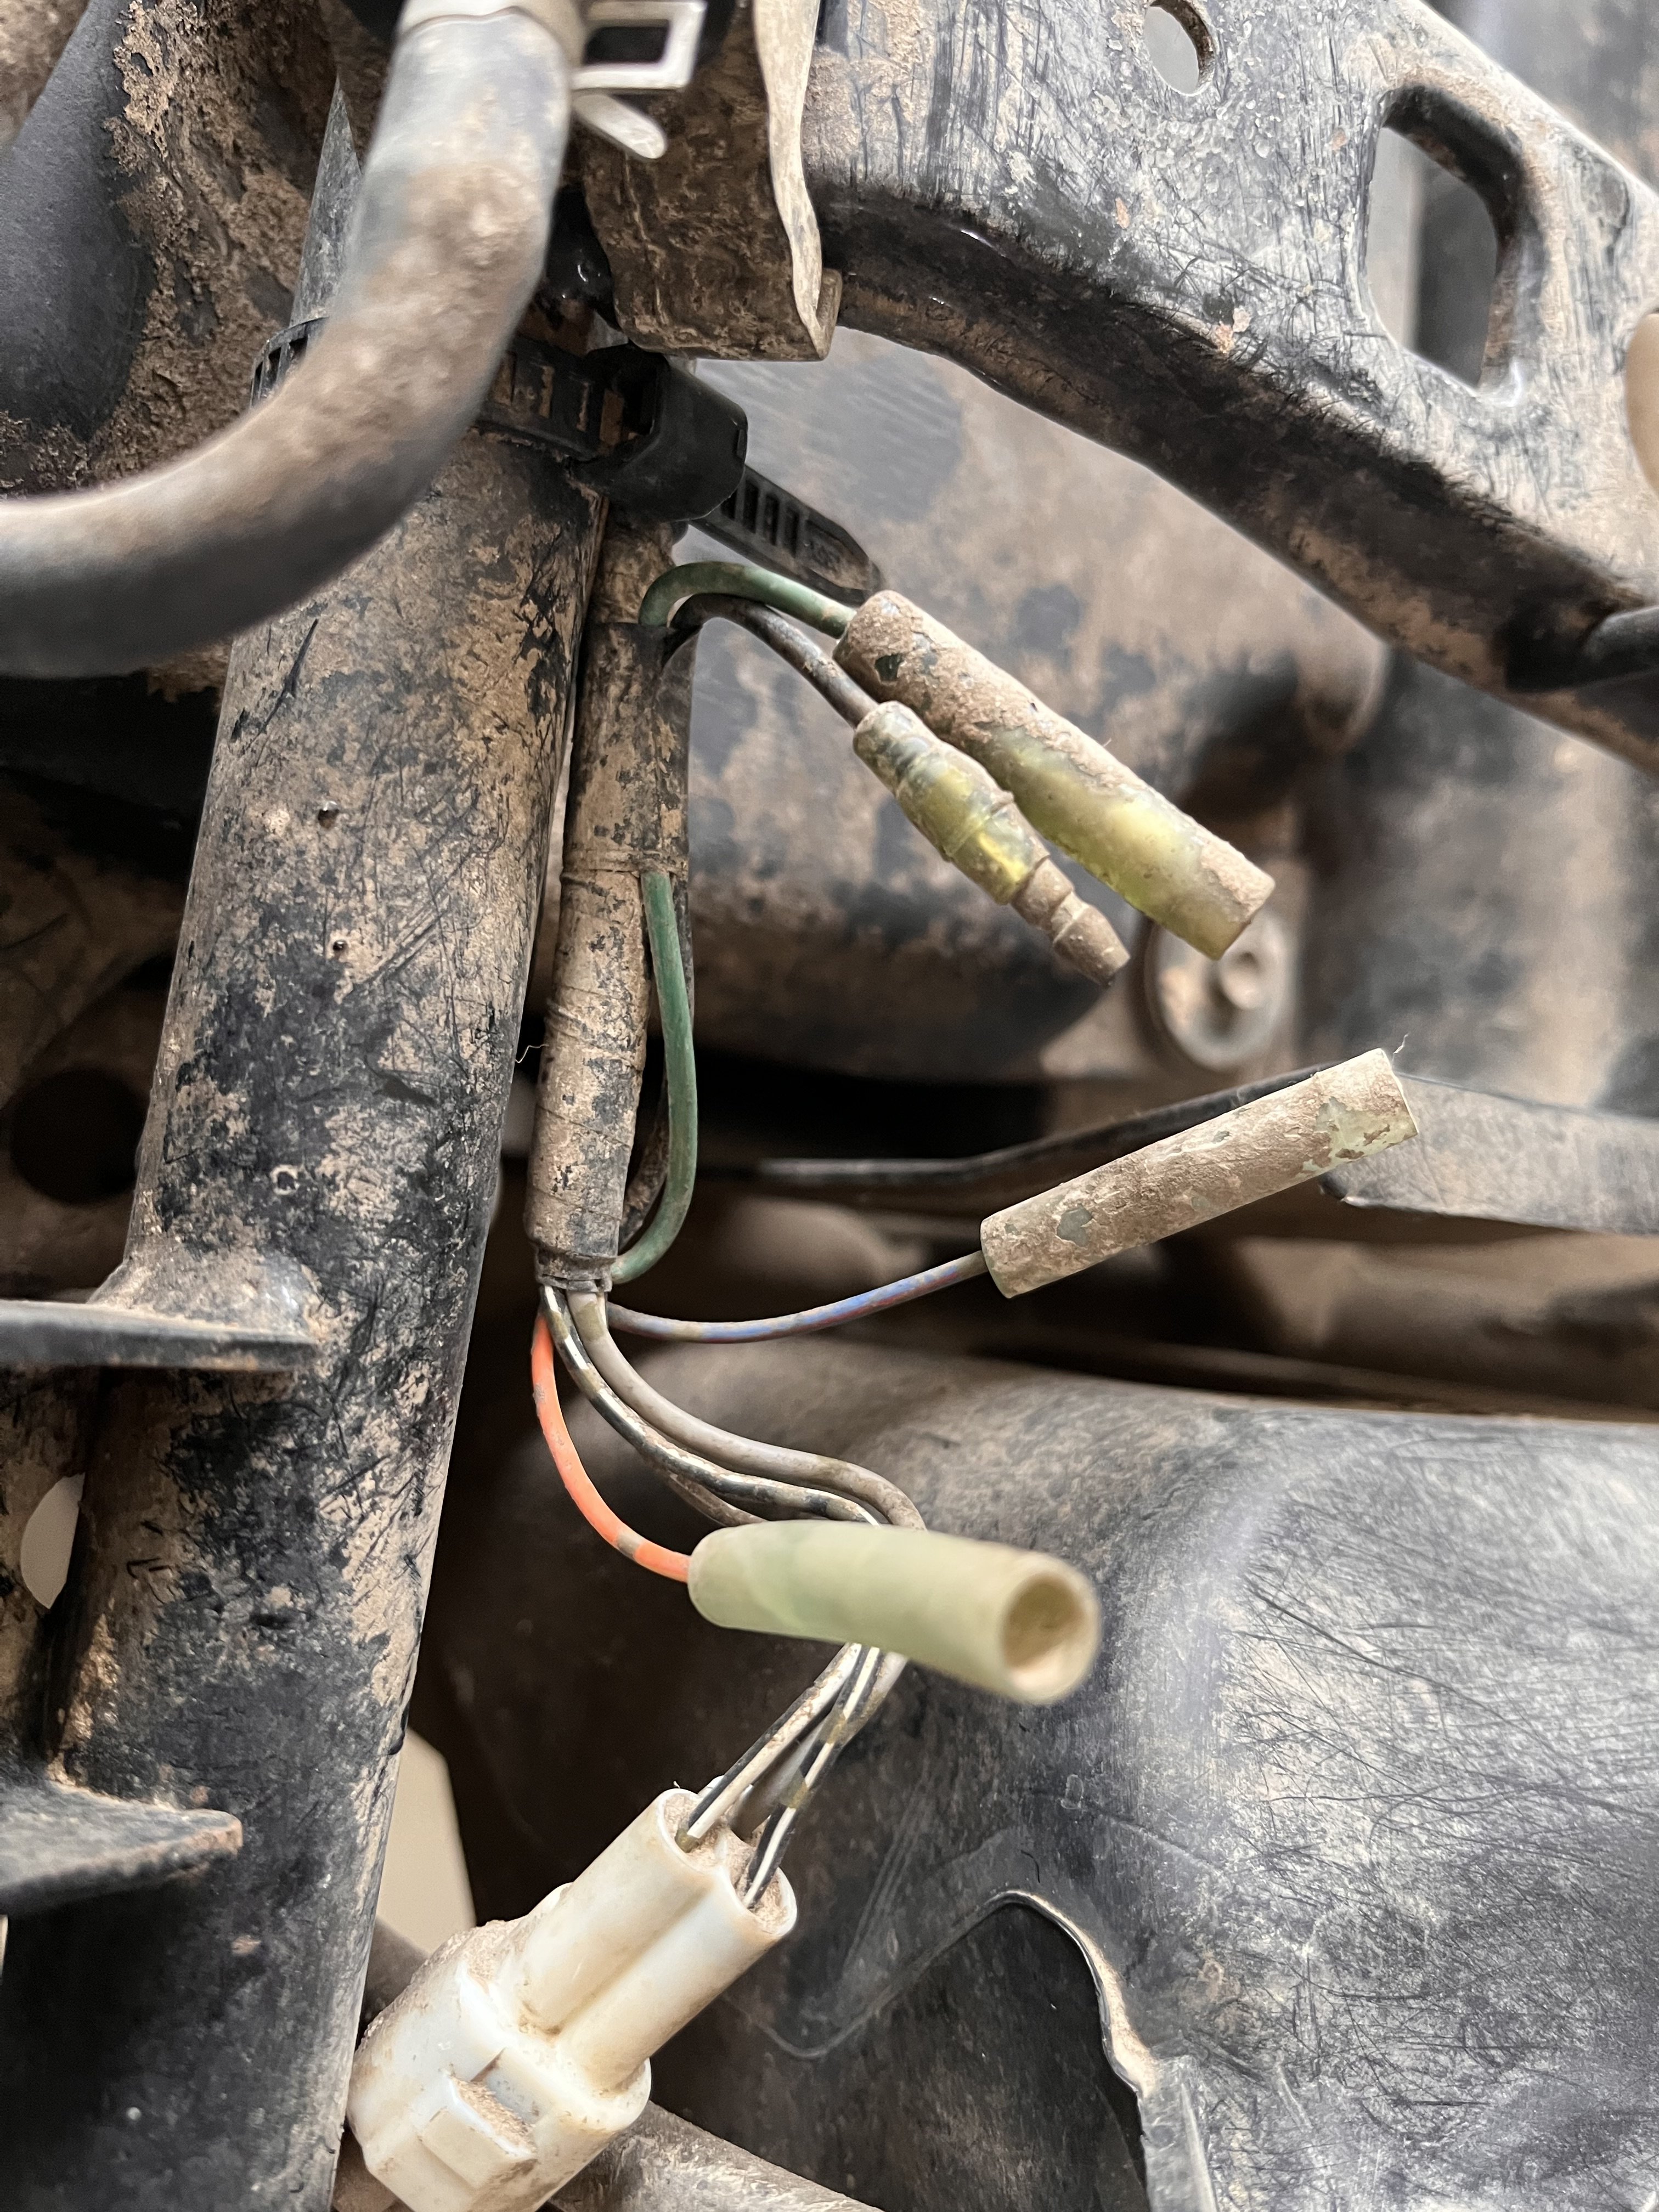
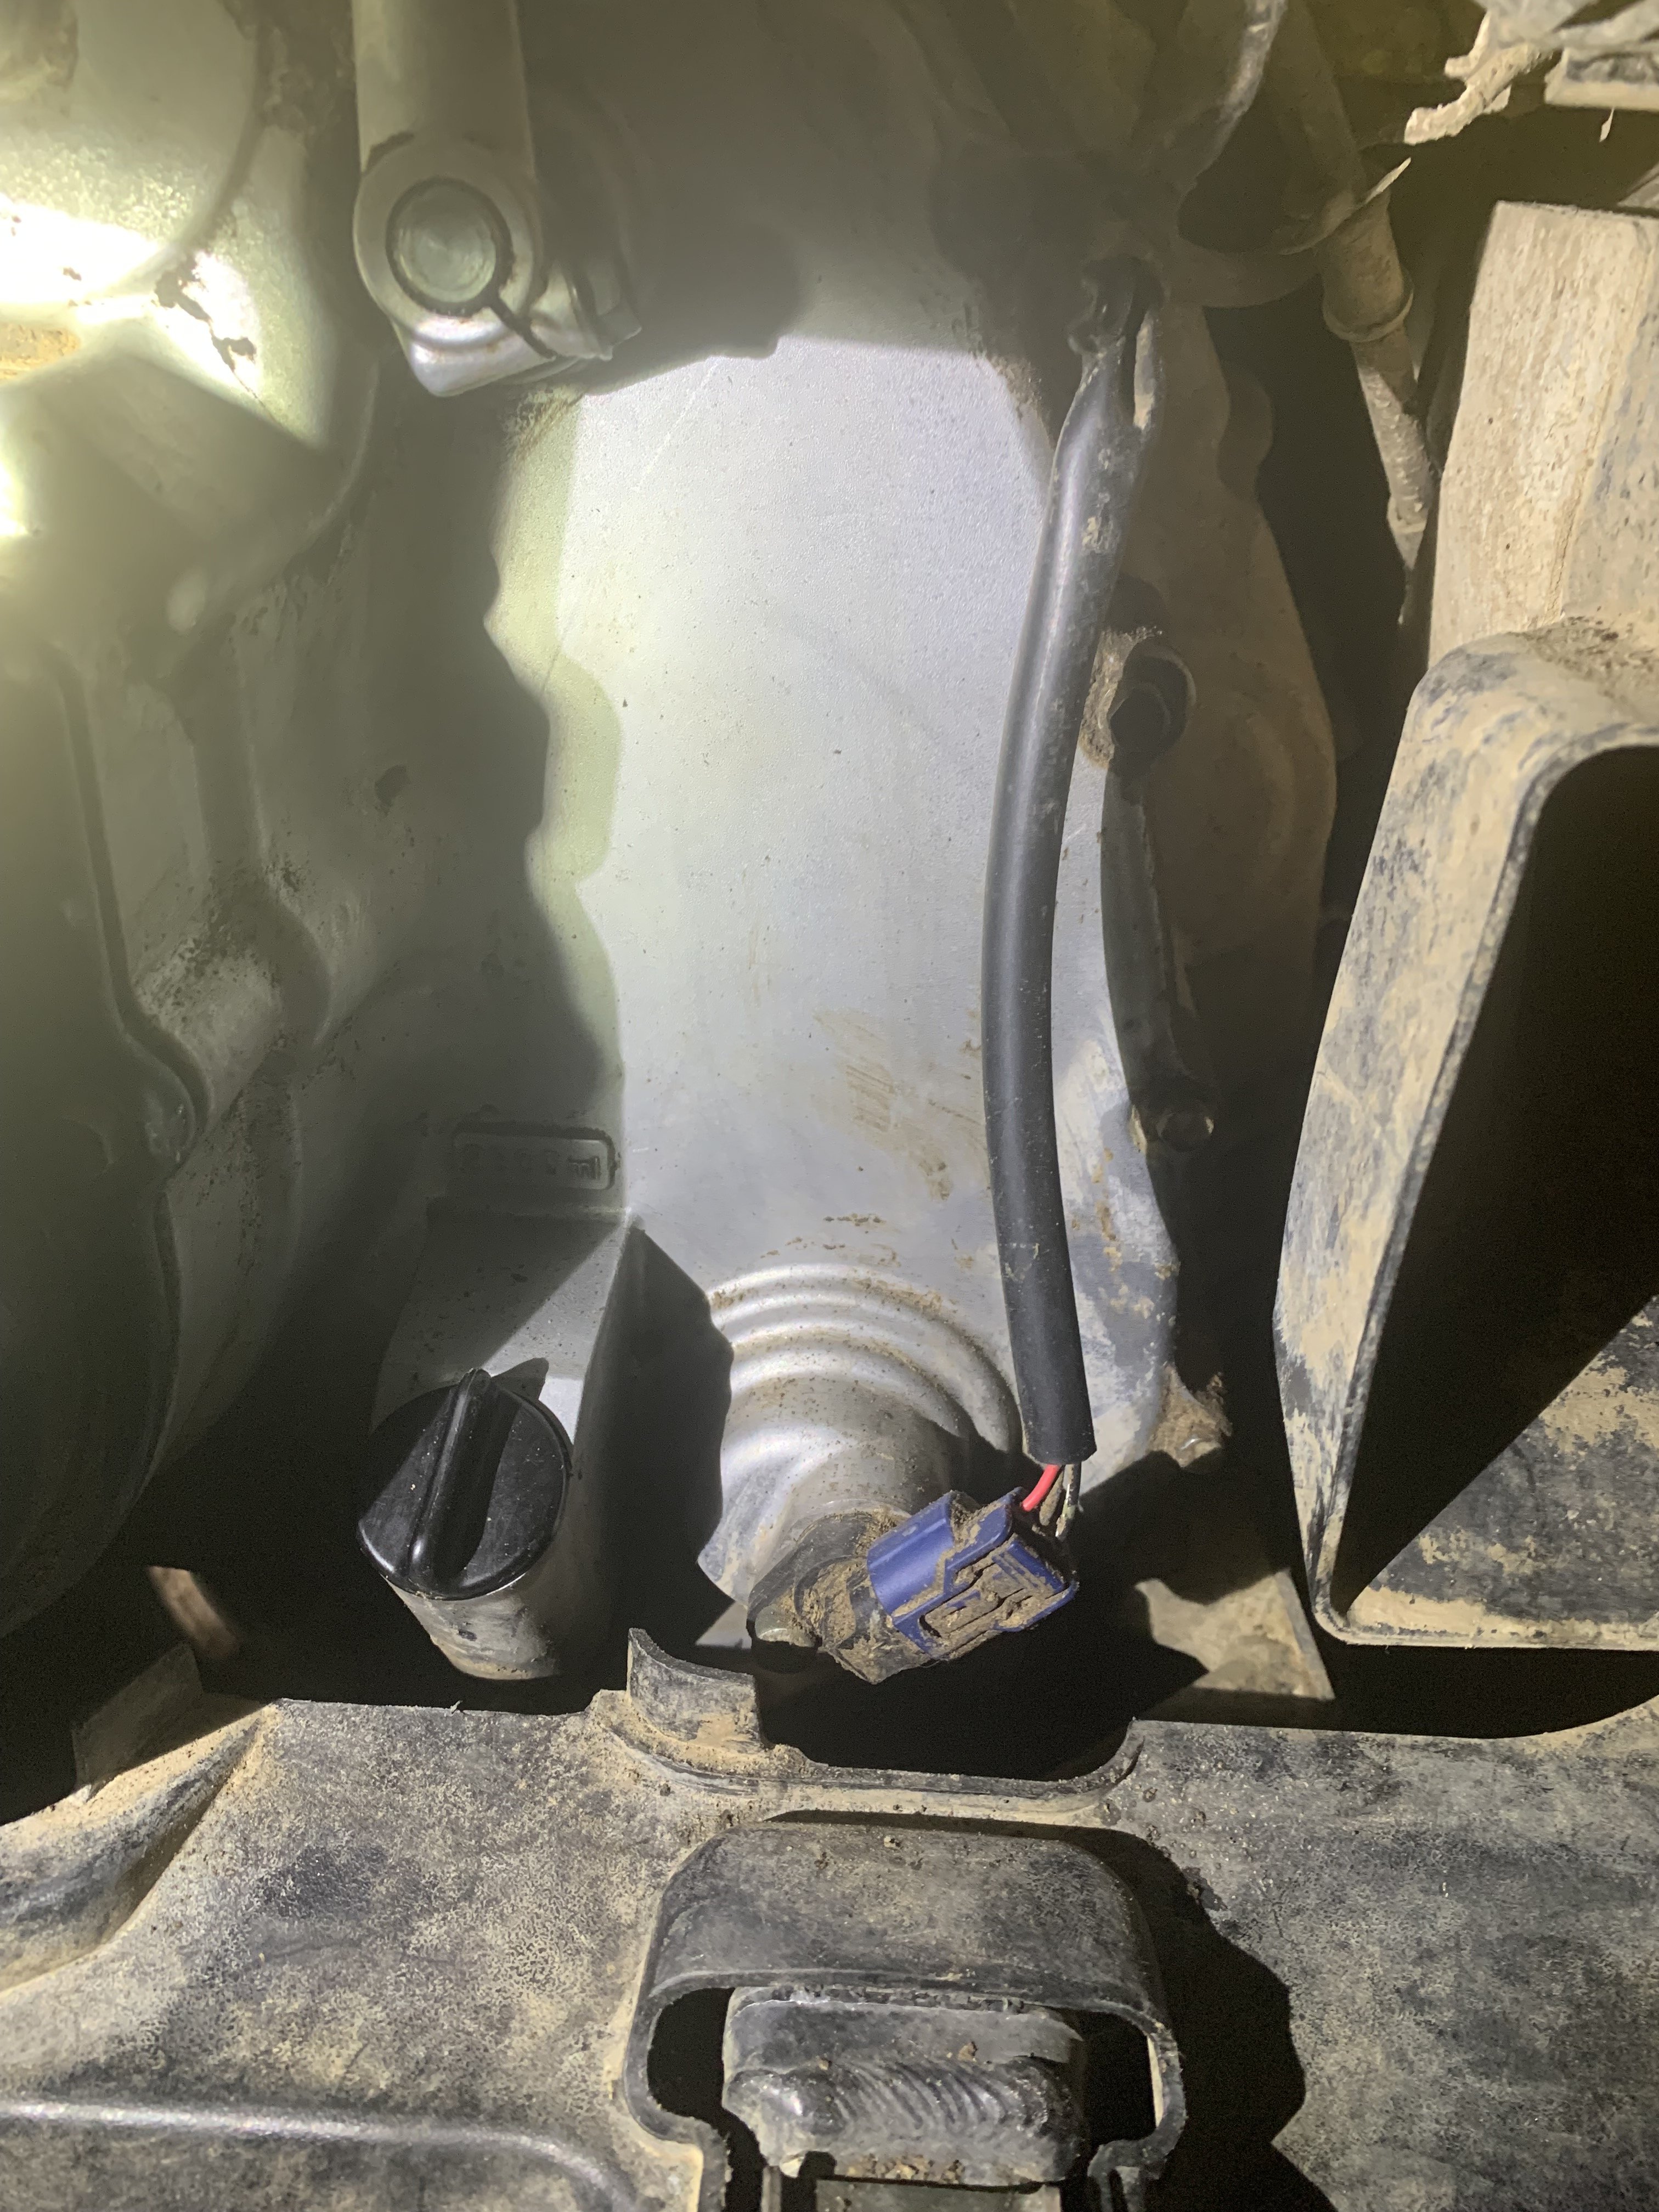
as title states, what are these wires? I took off the rear plastic, and right behind the brake light, these wires are all disconnected. Not sure what they go to. Aside from my current issue of what appears to be a bad coil (replacement ordered) the atv has run fine for me. I just bought it this past winter and spent time replacing front end components but motor has run fine until the this past weekend. By the looks of these wires they've been unplugged a while. only thing I can think of is they're for trailer lights maybe....? but i really don't know.
-
I read a few other threads that said its easy to short out electrical components using this trick. so I decided to buy the $19 dealer mode switch instead.
-
ok, well i found the 'paper clip trick' but decided against it. I went ahead and ordered the mode switch. Should be here this weekend and I can try to diagnose. In the mean time I alos went ahead and ordered a new coil off ebay for $9. easy replacement for minimal expense. after that, IF THAT DOESNT fix the issue, hopefully the dealer mode with provide more answers. just hoping its not that stator, thats another $100+ in parts plus the time and labor for the replacement.
-
2005 KQ 700 What is the easiest way to put my KQ in dealer mode? Went riding last weekend, I was pulling a harrow for about 3-4 hours on a hot Saturday, working on some food plots, stopped for a min to unclog the harrow, left the machine running, and it just died on me. Up to that point it seemed to be operating just fine. went to start it and it just cranked, eventually the dreaded red FI light starting blinking (i think it was blinking but might have been constant on). I left it overnight, thinking it had just overheated. but next day it did the same thing, wouldn't start and red FI light. anyway, after readying the service manual, it looks like i might be able to see what codes this thing has if I can get it in dealer mode. Do I really need a special tool to put in dealer mode? a mode switch, part # 09930-82720 any help appreciated. havnt done anything to diagnose it until today but so far all ive done is pull the plug. I had just replaced the plug in February. looks like normal wear for minimal ride time. I tried to get spark on the plug but it looks as if no spark. anyway, please tell me its an easy fix. Thanks
-
Thanks. Anyone ever used this? It looks more secure than a curt i saw which just mounted to the hole
-
2005 700 KQ it has the mounting hole for a ball. currently has a 2" ball mounted up that works fine. BUT there are a few things I'm looking at which would require a 2" receiver to mount on. Any one have a suggestion for a quick easy way to get a 2" receiver mounted up where the ball mount is? Id like to pull food plot type of equipment with it. black boar implements. rake, harrow, disc. things like this so the receiver needs to be well mounted.
-
quick follow up...... I've had the machine out a few times now. no issues up to this point. no real work with it yet, just cruising through some properties i hunt, very light trail riding. had one scare when it wouldnt start, turned out it was a loose battery connection. quick fix. Front diff not leaking, no issues with front wheel bearings, everything seems to be running smoothly....so far.
-
yeah I would agree with you on the axle fit. not sure exactly where the issue is but I have it worked out. As for the battery drain, That sounds like a good plan. Since I charged it, i put it back in and ive ran the machine a few times around the yard. No issues with a slow start. Should prob pull it out again and test the battery voltage.
-
Your correct in how it all assembles. I had no prob lining up the splines on the wheel hub, but as the hub slid through the wheel bearing, it was too tight of a fit to go all the way through. I used a flapper disc on the inside of the wheel bearing to open it up slightly. I shouldve taken off 1/8 of an inch and it wouldve still been a tight fit. I had to take the cv axle out of the differential and stand it on end, line up the steering knuckle and wheel, then bang on the hub with an 8# hammer for 10 min just to get cv to poke through enough so I could thread on the big nut and tighten it up. we'll see how well the u-joints in the cv hold up after the abuse. But its all assembled now and fluid in the front diff. Ran it for 15 min in the yard then parked it. back to the original issue, the front diff was leaking at the seal with the CV axle, well after sitting overnight with fluid in it, no leaks as of this morning. we'll see what it looks like later today but I'm optimistic that prob is solved. on to the next. which could be a short in the electrical system. Battery was dead when I tried to start it yesterday. it is a new battery, bought it 2.5 months ago. charged it up overnight. might just add in a ground to the frame and possibly a battery disconnect switch. should solve the prob if theirs a slow drain due to short somewhere.
-
Yes, disassembly was not an issue. Hub came out of the old wheel bearings with no issue. but getting it back in with new wheel bearings has proved to be a real task. Waiting on the inside dust seal of the steering knuckle. Should arrive tomorrow. once that gets here I can attempt reassembly again. Mech, the issue Im having is that the fit between the wheel bearing and the wheel hub is so snug, i'll have to beat on it with a hammer to get them to fit. prob should try greasing the wheel hub a bit.
-
well, it hasnt stopped. I only work on this thing once every couple weeks if you havnt noticed. mightve been done if I had just finished what I started. but.... I got the new wheel hub and replaced the wheel bearing and seals. BUT trying to install the wheel hub on the cv spline and thru the wheel bearing in the steering knuckle...its an extremely tight fit. other side wasnt nearly this tight. so i tapped it on with a hammer, and before I got it, I saw that the dust seal on the inside of the steering knuckle had a ripple in it and the spring was all kinked up and coming way out. SO I pulled it all apart again and ordered a new dust seal. should be here this weekend...hopefully. anyway I think this repair has cost nearly as much as I paid for this thing...well not that much but seems like its never ending... Any tips on how to get the wheel hub to slide on the spindle and thru the wheel bearing with a little more ease?
-
never F ' n ending repair!! As I used a hub puller to remove the wheel hub from the spindle and wheel bearing, the outside edge of the wheel bearing snapped off the bearing and stayed on the wheel hub shaft. So now I have to replace the wheel bearing and both seals again, as well as get a new wheel hub. all parts ordered and on the way but GEEZ im so tired of working on this thing, ready for it to be done. I can only hope this is the end of the front end work. no more issues PLEASE.
-
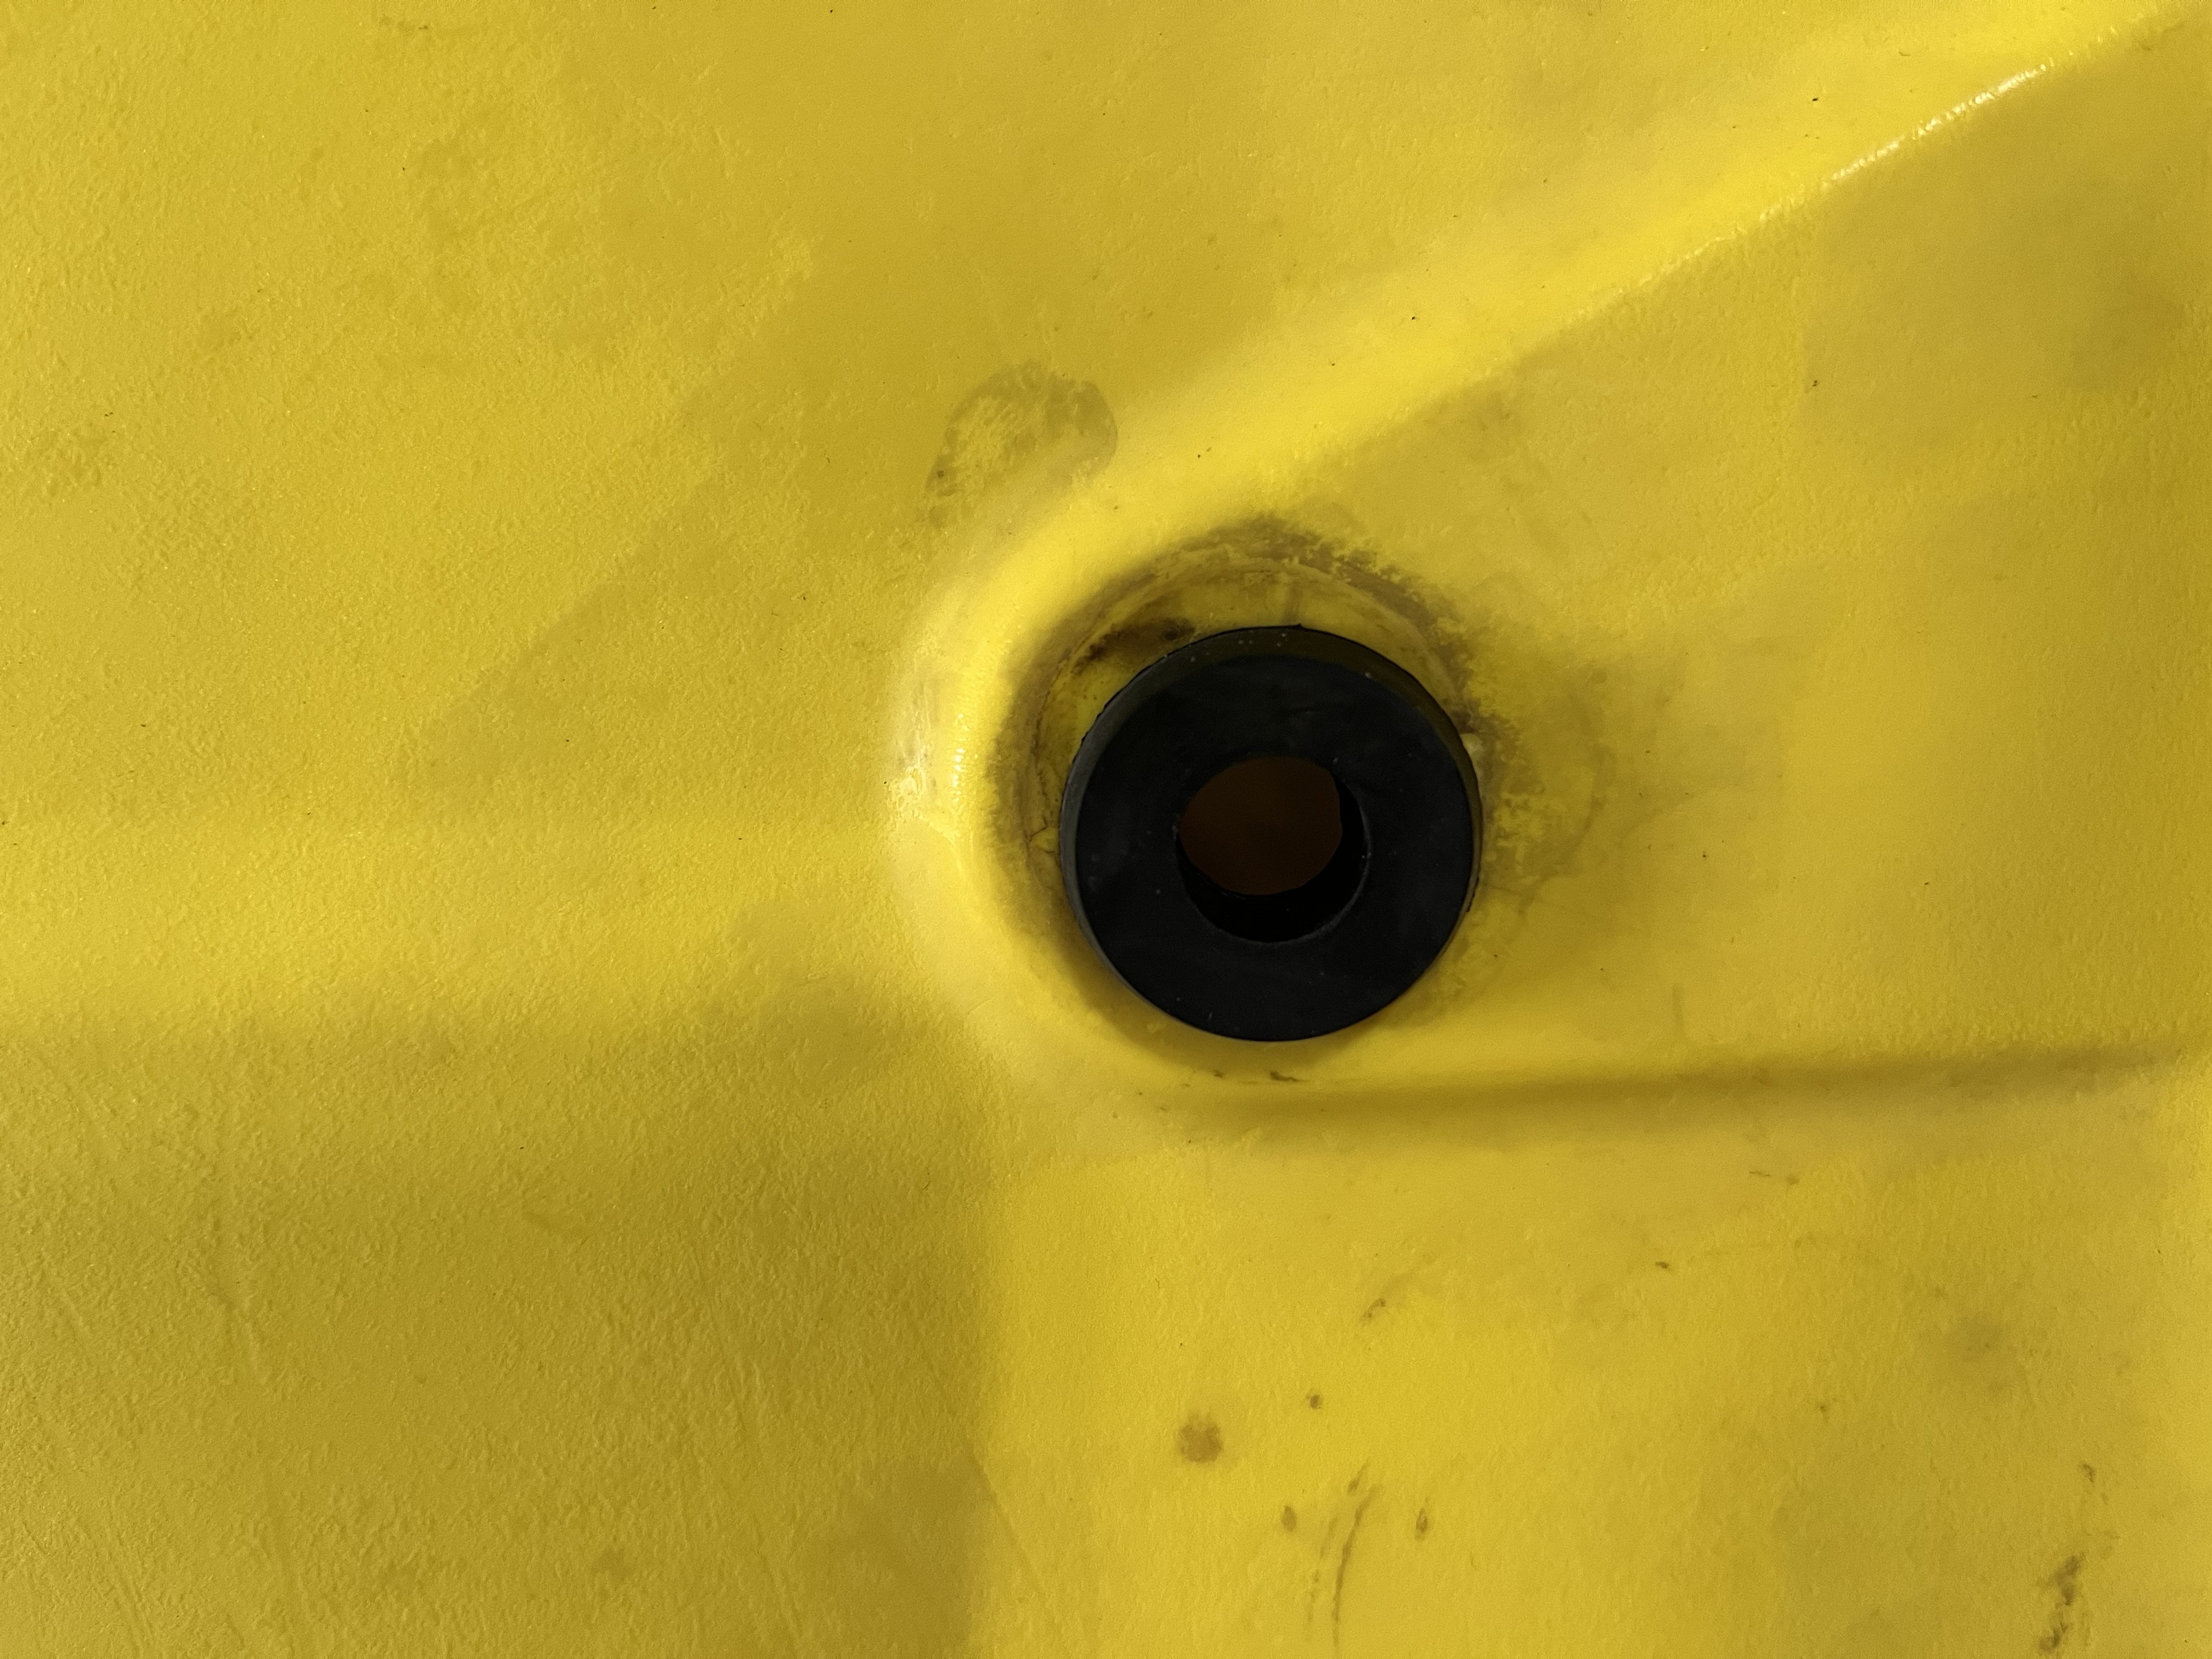
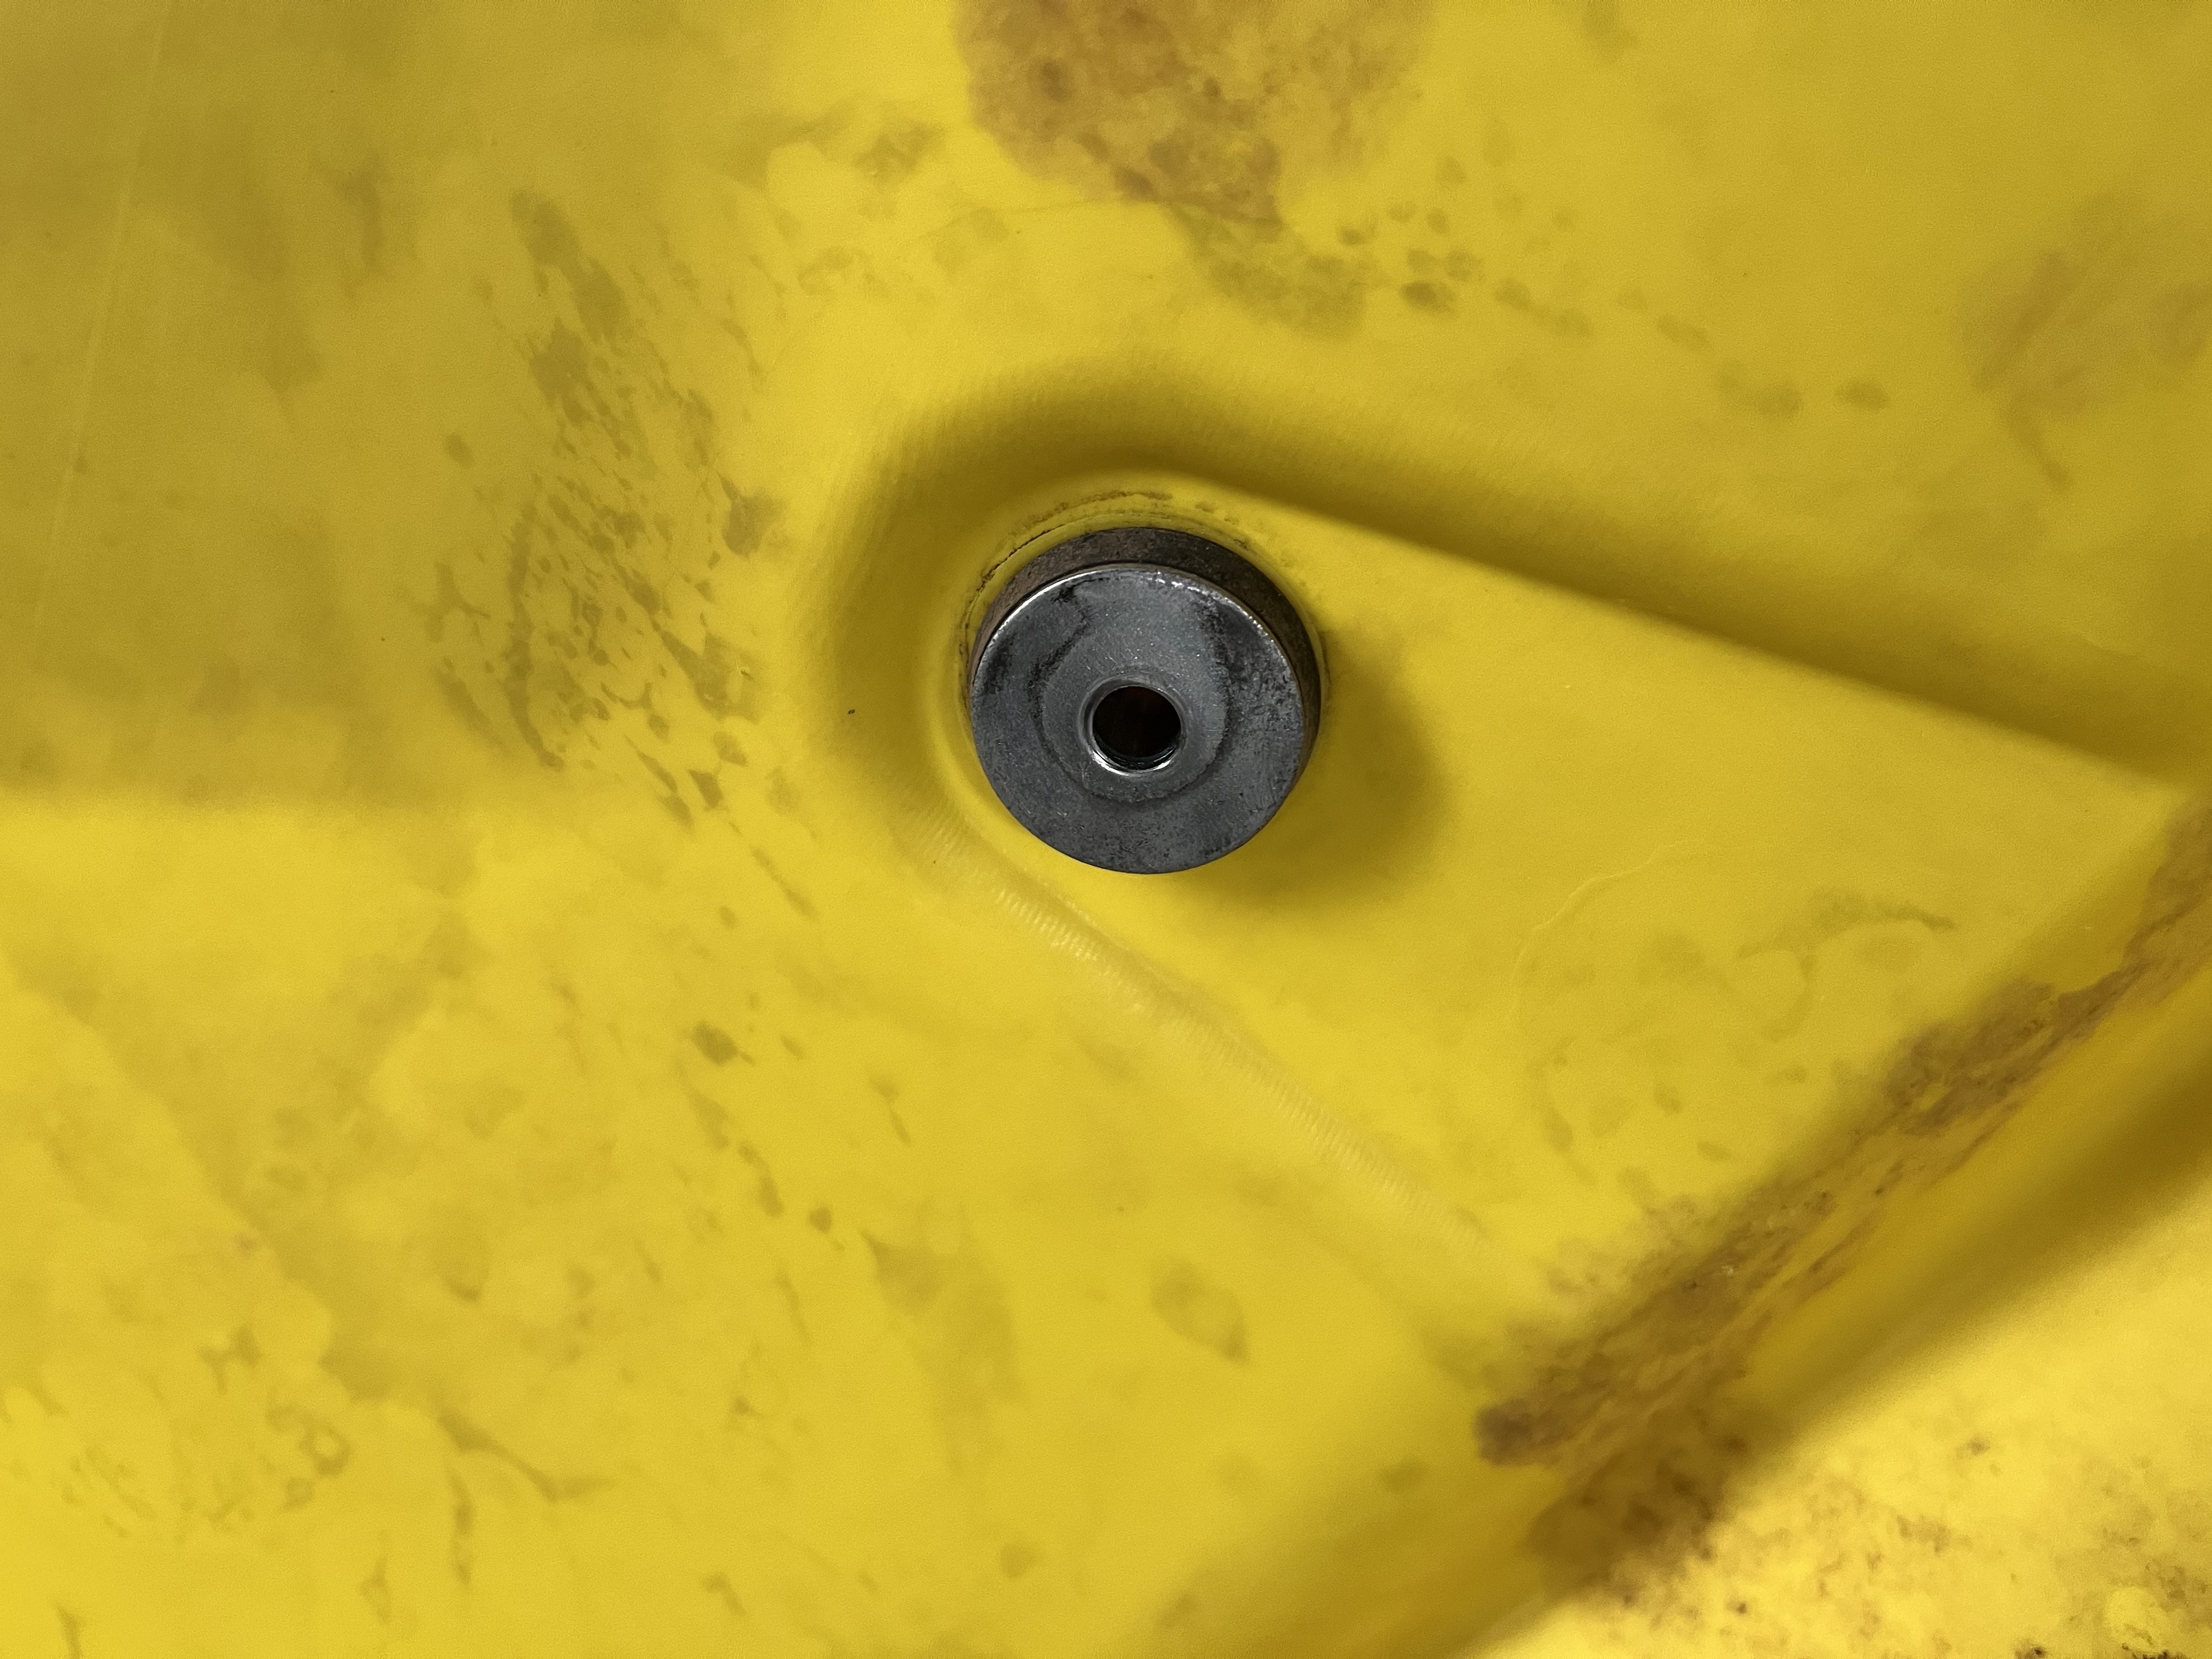
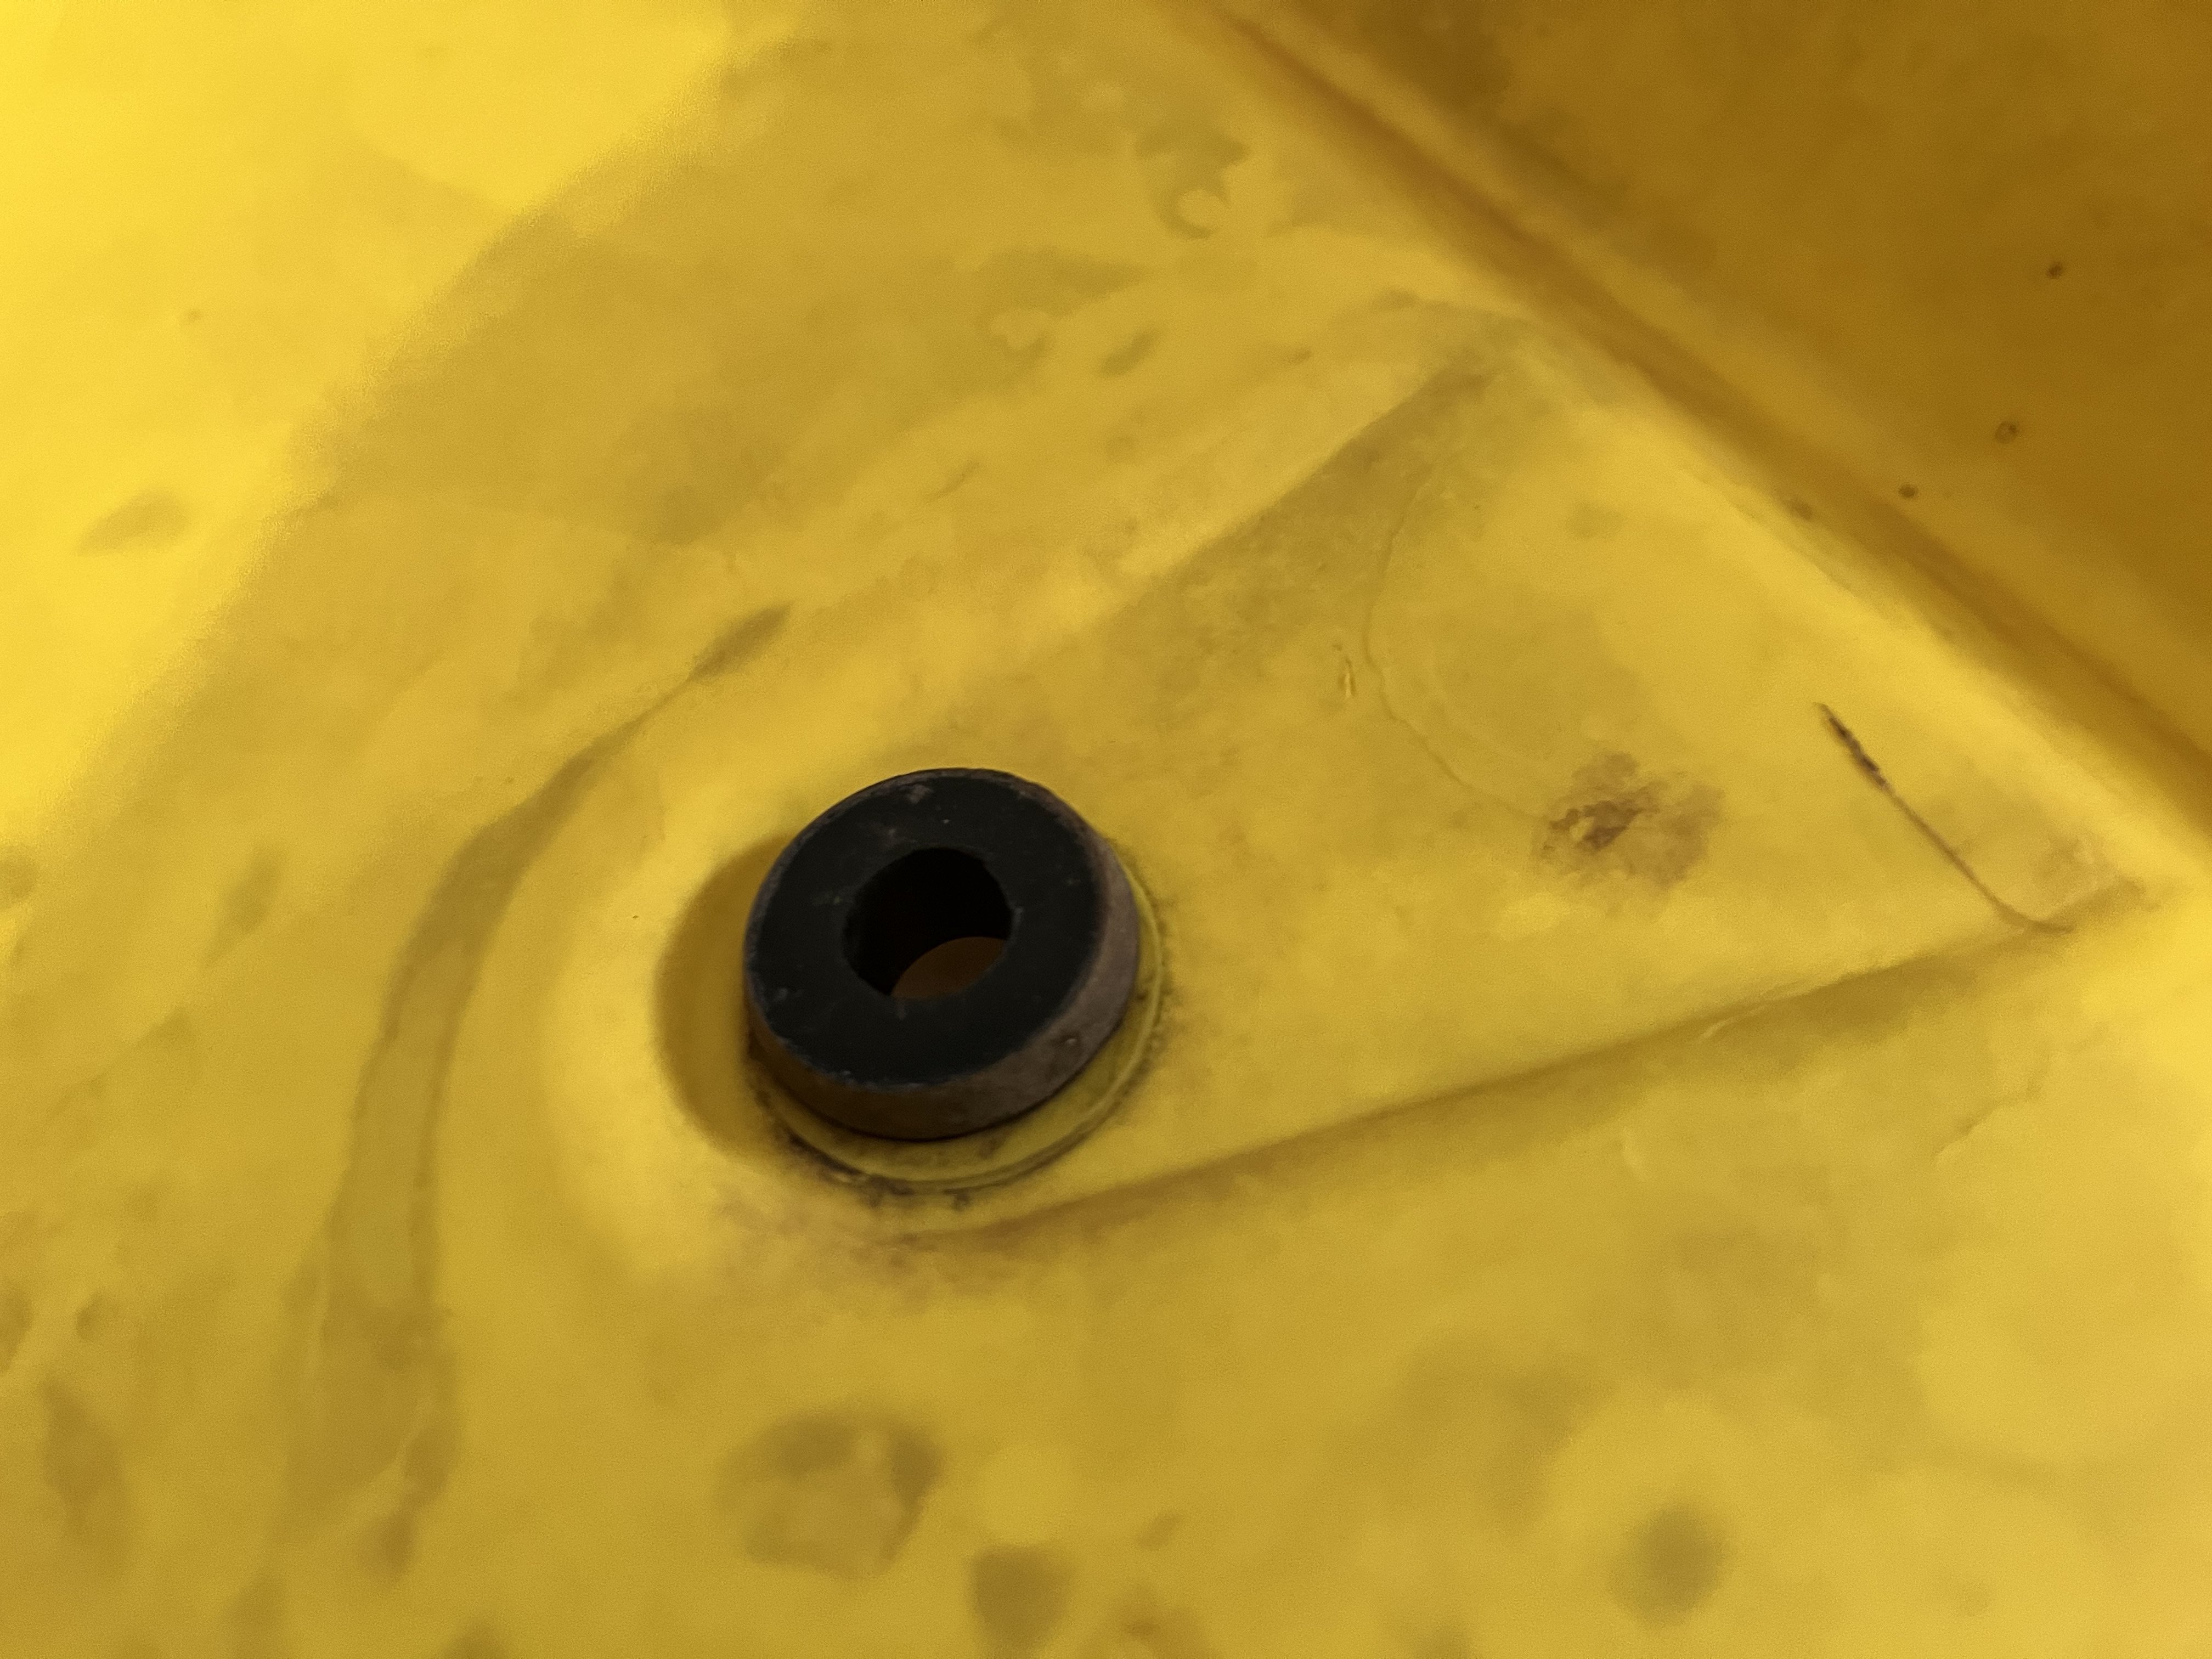
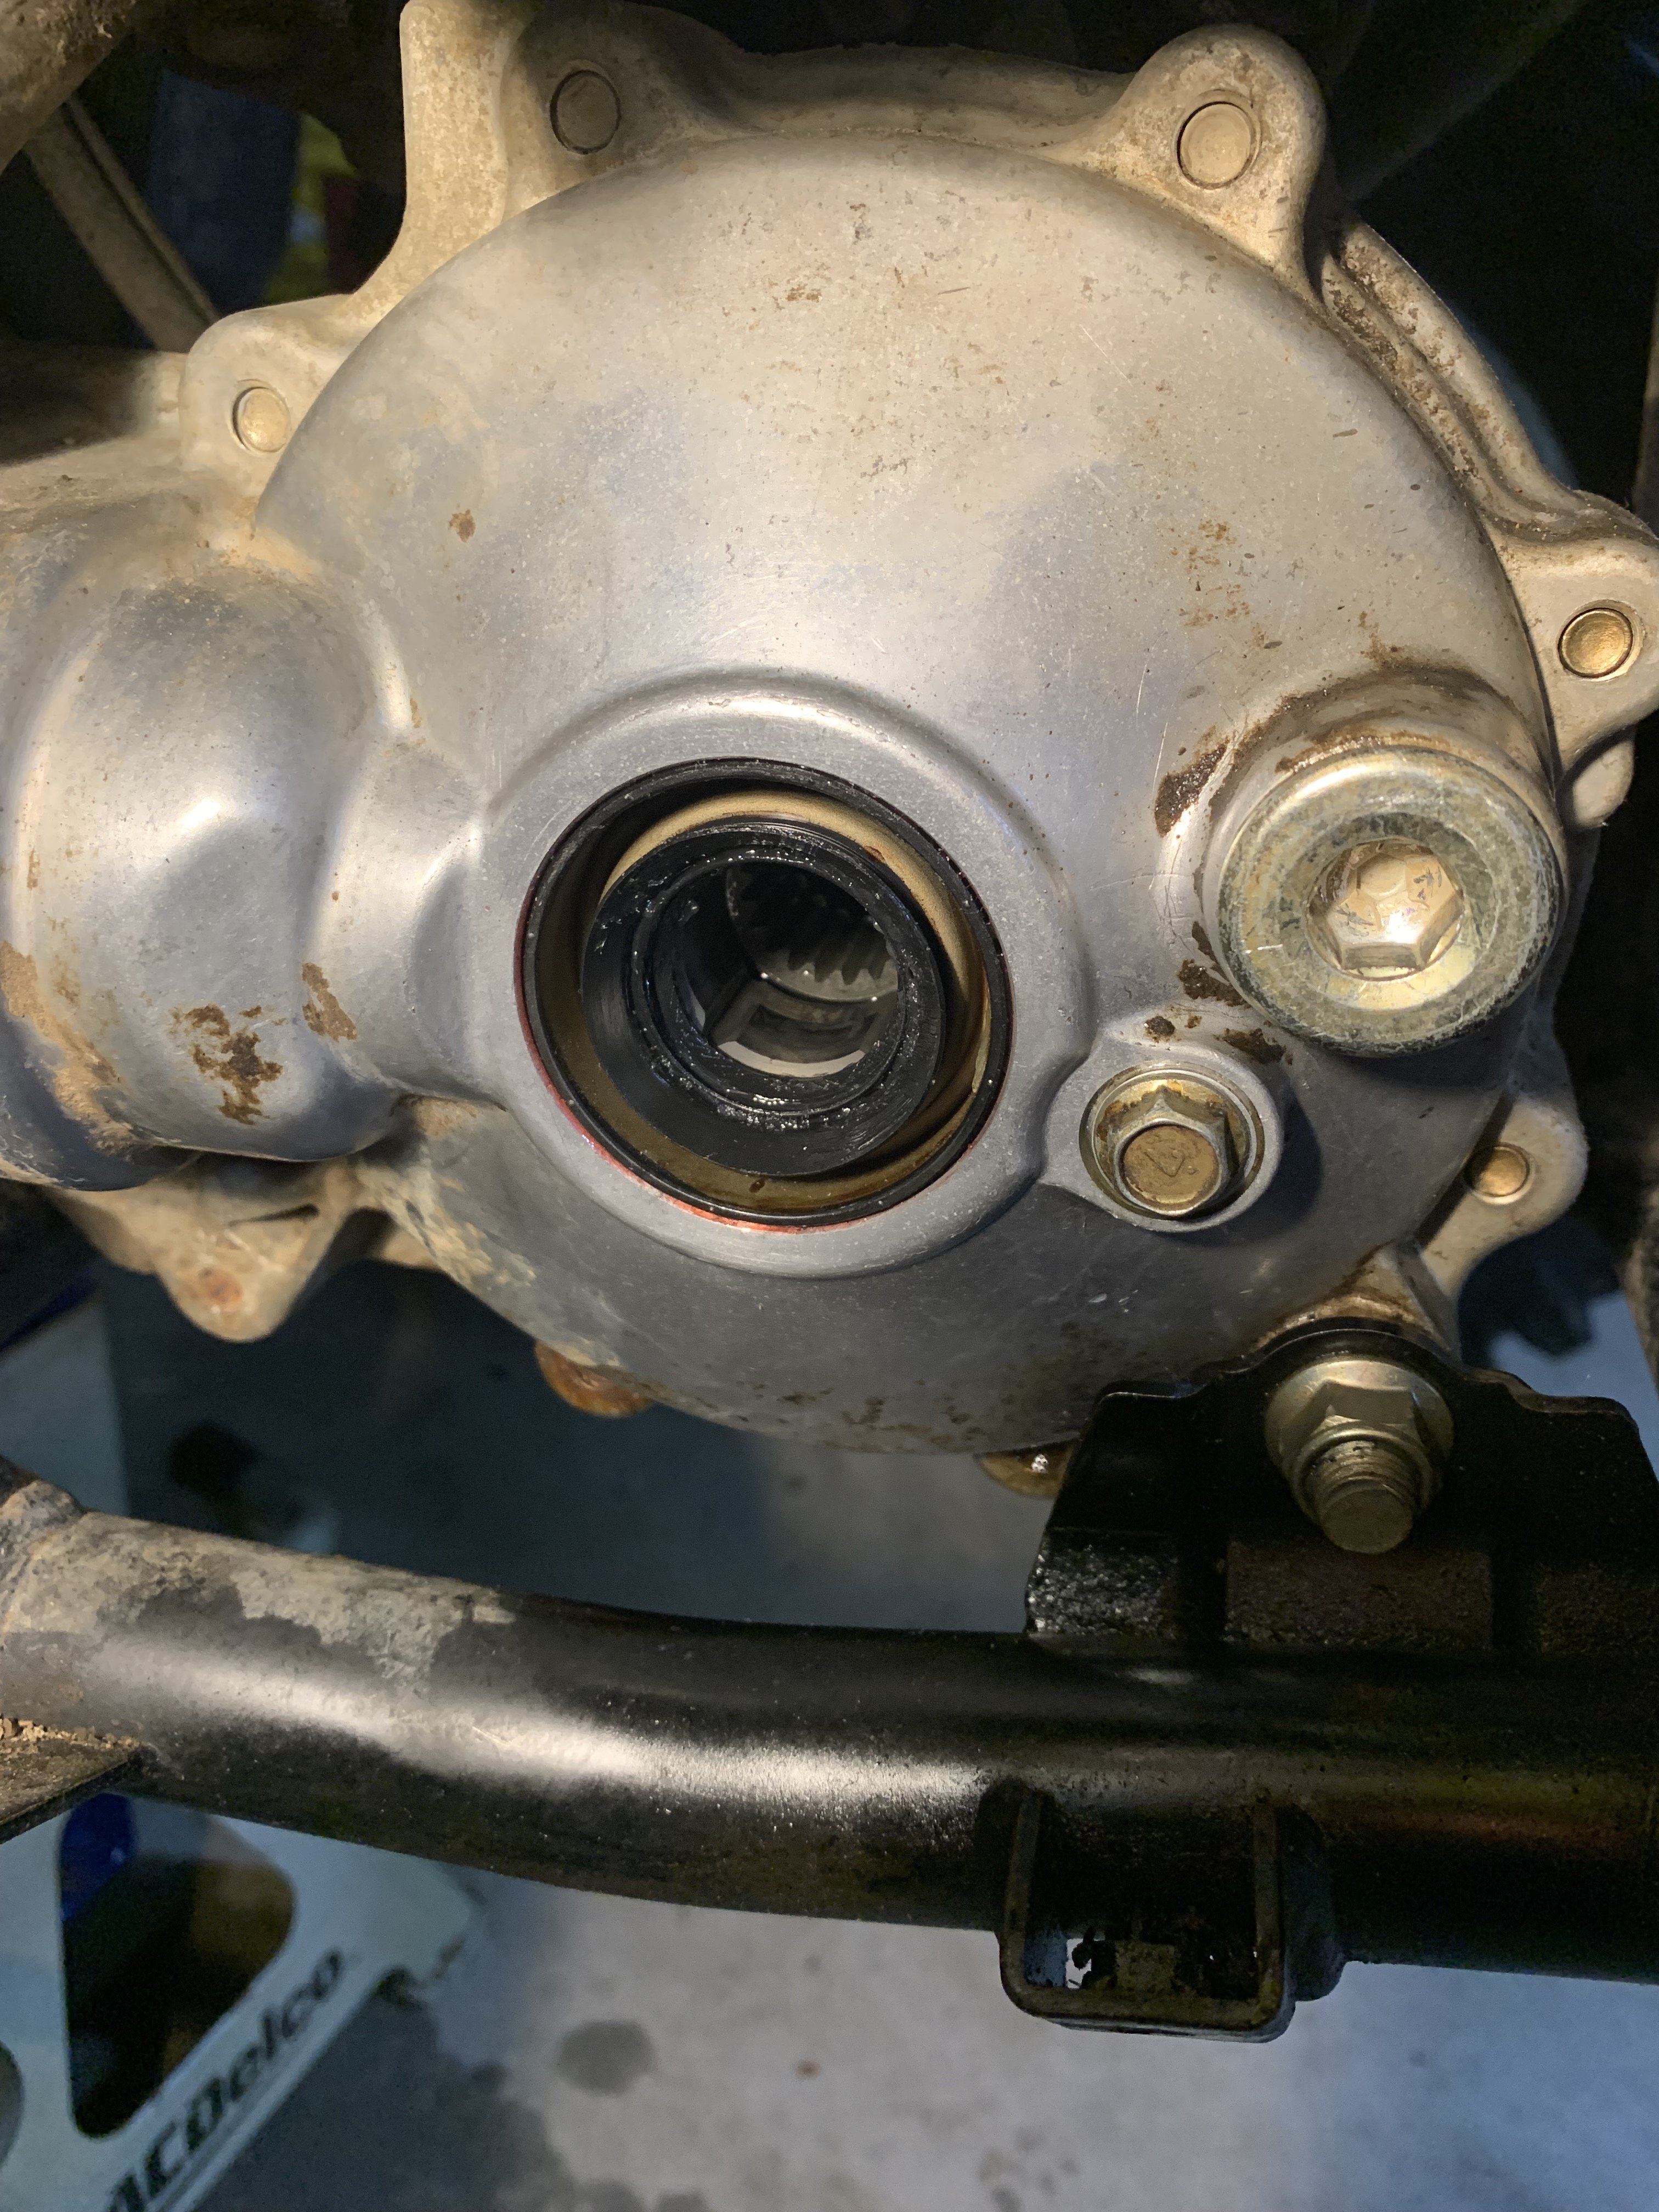
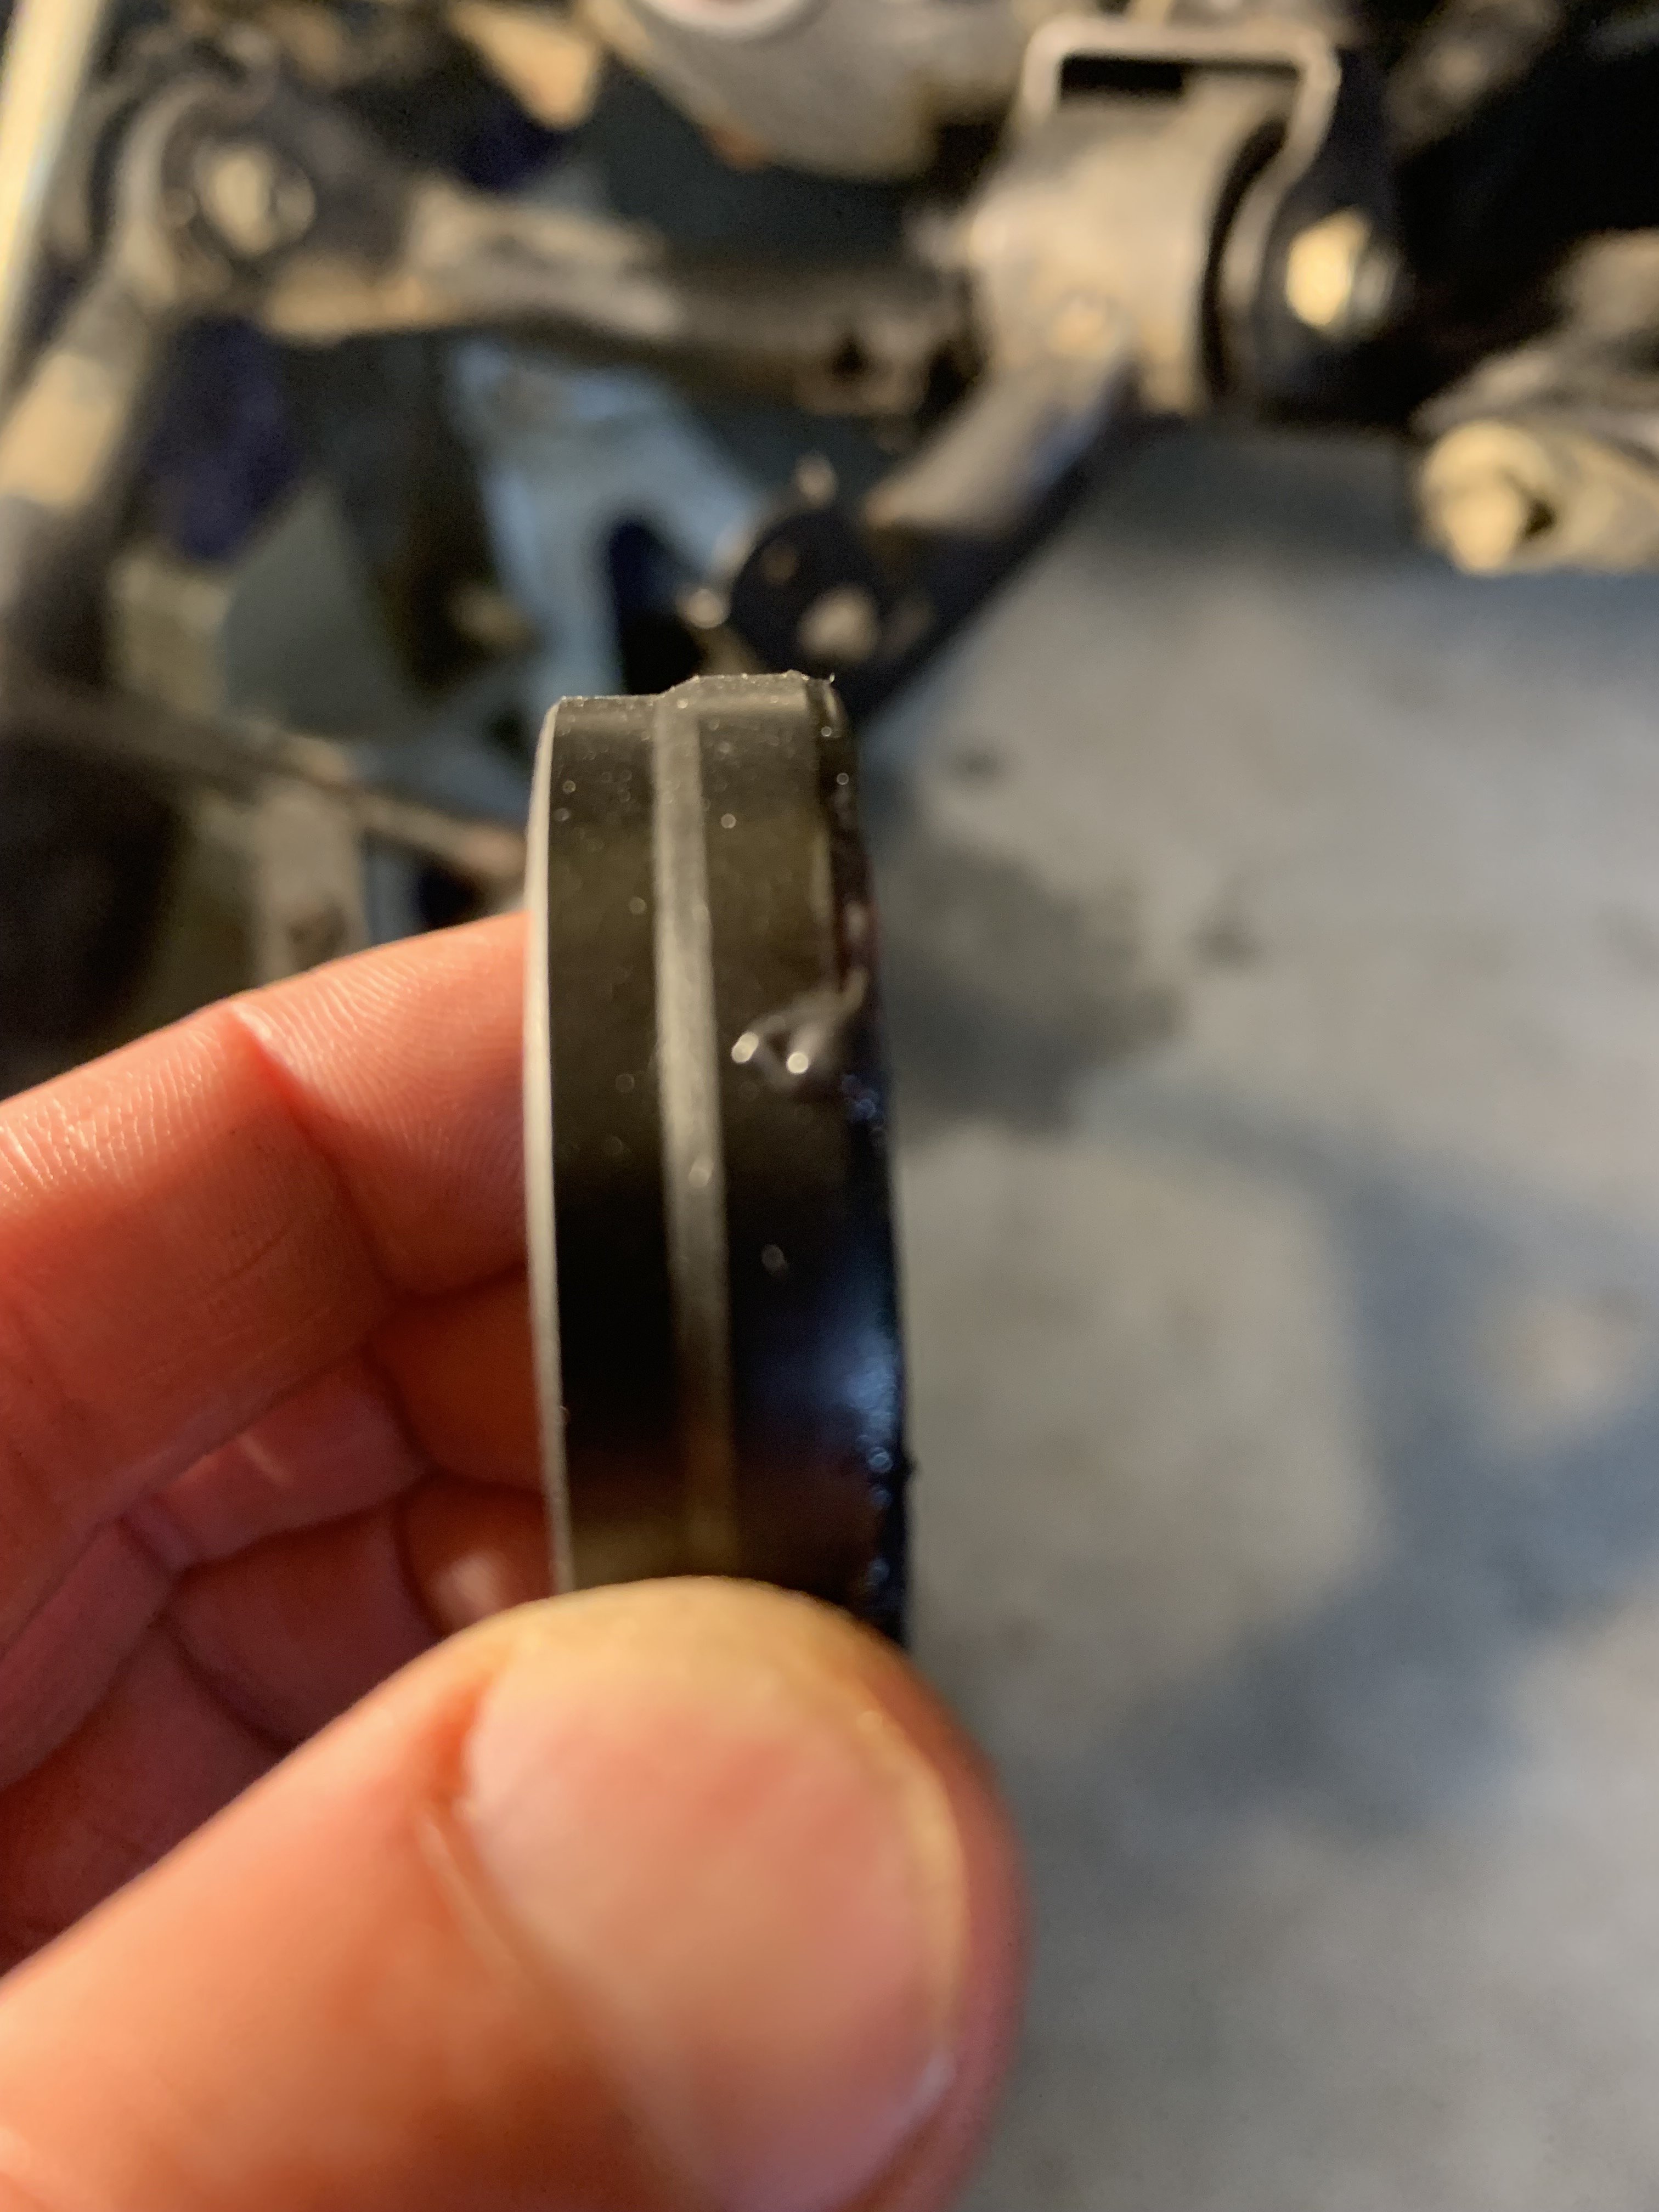
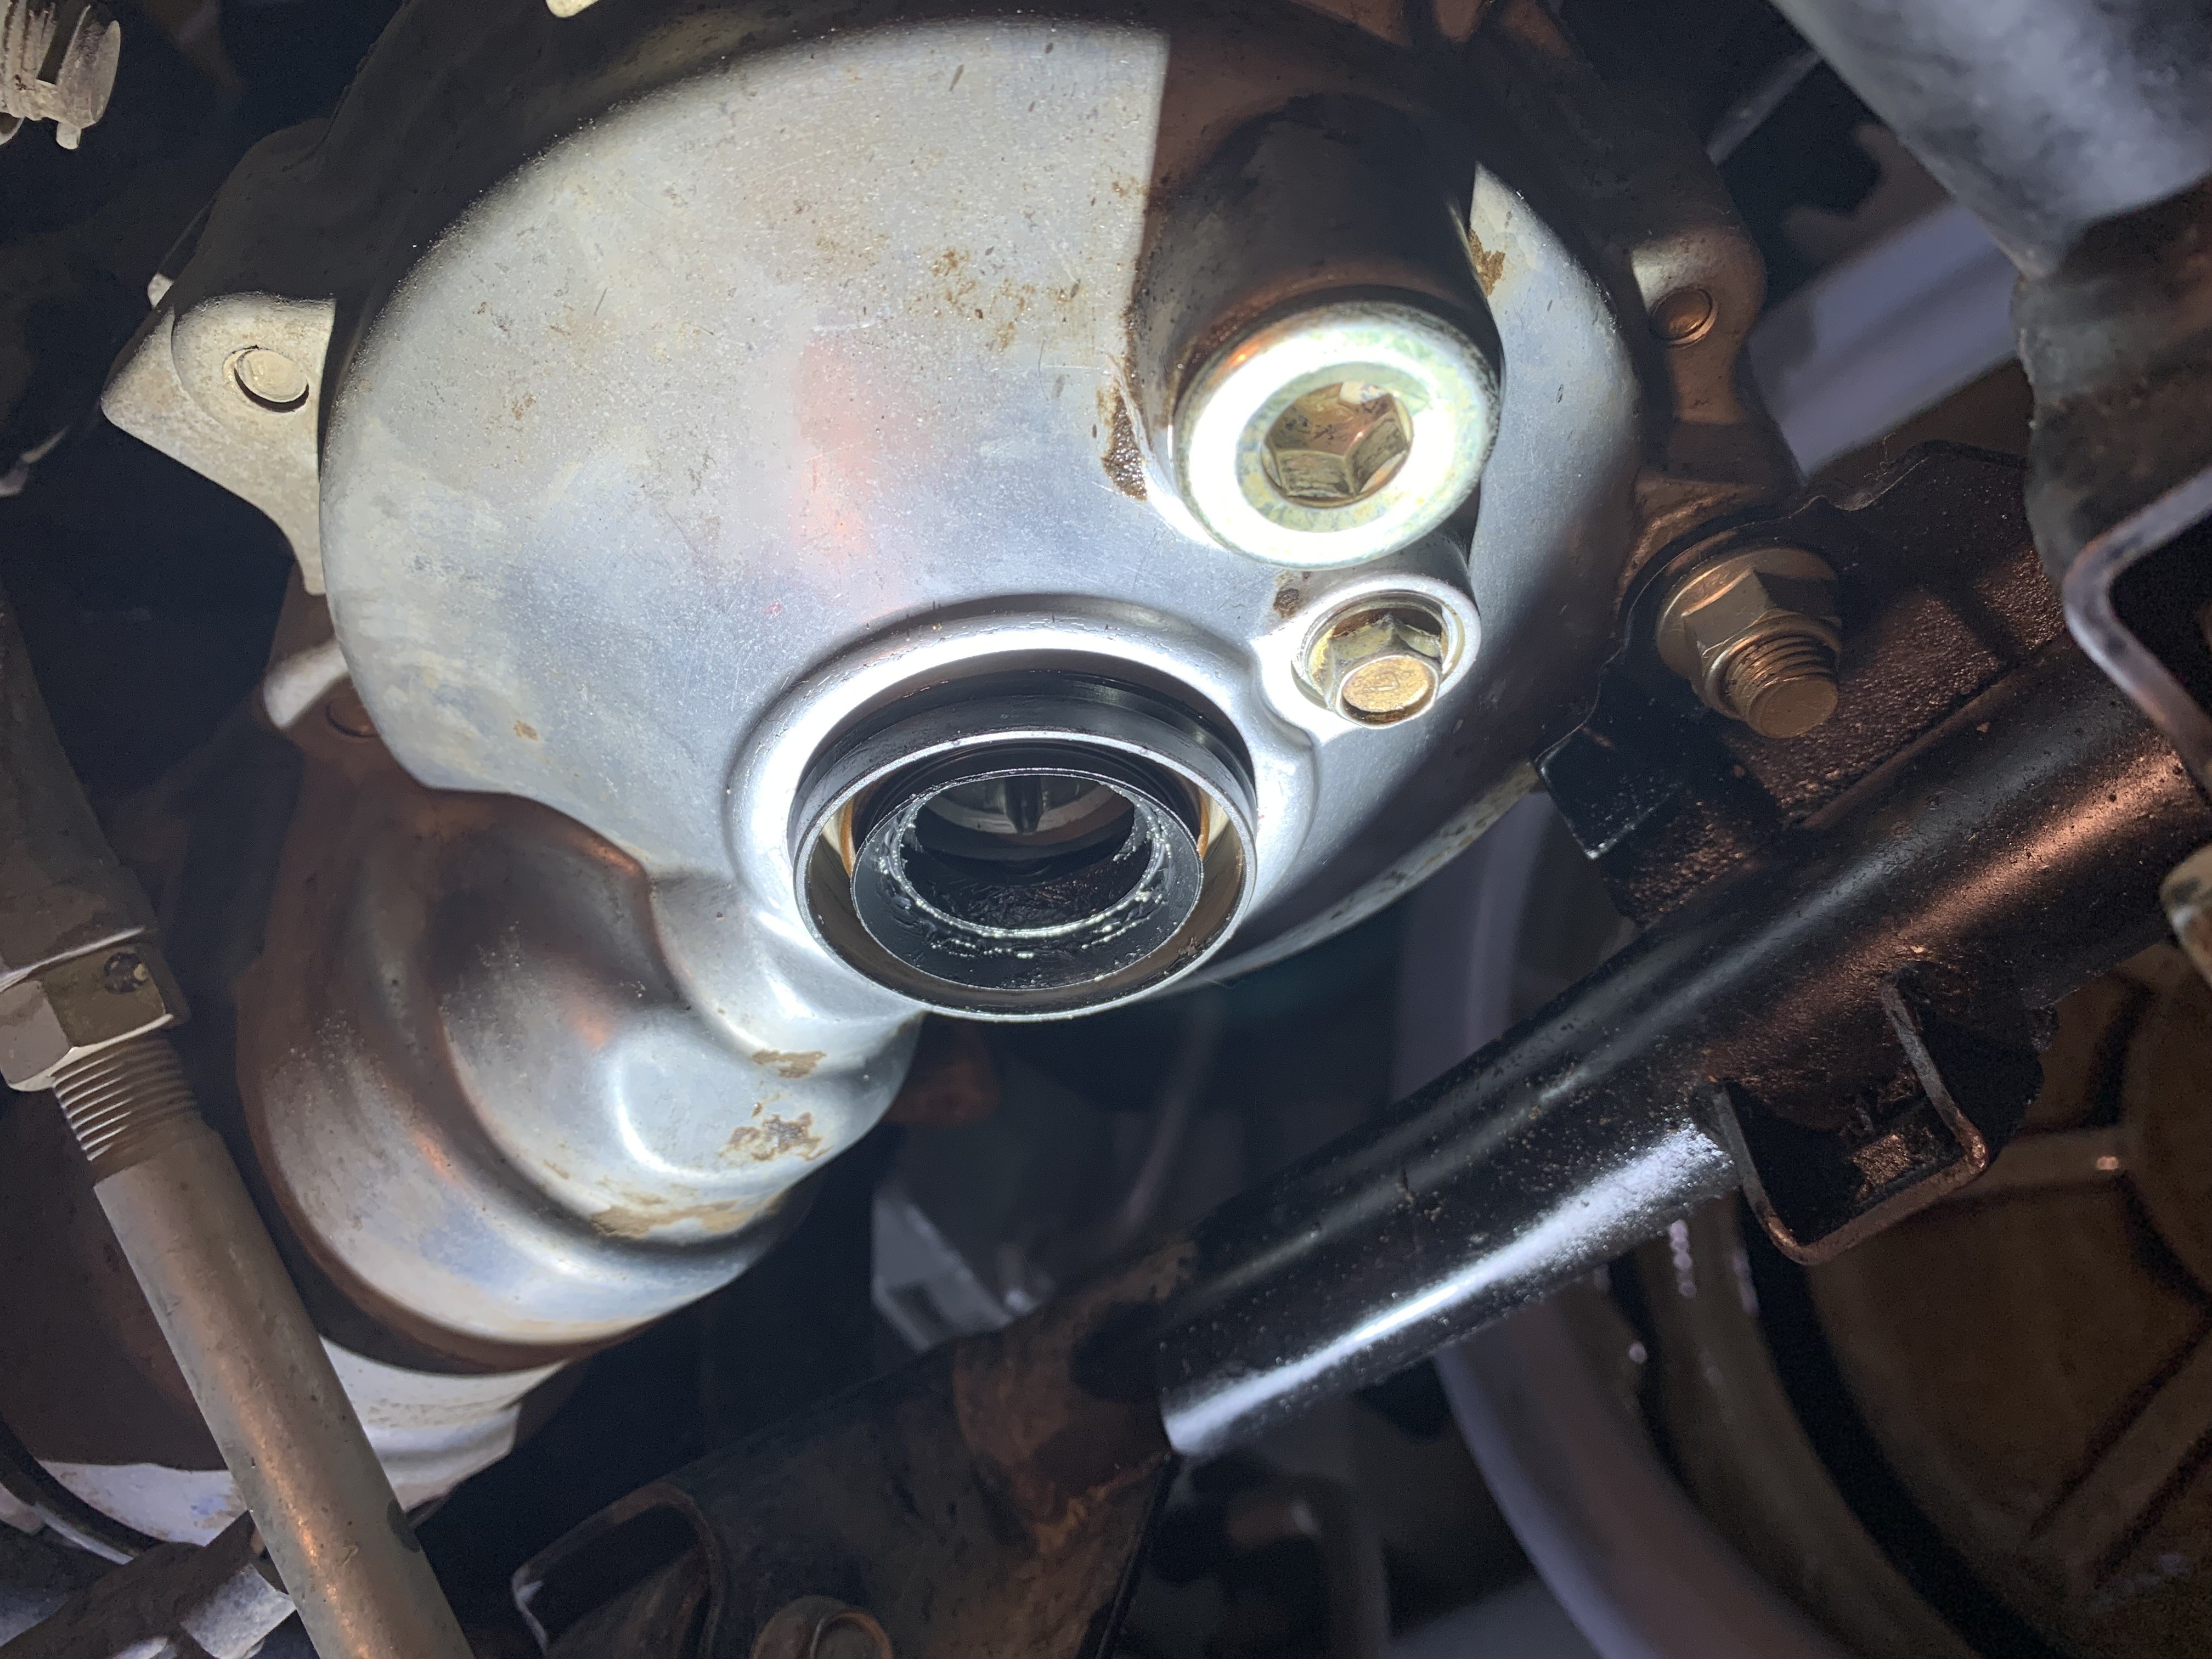
well, I think I finally found the issue. I first tore down one side and pulled the after market cv axle to compare vs the oe I still have on hand. They are nearly identical. No differences in the areas where it mates with the differential seal. So I went ahead and ordered another seal to compare with each axle. It mounted the same to each axle. Looking at the opposite side that wasn't torn apart, I could see a gap between the axle and seal that shouldn't have been there. The seal and axle weren't mating properly (obviously that's why it leaked) but it was because the seal was installed incorrectly. When I pulled the old seals I didn't pay enough attention to how they were mounted and when I put the new seals in, I set them flush with the differential. that's the issue. They need to protrude about 1/3 of the way out. there's a collar on the seal that shows just how far to install and I missed it. So, I now have one side done, waiting on the other seal to get here and I'll finish it up. had I not ordered a new seal to compare, I never would have seen this. 3 pic, one is the improperly installed seal as it sits flush with the differential, another shows the profile of the seal where you see the collar and the last shows the seal installed correctly.
-
Not sure about the first pic. But teh wire in teh second should attach right next to the oil fill cap. looks like the attachment point is broke off.
-
I've already checked the breather and its not clogged. That was my first thought, easiest to check. Its possible I put the seals in backwards as I've not replaced this type of seal before. However I do think this is unlikely. I'm sure that when I installed the seals I was mindful to install with the round spring on the inside of the differential. Assuming that draining the gear oil down to the 'level' plug will not solve this issue, and I don't think it will, I'll tear down one side to look into the mating of the cv axle into the seal. All this work started bc I had one boot torn up on the left cv axle. I threw away that axle but I saved the other. well the new cv axles are aftermarket from Oreilly and I'm wondering if they are slightly different sizing where they mate to the seal. Id like to measure both the OE and aftermarket cv axles to see how they compare. I also have a new seal coming which I'll also measure. prob should've ordered 2 new seals. I'm disappointed I didn't check the seal sizing to cv axles before I installed.