-
Posts
24 -
Joined
-
Last visited
Content Type
Profiles
Forum
Gallery
ATV Magazine
Events Calendar
Downloads
Store
Community Map
Posts posted by lasxgames
-
-
-
-
-
-
Thanks for the votes everyone!!!
nice trikes TPCTrikes, mywifeknowseverythin, and some very nice modded quads here. We have to keep the sport alive!!!
Thanks again Lary and Bo
-
http://kalecoauto.com/index.php?main_page=product_info&products_id=16
Blinker Fluid [bF-01] - $8.99 : KaleCoAuto, Hard to find automotive items!
Lowering Kit [LOW34] - $19.99 : KaleCoAuto, Hard to find automotive items!
Brass Balls - $19.95 : KaleCoAuto, Hard to find automotive items!
Brass Balls
larger image$19.95 Shipping Weight: 3 lbs 2 Units in Stock Add to Cart:
Ever wonder where those high performance rally car drivers get their brass balls? For the first time ever, brass balls are being made available to the public! Sold in sets of three, Brass Balls are an easy way to increase your performance driving ability. (For off road race use only. Use on street may result in arrest, serious injury, or death.)
-
first check and clean the air filter, then gas cap vent, then check the fuel flow to carb.
-
-
Have fun flying through the air with your ATV
So, you've seen the other ATV riders do it and you feel that it's about time you try that flying through the air stunt yourself too, but you are not sure how to go about it. You could try asking those who have tried it before to teach you, but then again, they may not have enough time to sit through with you to guide you from A to Z on the skills of jumping your ATV. The theoretical part of learning may sound easy, but you need to practice again and again to perfect your skills.
You may be sitting there and reading this while at the same time wonder how do they make their ATVs fly through the air almost effortlessly? You could be asking yourself a lot of questions and that is a good start to learning. When you have learned how to jump an ATV, it sure adds a whole lot of fun to your riding. However, many people do not understand the mechanics involved between themselves and their ATVs and it is usually the "not knowing" part that frightens people - and it should. When you do not know something, you would usually go all out to learn about it and the first and foremost important thing about jumping your ATV is to learn the very basics on how it's done.
Jumping an ATV is equivalent to learning to walk for the very first time. When you were a child, you didn't just suddenly get up and run without first learning to walk. The same concept goes with jumping your ATV. You have to start out on a smaller scale and not try to outdo yourself by going to a supercross track or something like that.
Here are some helpful tips, that we, at Jackel Motorsports, hope will get you started on learning to jump your ATV and more importantly, to land safely too!
Getting started - safety first!
Before you ride out to experience your first jump, please check and make sure that your ATV is in good working condition. Check the tires, wheels, shocks and suspension and be sure that everything is tight. And remember, no ATV ride (or jump for that matter), is safe without you first putting on your safety gears - that is, your helmet, goggles, gloves, boots, chest protector, long sleeve shirts, pants and any other protective gears that you have.
Since you are only going to start out learning to jump, there is no need for you to jump with a downward-sloped landing. If you do not already know, you should never hit a jump while sitting - your rear shock will compress and fling you off like a catapult, which is not going to be a very fun thing to happen during a jump. Start by selecting a smooth ramp-like take off and keep steady on the gas and start out slow in the attack positions - that way, you are neither standing all the way up or sitting down. Keep your arms bent, elbows out because this will help to absorb the landing as well as the impact of hitting the face of the jump. When your front wheels approach the face of the jump, blipping the throttle will keep the front end of the quad up so that you will be able to make a safe landing. Once you are comfortable and confident with small jumps, you can slowly move on to bigger and more exciting jumps.
The importance of landing well
After your first few jumps, you should be able to gauge your speed to make a perfect landing on the down side of the jump. Once you are more comfortable with your jumping skills, you can start to work on landing on the front wheels first. This has to be done with great care. Should you land with the nose of your machine too far down, you will be in for an ugly experience. One way to do is will be to press down on the rear brake to stop the momentum of the rear wheels, bringing the front wheels down. Another method is to manually push down the bars to bring the front end down. Depending on the jump, speed and position of your ATV, you could also combine both methods during your jump. In the event that the front end is too low and you think that you may just go over the bars, don't give up - hold the throttle wide open to speed up the momentum of the rear tires which will bring up the front end.
As the saying goes - practice makes it perfect, so our last word of advise is to practice and keep practicing until you have mastered the basic techniques. Once you are confident with the small jumps, it is time to 'gear up' and take on the big ones!


90cc atv

-
[ame=http://www.youtube.com/watch?v=SZq8WppNFJY]YouTube - Sport quad MK Jordan video cutt from MXMatt.com videos[/ame]
-
[ame]
[/ame][ame]
[/ame][ame]
[/ame] -
Welcome to the forumluvin it video
[ame=http://www.youtube.com/watch?v=PgRUH3fUweg]YouTube - Bo ATV[/ame]
-
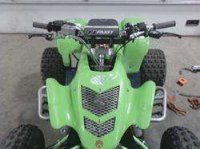
This is our 2005 blaster far from stock and 2008, 2009 Series Supercross Champion.
2005 blaster 200cc motor Factory 7 Fire-Breather 200cc Cylinder Kit-, Milled head, Project blaster green race plastic Project blaster vented hood, DG National Series Front Bumper: DG National Grab Bar, Moose Billet Thumb Throttle , Gibson Stearing dampner ,DuraBlue Eliminator Axle, ROLL DESIGN ATV Steering Stem, Fasst Flex Bars with anti vib dampners, 30mm Kiehn carb, reed spacer, v-force 3 reeds, American Star Long Shock A-Arms, 4 Douglas beadlock rims , 2 Razor rear tires,2 Front ITP Holeshot MXR Tires 19x6x10, Gas cap carbon fiber, Extreme Manufacturing Pro Peg Nerf Bars, Project Blaster Factory Aluminum Airbox, American Star new +4 roundhouse swing arm, rear Elka long travel duale rate rezi shock, front Triple Rate elka shocks/remote rezzi dual adj, notrology hot wire coil, lightend flywheel, barrenet clutch kevlar, after market inner and outer HD clutch basket, AMP RESEARCH LINK
-
-
Looking for ideas of Trailer's Interior Layout (toy haulers) storage, tools, beds, tie downs, lighting, etc.
Looking for Photos Of Trailer Interior Layout
-
looking for any info on how to do a shift star mod any prior posts and any feedback?? Thanks

-
If they bore make sure they Chamfer the Ports some places don't do it
and after picking up your cylinder from getting a fresh bore job, always wash your cylinder in hot soapy water. Washing in a solvent tank won't get the abrasives out! Dawn dishwashing liquid works great for the final cleaning of a freshly bored and honed cylinder. After you clean and rinse the cylinder, dry it quickly and then get a clean white paper towel with oil on it and use it to lubricate the bore. If the towel comes out of the cylinder, when you're done lubricating it, with any traces of black or gray then the cylinder needs to be cleaned yet again. When properly cleaned the white paper towel with the oil on it will look the same color on removal as it did when you put it into the bore.
FYI
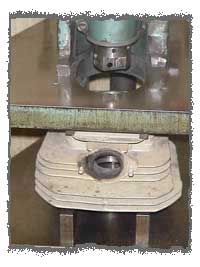
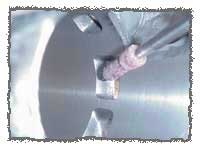
Here we are all set up to run some cylinders through the first step in boring a cylinder. After the upper and lower gasket surfaces are cleaned we are ready to go.
Mounting the Cylinder.
You are seeing correctly, the cylinder is mounted upside down. This assures that the new bore is square with the cylinder base.
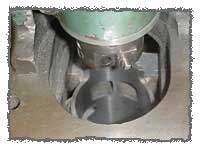
The cutting tip spins in the holder and automatically feeds itself down into the bore cutting a perfectly round hole parallel to the cylinder base. The bore is taken to within two thoundandths or so of the finished bore size using this machine. Most shops will be happy to show you their boring equipment if they have it. If all they show you is a hone, take your cylinder elsewhere. Removing large amounts of material with a hone can get the bore out of square - not cool.
Chamfering Ports.
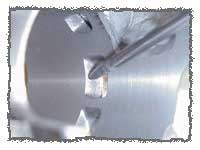
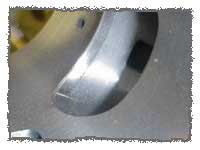
On two-stroke cylinders it is necessary to chamfer the port edges. Rounding of the sharp edge prevents premature wear on the piston and ring assembly. Using a rotary burr to make the initial chamfer, and finishing it out with a sandroll, is a good way to get the proper angle and finish.
The top of the exhaust port shows a properly chamfered port. It doesn't take a lot of material removal, just enough to break the sharp edge. I prefer to do my chamfer work before I finish hone the cylinder.
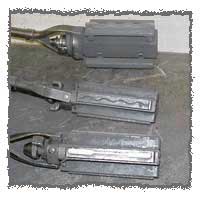
Honing Tools.
What you see in this photo are cylinder hones. Most of you have seen the "spring loaded paddle hones," these are much different . These hones adjust by a screw that allows the operator to add tension as needed. Unlike a spring loaded hone, they will only cut a round circle if used properly. The cylinder's final finish and size are attained using these pieces of equipment.
The fine stones that are doing the finish work will also imbed their abrasive into the cast iron walls of the cylinder. After picking up your cylinder from getting a fresh bore job, always wash your cylinder in hot soapy water. Washing in a solvent tank won't get the abrasives out! Dawn dishwashing liquid works great for the final cleaning of a freshly bored and honed cylinder. After you clean and rinse the cylinder, dry it quickly and then get a clean white paper towel with oil on it and use it to lubricate the bore. If the towel comes out of the cylinder, when you're done lubricating it, with any traces of black or gray then the cylinder needs to be cleaned yet again. When properly cleaned the white paper towel with the oil on it will look the same color on removal as it did when you put it into the bore.
You are now ready to install your new piston into the cylinder and get back to riding!
-
Time-Sert thread repair
Time-Sert Thread Repair Inserts
[ame=http://www.youtube.com/watch?v=RvmL0pEphQI]YouTube - + TIME-SERT + THREAD REPAIR SYSTEM www.timesert.com thread repair system for stripped thread repair.[/ame]
-
-
(ANTI VIBE BAR)
Old school
Fill your handlebars with lead shot size 8 or 9. Cap the ends with silicone.
(caution lead is harmful if sucked on or swallowed)
They help to reduce the vibration of the bike that you feel through the handlebars. This reduction in vibration translates into less fatigue and numbness in your arms and hands.
-
here is another link for painting DIY: How To Paint ATV and Dirt Bike Plastic - Yamaha Blaster Forum
-
-





2004 Polaris Sportsman 90 slipping or no power to go
in Polaris ATV Forum
Posted
If you every need any help with the 90 sportsman let me know we raced with that same motor in a Kasea 90 (took the championship). We've done just about everything with that motor application.
Polaris and Honda are both good for their own uses and both have pros and cons. We own both and opinions vary thats why we don't bash someone else's ride. It's all good!!!!!!!!! We need to hang together for our sport!!!!