Search the Community
Showing results for tags ' tail'.
Found 3 results
-
I have a 2003 kodiak, 450, that the tail, light is being turned on by front brake control handlebar lever which I dont think should even happen . I have disconnected the brake switch by removing the spring. You can barely touch the lever and the tail light comes on the problem is after parking there is enough contact that the light dont burn but it will run the battery down in a period of 24 hours. Its a good machine with right at 5000 miles and 1500 hours but I am at the end of my rope with it
-
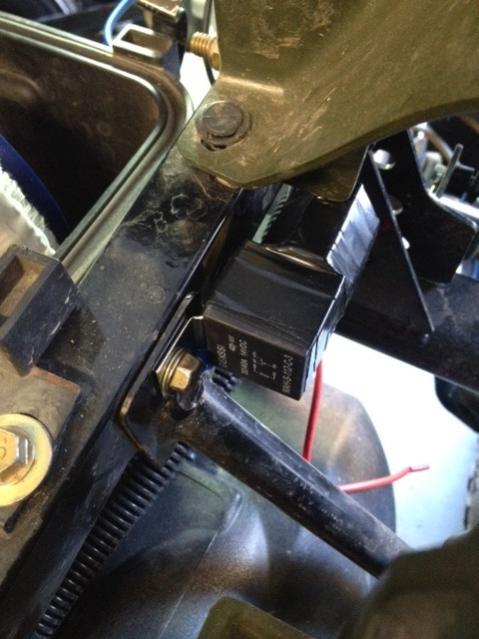
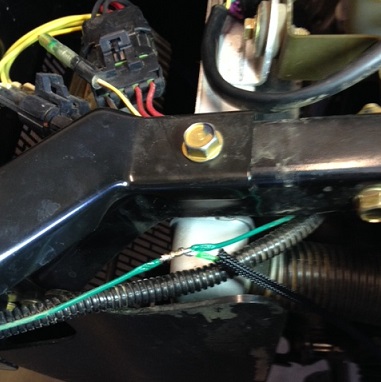
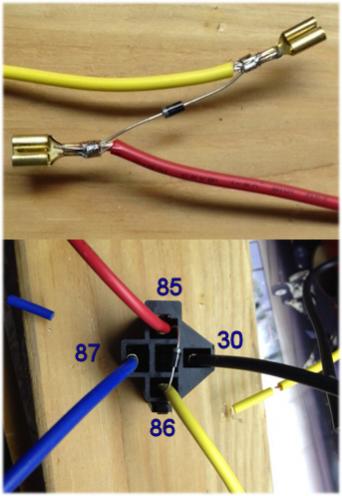
This is a 2008 Polaris Sportsman 500 X2 modification to make the taillights only come on when the headlights are on. Normally the taillights are always on, which I admit is very helpful when following someone on the trail in lowlight conditions. I prefer to have the option of when the lights are on, so I installed the following mod to my Polaris. Parts: - 1 x Bosch style relay. Amazon: AGT (5 Pack) 30/40 AMP Relay with Harness; spdt 12V Bosch Style (40AMP-HRNS) for 13.99. - 1 x 1N400X diode (I used a 1N4004, but any diode in the series should be fine) - Wire connectors, preferably marine grade heat shrinkable. - Heat shrink wrap. - Wire protection: split loom and nylon sleeve. - Wire: 5 feet of 16-18 gauge. Bosch relay info: CHETS CIRCUITS (and scroll down to yellow diagram near mid page--thanks Chet) Basic concept: 1. Splice into a headlamp wire and run it to relay pin 85; ground pin 86 to the frame. 2. Cut the two taillight wires (L and R), and connect one side of the cut (both L and R) to relay pin 30, and the other side to pin 87. 3. When the headlights are on, power from the headlight wire to pin 85 causes the relay to close the taillight connection through pins 30 and 87 to make the taillights turn on. When the headlights are off, the connection between pins 30 and 87 is open, resulting in the taillights being off. 4. The brake lights are on their own circuit, so will still work normally. 5. The relay only draws about 170 milliamps from the headlight splice so there is no apparent change in headlight intensity. 6. I don’t think joining the individual L and R taillight wires to pass through the relay (pins 30 and 87) has any effect on the electrical system since they come from the same splice upstream. My install used a 5 pin relay with pig tail wire connector. I removed the unneeded center pin wire (87a pin): [ATTACH]1759[/ATTACH] I pulled out the 85 and 86 wire pins and soldered a 1N4004 diode in as a precaution against back EMF. Back EMF is a voltage spike caused when power is removed from the relay that could cause damage to switches in a system not specifically designed to have a relay. An electrician may know better whether or not this is needed to protect the headlight system of the quad. Note the diode’s cathode end must connect to the power wire (pin 85 in this case), and anode end must connect to the grounded wire (pin 86), I.E. Reversing the diode polarity will cause a short and potential damage. An option is to purchase a relay with an integrated diode. Diodes are cheap at Radio Shack. I suspect installing a diode is overkill, but I had the time and energy . . . Soldered in diode and with connectors and diode reinstalled: [ATTACH]1764[/ATTACH] Next, I found a place to mount the relay. On the left side frame, next to the air box, was a foot-well brace bar that bolts into the frame. I mounted the relay on this bolt and also connected the relay ground wire (pin 86) to the bolt by crimping a ring connector to the wire: [ATTACH]1762[/ATTACH] Then I very carefully removed a half inch of insulation from the front left headlight power wire (a green wire on my quad) and soldered in a wire to connect to pin 85. I put a nylon sleeve on this wire and ran it back to the relay, following existing wire looms and zip tying it in place: [ATTACH]1763[/ATTACH] Next I accessed the taillight wires--the PS500 X2 made this easy since it has a dump bed that lifts up. For typical quads, you may need to remove the rear storage rack to access the taillight loom. As you can see in the pic, my taillight wires are red w/white trace, the brake light wires are orange, and the ground wires are dark brown. Cut the taillight wires and crimp on connectors, then connect to pins 30 and 87 (black and blue wires in my case). Polarity doesn’t matter. View from above: [ATTACH]1763[/ATTACH] Made all the connections to the relay then tested the light system. Worked like a champ. I used shrink wrap and tape to seal the connections then put split loom wire protection over the wires between the relay and taillight loom and zip tied everything in place. I also spliced in a license plate light to the taillight circuit. I used tape to mask the dome so only a slit is open to shine softly on the plate. Had a couple more pics, but apparently can only upload up to 5 total, or per post.

-
TIGER TAIL PRODUCT REVIEW By: Mike and Kristin Plourde When we first got the package, we thought it seemed really heavy. After taking the Tail out of the box, we determined it’s really not that heavy compared to most winches and tow systems you can get out there and it seemed to be extremely well built, and it has to have some weight to it to be able to do it’s job! The Rhino is not only a fun means of transportation, it is also our recovery vehicle at races and any time someone finds their limits in the mud. So, we immediately took it out to the garage to go put it on the Rhino. When we first looked at the set up we thought, “This will be interesting to get a wrench between the spool and the bottom mounting plate.“ But to our surprise they covered this, the bolts have a collar which drops into the bolt hole and holds it in place. All it took was one wrench on the bottom nut. This process took maybe five minutes. The unit easily slides right into the receiver. At this point the only down fault I have seen was it does not come with a pin to hold it in the receiver, I was required to buy an additional one. Not a big deal but a tiny inconvenience. Eager to try out the Tiger Tail, we headed out to a local ride spot to test it out. Lucky for us as we were unloading the toys someone in an Isuzu Trooper, not meant for the mud, found a mud hole. He managed to bury his front end in the peanut butter-like slop up to the bumper. With the rear tires barely clinging to the surface by inches of hard packed dirt, he was not moving. So we thought this could be the perfect time to test out the Tiger Tail and be of a little assistance. I backed the Rhino up to his vehicle, and found it takes some slack on the rope before the hook will come out of the holder. As soon as the hook was free, it easily extended and retracted. We hooked it up to the Trooper and I slowly pulled forward to fully extend the rope. This being a heck of a first test for the Tiger Tail, I floored the Rhino, spinning the tires on the hard pack. To my amazement , the Rhino started inching forward and before we knew it, he was out of the slop and on to the hard stuff. We unhooked the Tiger Tail and it went right back into it’s housing trouble free. From what we have seen so far, this is an absolutely amazing product. From the first glance of the Tiger Tail we knew it was well built and well thought out. We know that it will definitely come in handy out on the trails and the track. They even put a hole on the main bracket so you can still have a ball for towing on the back of your rig. Great idea! We will definitely recommend it to all of our friends. This is also one of those products that everyone who sees it wants to know all about it.