Search the Community
Showing results for tags ' lights'.
-
I am starting this thread as it's that time of the year....I'm planning to put some up myself, nothing crazy, maybe my 2 front trees and hand rail. When I do, I will post a pic in this thread. Has anyone else put their house lights up yet? Post a pic!
-
I just bought this and the previous owner has disconnected the wires going to the cluster. I have found where one end has been cut. One is a sky blue and the other a green wire. I cant find where these connect to? When I ground either wire each light will come on. Any help would be great...
-
I just purchased a 95 4004x4 sportsman and I cannot get the headlights to work im not a mechanic by any means is there a fuse if so were do I look
-
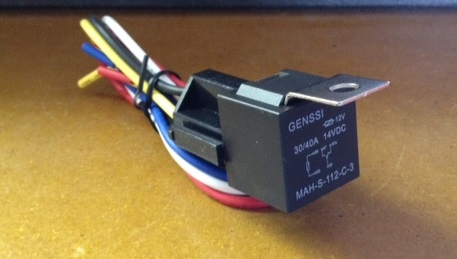
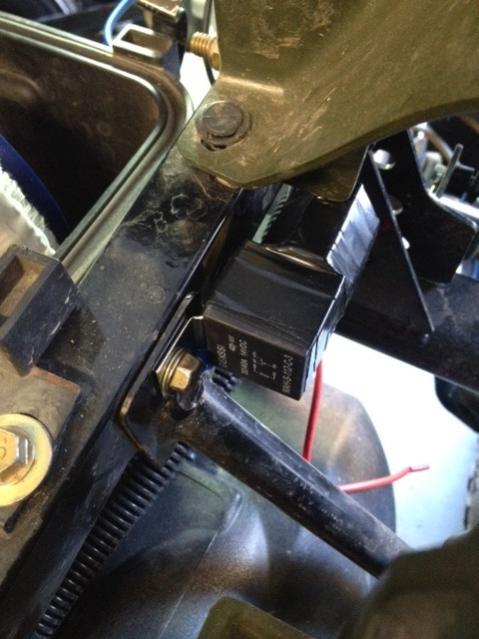
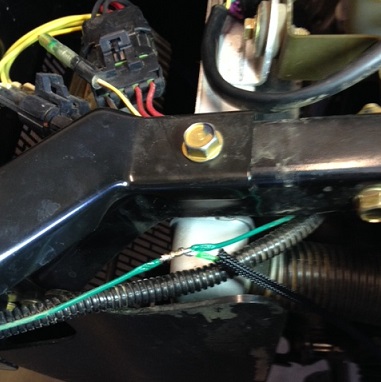
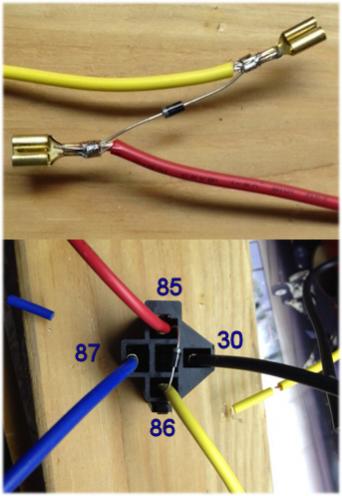
This is a 2008 Polaris Sportsman 500 X2 modification to make the taillights only come on when the headlights are on. Normally the taillights are always on, which I admit is very helpful when following someone on the trail in lowlight conditions. I prefer to have the option of when the lights are on, so I installed the following mod to my Polaris. Parts: - 1 x Bosch style relay. Amazon: AGT (5 Pack) 30/40 AMP Relay with Harness; spdt 12V Bosch Style (40AMP-HRNS) for 13.99. - 1 x 1N400X diode (I used a 1N4004, but any diode in the series should be fine) - Wire connectors, preferably marine grade heat shrinkable. - Heat shrink wrap. - Wire protection: split loom and nylon sleeve. - Wire: 5 feet of 16-18 gauge. Bosch relay info: CHETS CIRCUITS (and scroll down to yellow diagram near mid page--thanks Chet) Basic concept: 1. Splice into a headlamp wire and run it to relay pin 85; ground pin 86 to the frame. 2. Cut the two taillight wires (L and R), and connect one side of the cut (both L and R) to relay pin 30, and the other side to pin 87. 3. When the headlights are on, power from the headlight wire to pin 85 causes the relay to close the taillight connection through pins 30 and 87 to make the taillights turn on. When the headlights are off, the connection between pins 30 and 87 is open, resulting in the taillights being off. 4. The brake lights are on their own circuit, so will still work normally. 5. The relay only draws about 170 milliamps from the headlight splice so there is no apparent change in headlight intensity. 6. I don’t think joining the individual L and R taillight wires to pass through the relay (pins 30 and 87) has any effect on the electrical system since they come from the same splice upstream. My install used a 5 pin relay with pig tail wire connector. I removed the unneeded center pin wire (87a pin): [ATTACH]1759[/ATTACH] I pulled out the 85 and 86 wire pins and soldered a 1N4004 diode in as a precaution against back EMF. Back EMF is a voltage spike caused when power is removed from the relay that could cause damage to switches in a system not specifically designed to have a relay. An electrician may know better whether or not this is needed to protect the headlight system of the quad. Note the diode’s cathode end must connect to the power wire (pin 85 in this case), and anode end must connect to the grounded wire (pin 86), I.E. Reversing the diode polarity will cause a short and potential damage. An option is to purchase a relay with an integrated diode. Diodes are cheap at Radio Shack. I suspect installing a diode is overkill, but I had the time and energy . . . Soldered in diode and with connectors and diode reinstalled: [ATTACH]1764[/ATTACH] Next, I found a place to mount the relay. On the left side frame, next to the air box, was a foot-well brace bar that bolts into the frame. I mounted the relay on this bolt and also connected the relay ground wire (pin 86) to the bolt by crimping a ring connector to the wire: [ATTACH]1762[/ATTACH] Then I very carefully removed a half inch of insulation from the front left headlight power wire (a green wire on my quad) and soldered in a wire to connect to pin 85. I put a nylon sleeve on this wire and ran it back to the relay, following existing wire looms and zip tying it in place: [ATTACH]1763[/ATTACH] Next I accessed the taillight wires--the PS500 X2 made this easy since it has a dump bed that lifts up. For typical quads, you may need to remove the rear storage rack to access the taillight loom. As you can see in the pic, my taillight wires are red w/white trace, the brake light wires are orange, and the ground wires are dark brown. Cut the taillight wires and crimp on connectors, then connect to pins 30 and 87 (black and blue wires in my case). Polarity doesn’t matter. View from above: [ATTACH]1763[/ATTACH] Made all the connections to the relay then tested the light system. Worked like a champ. I used shrink wrap and tape to seal the connections then put split loom wire protection over the wires between the relay and taillight loom and zip tied everything in place. I also spliced in a license plate light to the taillight circuit. I used tape to mask the dome so only a slit is open to shine softly on the plate. Had a couple more pics, but apparently can only upload up to 5 total, or per post.
-
Hi folks, I am new to this forum and signed up hoping to get some advice as to what the problem is with the electrics on my timberwolf. The quad is a 2000 4x4 model, just bought it on the cheap a few weeks ago with electric start and lights not working. The starter makes no noise and no attempt to start whatsoever when the button is pushed and the lights dont work at all. It has a battery that has charge in it, so dont know why it wont just run off the battery, could it be a fuse? I saw a thread on here about electric start not working on a timberwolf, I got some info from that but think this problem may be different so thought I'd make my own thread. Any advice would be appreciated Cheers
- 2 replies
-
- electric
- electrical
-
(and 6 more)
Tagged with:
-
Hi, I bought my Warrior used, but the headlight(s) was gone (wiring is there). What is a cheap alternative from OEM for headlights? I assume I'll need some sort of mount too. Thanks.
-
hey guys i"m new here but I have a problem hoping you guys could help. I have a 2001 polaris scrambler 500 and when i bought it the battery was bad. I would just start it with the pull start and everything worked fine. The head lights, the lights by the key turn, and the 4 wheel drive light . Then, I finally decided to buy a new battery and set up it up like I was suppose to and then installed it onto my a.t.v. Now, for some reason the lights don"t work any more. I looked around to see if a fuse box was on the a.t.v but I haven"t found one. Does anybody have a idea of where one could be or what could be the problem ? Any info. that you guys could help me with would be very nice. thanks
-
DragonFire Racing heads back to Lake Elsinore to race under the light in the Lucas Oil Offroad Championship. After a devastating crash on Sunday Jerry Whelchel is in 4th place in the point standings and 8 points back. He looks to get the points lead back this weekend, a new motor, almost a new truck and new Body, look for Jerry in the Unlimited 2 to be back on the podium this weekend. Larry More...
-
- dragonfire
- elsinore
- (and 6 more)
-
Turn The Darkest Nights Into Day With The New Vision X Solstice Series Algona, WA, Scottsdale,AZ– (12/17/2008) Vision X introduces its all new Solstice series of LED off road lamps. Equipped with its brand new 10 watt LED technology, with each 10 watt LED producing 800 lumens featured in the XIL-6100 series 60 watt 6” round off road lamp which produces 4800 Lumens (500 watt halogen equivalent) and in the XIL-4100 series 40 watt 4" square off road lamp producing 3200 lumens (300 watt halogen equivalent) making them the brightest LED off road lamp on the market in such a compact design. Not only are they the brightest, they are the most efficient with the 6100 series drawing less than 3 amps and the 4100 series drawing less than 2 amps due to their advanced electronic drivers which are also responsible for their 50,000 hour life span and variable 9-60 Volt DC input. Other key features are as follows; Rugged die-cast aluminum housing provides optimum durability and heat dissipation. The Solstice series also feature an IP68 ingress protection rated housing making them impenetrable to dust and submersible under water up to 3 meters. The unbreakable polycarbonate lenses are housed by a 6061 aluminum face plate which doubles as a radiant heat sink to melt away snow and ice in frigid conditions. Their stainless steel mounting bracket features knurled aiming knobs for 90 degrees of adjustment and is centered on the profile of the lights which provides a slim 1.5" mounting depth. The Solstice series has also been subjected to a 6Grms vibration test to ensure their performance in high impact conditions. Built to last, this Vision X series also features a lifetime warranty. Whether in an underground mine, the North slope of Alaska, Racing the Baja 1000 or even in Space; Vision X products have been chosen as an industry leader. The Solstice series is another example of why Vision X continues to leave the competition in the dust. Vision X plans to continue the Solstice series with many other new products utilizing their new 10 watt LED technology being engineered as we speak. Please visit our website for new product updates at http://www.visionxusa.com/ . ##Vision X Off-Road## Vision Motor Sports was established in 1997. Located in Seattle Washington Vision has become one of the leading manufacturers of 12 volt lighting in the World. Vision X is known in many markets to be the premier lighting choice. You will find Vision lighting on Boat Towers, Off Road Vehicles, Emergency vehicles, Military Vehicles, Public Transportation Vehicles, Heavy Equipment, commercial vehicles, computer industry, commercial lighting, even underwater in Scuba diving lights all over the World. UTV Industry News UTVGuide.net More...
-
I know this was out all last year, but it is still neat to see. Jingle Bells Wizards of Winter


