

-
Popular Now
-
-
Similar Forum Topics
-
 By jen
Wow...I packed a small soft side cooler with an ice pack at -4 F and inserted my Type K thermocouple sensor inside so I could monitor the temperature without opening. After 3 hours the inside temperature was 60 F...OMG! The ice pack was solid frozen. Standard temperature for safe storage is < 40 F. What I found by asking was that there should be no air space in the cooler. Packed with Ice preferably ice from connivence store (normally 0 F of less). Food should take up short day trip1:1 ratio.
Good coolers are expensive.
-
 By LashinWheeler
Hello all, I have a 2006 Polaris Sawtooth with no spark. It has a dead battery but with a jump pack on it, it will still not Spark. Plug is good, Throttle ETC is not closed, Stator pick up coil seems to Ohm out in the correct range, Unsure how to properly check the CDI. And when ignition is on the Neutral and reverse light come on but after cranking just the neutral stays on.
Any help would be great,
Thanks!
-
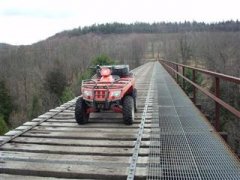 By mikeexplorer
We rode here the day before the event. This is a DCNR state forest trail system. The story behind the name is miners would put their bottles of whiskey in the local springs to keep them cold until their shift was over. Part of the trail system is on old strip mines so some areas are barren, others are full forest.
-
 By flyinbrian365
View File 2018-2019 Polaris Sportsman 850/1000 service manual
2018-2019 Polaris Sportsman 850 / 1000 – Official service manual Resource
📌 This thread is dedicated to the factory service manual for the 2018 and 2019 model year Polaris Sportsman 850 and 1000 ATVs.
What's Covered:
This service manual covers complete OEM factory procedures for the following models:
Polaris Sportsman 850 (2018–2019) Polaris Sportsman 1000 (2018–2019) Polaris Sportsman 1000 XE / Trail / High Lifter / Touring variants (where applicable) Manual Contents Include:
Engine service & specifications (ProStar 850 & 1000 single-cylinder EFI engines) Fuel system diagnostics & EFI troubleshooting Drivetrain, transmission, and AWD service procedures Electrical system schematics & wiring diagrams Suspension, steering, and brake system specs Clutch adjustment, belt service, and CVT procedures Torque specs, fluid capacities, and maintenance schedules Diagnostic trouble codes (DTCs) and service tool usage Intended Audience:
This resource is for owners, shade-tree mechanics, and professional technicians working on 2018–2019 Sportsman 850/1000 platforms. Whether you're doing routine maintenance, diagnosing a fault code, or tackling a full engine rebuild, this manual has the factory-spec procedures to get it done right.
Submitter flyinbrian365 Submitted 06/04/2026 Category Polaris ATV
-
 By Admin
View File 2021-2026 Polaris Sportsman 450 / 570 1-Up service manual
Download the 2021-2026 Polaris Sportsman 450 / 570 1-Up service manual PDF for complete factory repair, maintenance, troubleshooting, and diagnostic procedures. This comprehensive Polaris Sportsman repair manual covers all major systems including engine service, EFI fuel injection, clutch and transmission repair, AWD drivetrain systems, suspension, steering, brakes, electrical troubleshooting, wiring diagrams, torque specifications, and factory maintenance schedules.
Designed for ATV owners, mechanics, hunters, trail riders, farmers, and DIY enthusiasts, this factory-style service manual provides detailed step-by-step instructions and diagrams for maintaining, troubleshooting, repairing, and rebuilding the Polaris Sportsman 450 H.O. and Sportsman 570 1-Up utility ATV models.
Topics covered include:
Polaris Sportsman 450 engine repair
Polaris Sportsman 570 service procedures
EFI fuel injection diagnostics
Clutch and transmission troubleshooting
AWD and differential repair
Suspension and steering maintenance
Brake system service
Electrical troubleshooting and wiring diagrams
Oil change procedures and maintenance intervals
Torque specs and factory service data
Polaris ATV diagnostic procedures
Popular related searches:
2021 Polaris Sportsman 570 service manual PDF
Polaris Sportsman 450 repair manual
Sportsman 570 wiring diagram
Polaris Sportsman torque specs
Sportsman 450 maintenance schedule
Polaris Sportsman troubleshooting guide
Polaris ATV factory service manual PDF
This Polaris factory repair manual is ideal for riders looking to maintain, troubleshoot, repair, or upgrade their Sportsman 450 or Sportsman 570 1-Up for trail riding, hunting, farming, utility work, and off-road adventures.
Submitter Admin Submitted 05/28/2026 Category Polaris ATV
-

COMMUNITY SECTIONS
ATV FORUMS
QUADCRAZY MEMBERSHIP
Be a part of best online community of ATV riders and join thousands of people who love ATVs! Share your ATV photos, videos, ATV rides, get help with your ATV and more. Not a member?

Recommended Posts
Join the conversation
You can post now and register later. If you have an account, sign in now to post with your account.
Note: Your post will require moderator approval before it will be visible.