Curtis Underwood
-
Posts
59 -
Joined
-
Last visited
-
Days Won
3
Content Type
Profiles
Forum
Gallery
ATV Magazine
Events Calendar
Downloads
Store
Community Map
Everything posted by Curtis Underwood
-

Suzuki Quadrunner 250 — Wild series of fuel problems
Curtis Underwood replied to Jd101506's topic in Suzuki ATV Forum
To start with on the fuel pump, it should have three hose connections. One is the out to carburetor, one is from fuel tank, and one is a vacuum from the crankcase. The pump has diaphragm that the vacuum from the crank case pulls back and forth to pump the fuel if these lines are not on the correct places, it will not pump correctly but can give some fuel depending on the way it is connected. After market fuel pumps may look the same but hook up different and also, they can be bad from the factory. I had one I bought on eBay that would pump with line to carb off and not pump with line on. I replaced it with another one and solved the problem. The carb that runs good with just main lining to the card is probably a good carb and the others are probably even if one is an OEM carb. Most carbs are made in China even OEM ones. My advice is to check to make sure the hook ups to the fuel pump is correct and if it is, replace the pump because that is where your problem most likely is with the carb you have mainlined, and it ran well. I have heard aftermarket stuff is junk well I have used a lot of both OEM and after market and have had problems with both. I bought a new OEM carb for a Yamaha and had nothing but problems with it so I ordered an aftermarket. When it came in it was the exact same carb with exactly the same markings as the OEM and it worked, cost less and ran well. -
1997 Yamaha Kodiak 400 - Leaked when manually moving
Curtis Underwood replied to 83BMichigan's topic in Yamaha ATV Forum
For some reason it posted before i finishe the comment and would not allow me to edit. So here is the finished comment. Those 4 wheelers all have issues with the carb needle valves which shut of the fuel to the carburetor when the carburetor bowl is full. Since you stated it was leaking from the carburetor overflow then the needle valve is not cutting it completely off. This can and does cause more problems then just fuel leaking out on the floor. It can flow back into the engine and into the oil through the rings. If this happens it will cause damage to the cylinders, main bearing and valve seals( you need to check oil and smell of it to see if oil has fuel in it). The vibration of running motor will usually cause the needle to close this is the reason they don't usually leak while running. But if you see them leaking while engine is running then the carb has to be cleaned or rebuilt. Mine leaks by the needle but I trun the pitcock valve to the off position as soon as I kill it. This prevents the overflow which in most cases only happens when you stop the engine. Those pitcok valve have orings in them that do go bad and will allow fuel to pass the pitcock. To check to see if your pitcock valve is working correctly turn it to off position and disconect fuel line to carburetor. If fuel continuously runs out, the pitcock valve is bad so you need to replace it. I have replaced carburetors on several machines because of this issue. The problem is those Chinese carburetors which is sold online and sold by OEMs are not very good. You might get one out of 3 that does not start leaking by the needle either as soon as it is put on or with in a week. Cleaning them some times will stop issue for a month or two. -
1997 Yamaha Kodiak 400 - Leaked when manually moving
Curtis Underwood replied to 83BMichigan's topic in Yamaha ATV Forum
Those 4 wheelers all have issues with the carb needle valves which shut of the fuel to the carb when the carb bowl is full. Since you stated it was leaking from the carb overflow then the needle valve is not cutting it completely off. This can and does cause more problems then just fuel leaking out on the floor. It can floof back into the engine and into the oil through the rings. If this happens it will cause damage to the cylinders, main bearing and valve seals. Mine leaks by the needle but I trun the pitcock valve to the off position as soon as I kill it. This prevents the overflow which in most cases only happens when you stop the engine. Those pitcok valve have -
Glad you got it going. Have fun.
-
Does the engine have more than the 6 wires coming from it? The engine stator usually has three wires that goes to the rectifier/regulator, one or two wires from the ignition sensor (depending on if the sensor used ground or not), and a ground wire. The neutral switch is usually only one wire unless it has a shift indicator system, that gives which gear it is in then it might have a 6 wire connector. Then on most engines you have a coil with two wires running back to the CDI. Engines usually have either 9 wires to 13 wires coming from the engine going to the atv body. Engines on early model machines have: 1. 2 coil wires one that leads from the coil to the ignition/stop switches and the other to the CDI. 2. 1 neutral safety wire that prevents the starter engaging unless the switch is closed. 3. 3 stator wires that got to the rectifier. 4. 1 ground wire from stator to body ground on atv. 5. 2 sensor wires that got to the CDI unit. Engines on later model machines depends on the type electronic display if it has any certian wire: 1. 2 coil wires one that leads from the coil to the ignition/stop switches and the other to the CDI. 2. 1 neutral safety wire that prevents the starter engaging 3. 3 stator wires that got to the rectifier. 4. 1 ground wire from stator to body ground on atv. 5. 2 sensor wires that go to the CDI unit. 6. 6 wires from the shift switch (which includes neutral safety) 7. 1 wire from the oil pressure switch (optional) 8. 1 wire from the engine temperature switch (optional) So you see how complex it can get. If you can not get a print that is color coded for your engine and one for you ATV wiring harness then you will need to trace each wire on the engine and on the ATV harness to see what it goes to then hook it up to the corrosponding wire on the ATV. There is no easy solution without the prints.
-
Frst and foremost. You will need the wiring diagrams for 250cc Zongshen engine and the 2002 Yamaha Blaster. Wiring on the engine itself has: 1. The stator/altenator wires that will connect to the your regulator/rectifier on your ATV. 2. The engine may also have a neutral safety switch wires, oil pressure switch wires and or temperature switch wires. It depends on the engine to what wiring it has. So unless you are good at identifying which wire does what. You will have to have the engine and ATV wiring diagrams. Then you if you are not real familar with electrical wiring, you should have someone that is do the connections.
-
2004 Arctic Cat 400 TRV Won't Start
Curtis Underwood replied to alexwv1863's topic in General ATV Discussion
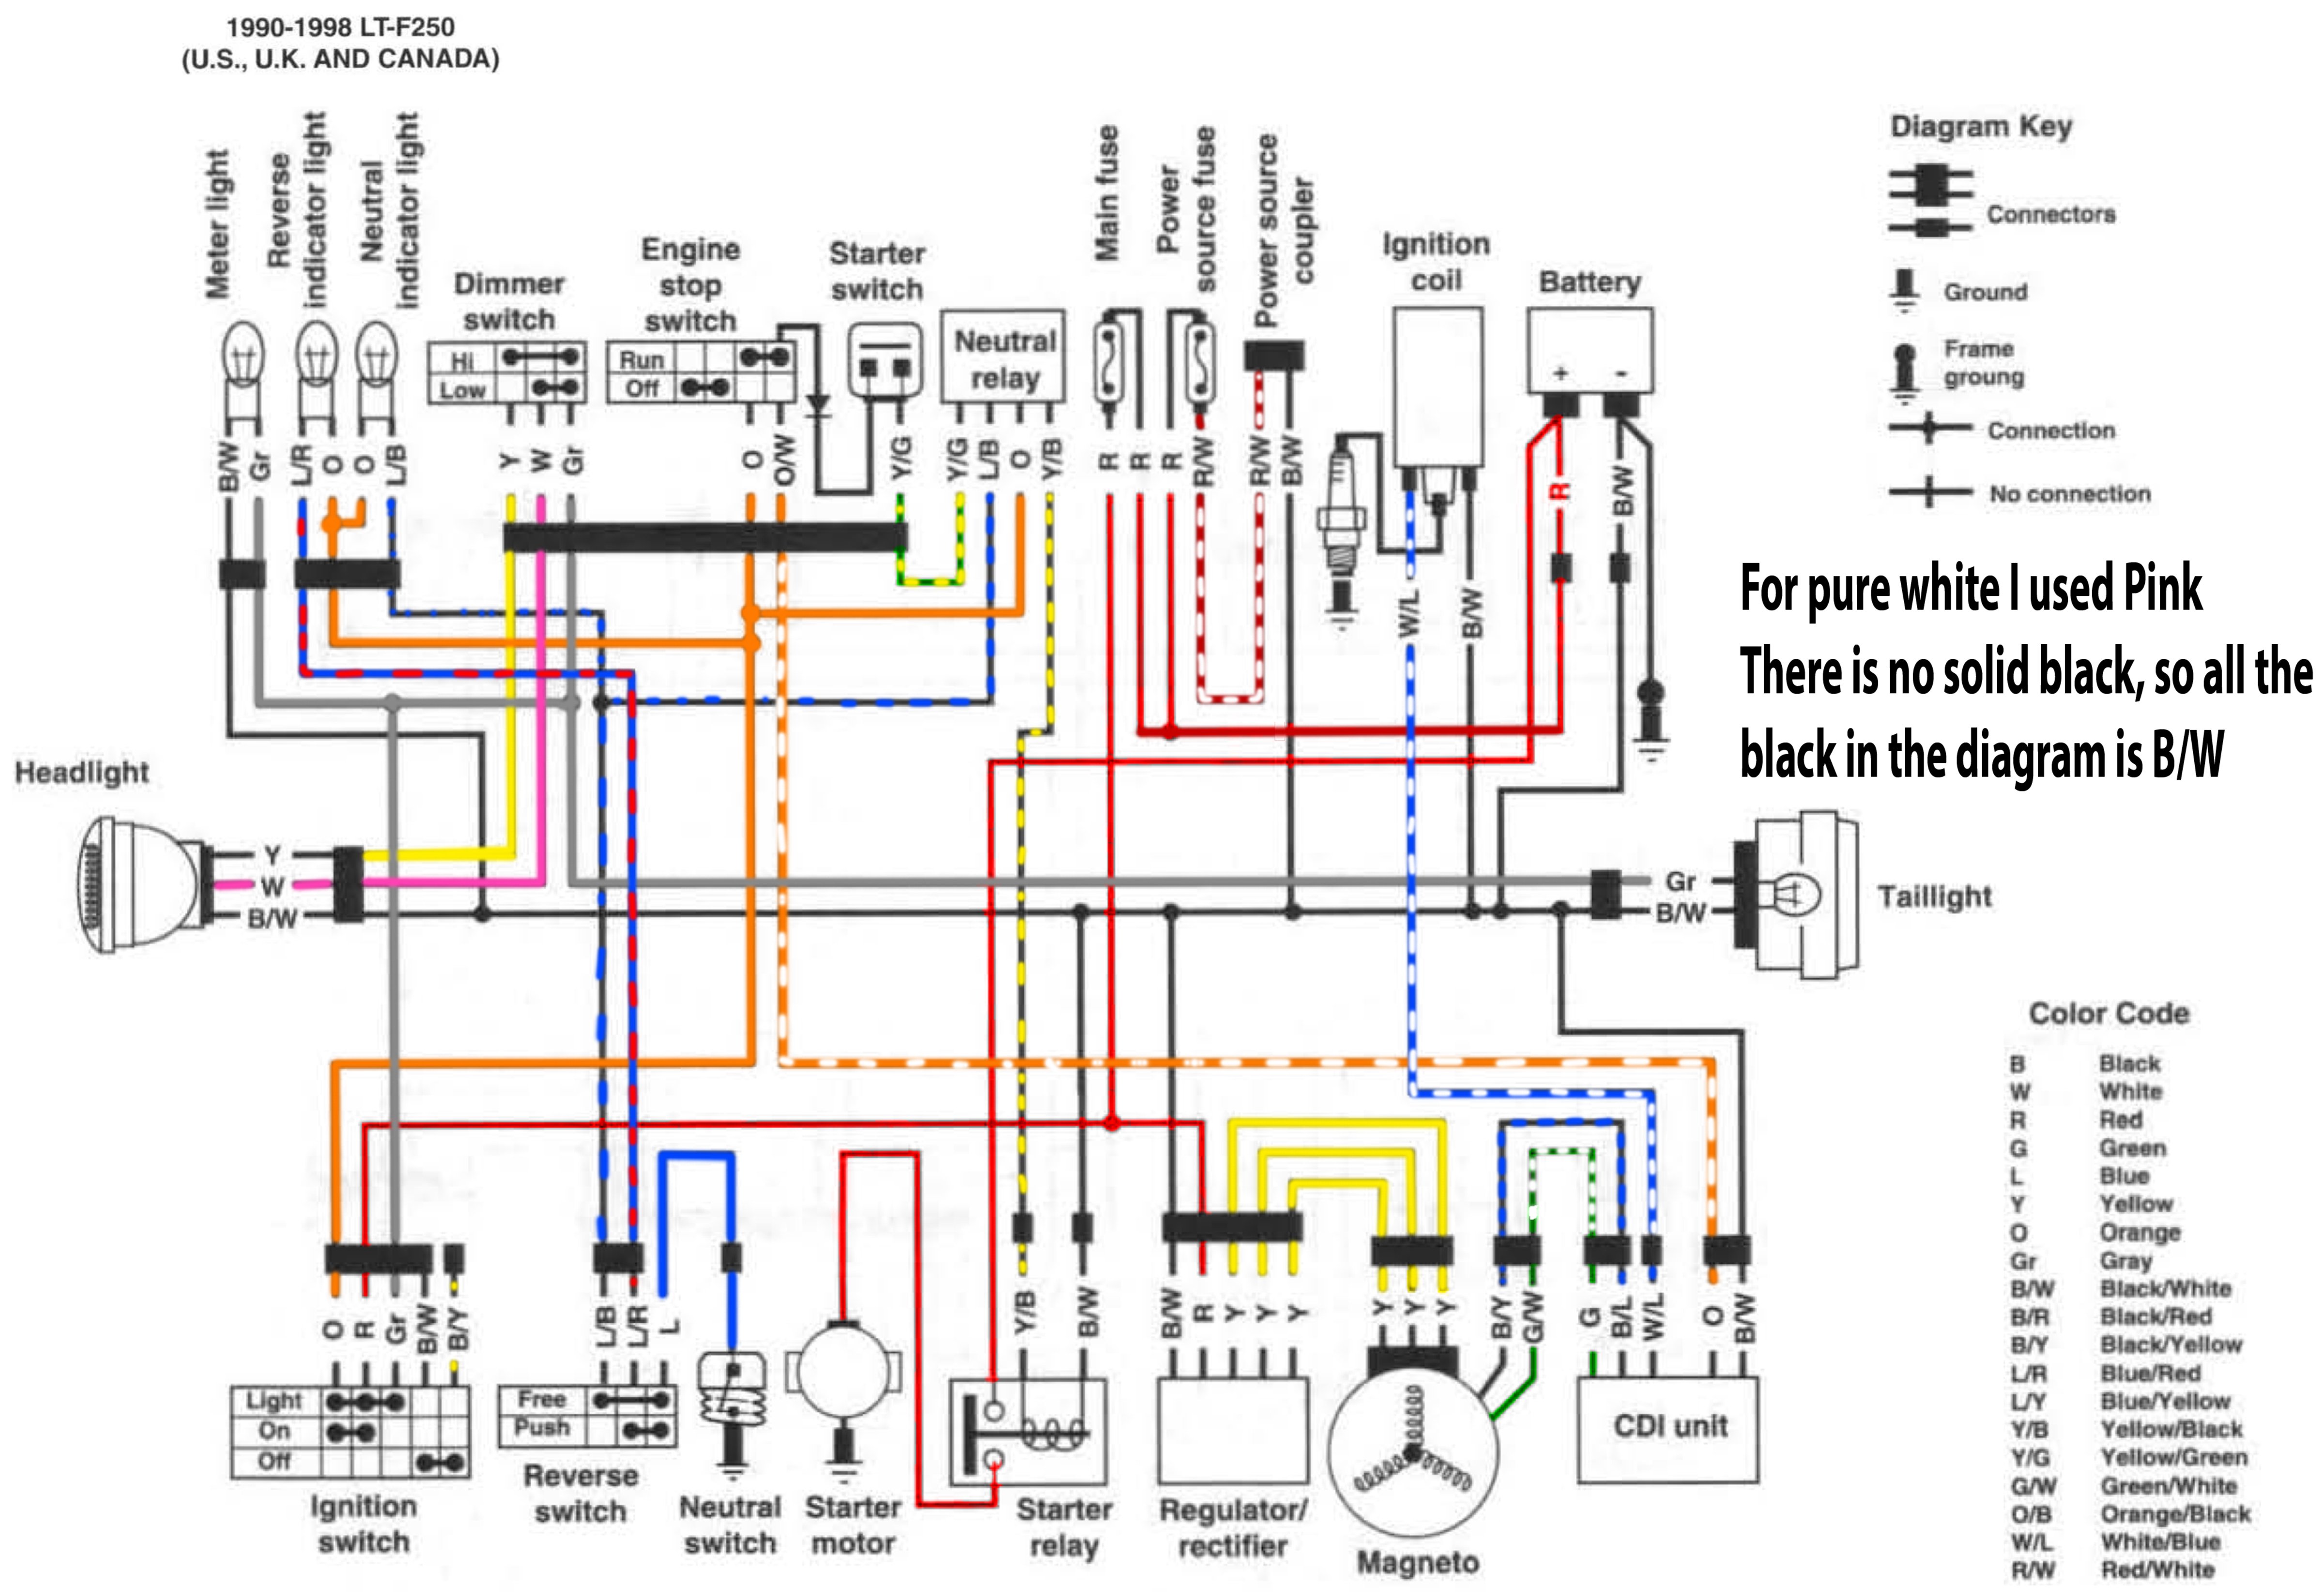
Well first thing first 😂. Lets start with standard troubleshooting. 1. Make sure battery is fully charged. 2. Drain the fuel and put new fuel in since it has been a year since you worked on it. Drain the carburetor. Fill with new fuel. 3. Check to see if it is firing by removing plug and turning it over. If it is not firing goto step 11 and if it is firing goto step 4. 4. Remove air filter and use 1 sec burst of starting fluid while turning over. If it ran for few seconds you have carburetor issues goto step 5. 5. Remove fuel line from carb use a cup to catch fuel and turn engine over to see if fuel is flowing (most artic cats have fuel pumps). If fuel is flowing goto step 9 6. Remove input line from fuel filter and turn engine over if you have fuel flow replace filter. 7. Remove fuel line that runs from tank to fuel pump. Lay the fuel hose lower than tank or use a hand pump to see if you have fuel flowing from tank(if you do it is a problem with the fuel pump). 8. The fuel pump on most of these use crankcase pressure changes to pump, if fuel pump hose to crank case is good and you turn the engine over with the tank line hooked up and no fuel flow out of the carb line then either one of two things is wrong you have a bad crankcase pressure leak or the fuel pump is bad. Replace pump and recheck. 9. Clean carburetor by removing caburetor, remove bowl, remove jets (use torch tip cleaners to clean jets out), Spray all ports and tubes with cleaner(Best to use a tank cleaner and let soak then use water to wash carb and blow out with air). 10. Put carb back together and try if it runs great but if not replace carburetor. 11. Not firing. This area get complex due to the CDI module has a lot of inputs and outputs that have to have the correct voltage for it to run. Below is a wiring diagram for a 400 Artic cat. Item 11 is the CDI module that controls the firing, Item 16 is the magneto and firing sensor, item 10 is the coil. As you can see it is complex. I could not find a decent diagram without purchasing the manual. But below is a diagram but not very readable. So if it is not firing we will have to work you throught it. -
1988 Suzuki Quad Runner 250 2x4 Won't Start. Help!
Curtis Underwood replied to alexwv1863's topic in Suzuki ATV Forum
Congrats. Getting any machine to run is an accomplishment and a learning curve. On your other machine you know now how to go about finding the problem. Trouble shooting for starting problems is the same for most ATV's and small engines. Good luck on finishing. As to the broke bolt Davefrombc is correct. -
1988 Suzuki Quad Runner 250 2x4 Won't Start. Help!
Curtis Underwood replied to alexwv1863's topic in Suzuki ATV Forum
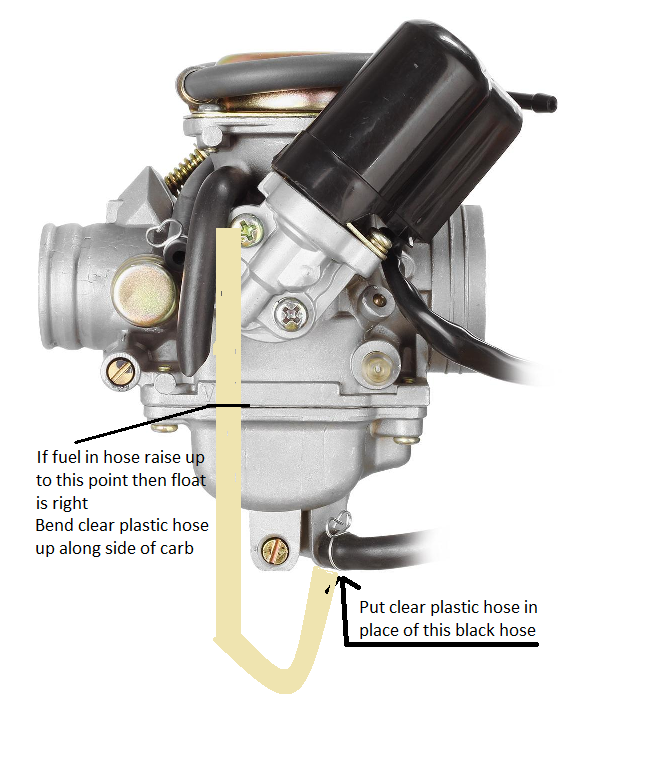
This is what I would do with a machine that has had all this done. 1. I would set the valves. 2. Recheck the time making sure the timing chain tensioner is set so that the chain is tight and timing marks line up. 3. Close off the fuel to carburetor. Drain bowl. Leave fuel Off. 4. Check the oil level and make sure it is not thin which would indicate fuel in the oil. If run with fuel in the oil several things could happen. Engine damage from lack of lubrication, fire due to fuel in oil chamber. If oil is good do the following. 5. Turn engine over spraying a small amount of starting fluid in carb and see if it starts for a few seconds. The reason for this is to ensure you have everything set correctly before actually running the engine. If it does not run a few seconds then you have a firing problem or the carburetor is not allowing fuel/air to get through the throttle air control. I have actually done this with the carb off and it would fire off for a second but that is not advisable be cause a back fire could start a fire with carb off. 6. If it runs for a few seconds then I would take a clear hose and attach to the drain port on the carburetor and run it up the side of carburetor. Open the drain screw and turn the fuel on. The clear tube will show the fuel level in the carburetor and if the float is set correctly. Below is a pic of a Honda carb showing where the fuel level should be on most all the carbs. The fuel level should never get higher than 1/8 inch above where the bowl meets the carburetor if it does then it will flood and have fuel blowing back out of carb as the video you posted showed. Most carbs use where the bowl meets carb but some are 1/8 inch higher due to the way the carb is made. So check you manual for the proper level if it is shown otherwise use the picture belows level. 7. If it shows the correct level screw the fuel drain screw in to shut it off, remove the clear hose and put the drain/overflow hose back on. 8. Start the machine it should start and run. If it does not run then you have to start finding out why and most likely will be carb problem because it ran using the starting fluid. This is how I check one that I am having problems with and I usually find the issue faster doing this. Taking short cuts by not doing a step will cause you to miss somthing and you will end up going over and over the same things and still not finding the problem.
-
1988 Suzuki Quad Runner 250 2x4 Won't Start. Help!
Curtis Underwood replied to alexwv1863's topic in Suzuki ATV Forum
If your battery on the bike is down the jumper battery may not bring the voltage up enough due to the connections, jumper battery state and wire size of the jumper cables so voltage drop may not raise up to a point of being good. The best thing to try is charging your battery, then starting it. Check and note the battery voltage before starting at the battery (should be 12.5 to 13 volts) then after it is started check the voltage again (this should be 13.5 to 14 volts at idle(just higher then the volatge noted before) and as the rpm increases this voltage should increase to a maximum of 14.5. This tells you you charging system is working. Your voltages may be slightly different as long as the voltage running is higher than the voltage with ignition off your charging system is working. Voltage readings depend on the meter you use which can differ from meter to meter so your meter may read 12.3 before starting and 13.3 running which would mean your charging system is working. -
I would like to see them going up hills and cross country. I don't know just got the feeling they will not be as good as a good old gas burner. Also what happens when they run out of juice you just can't run and get some fuel 😂
-
1988 Suzuki Quad Runner 250 2x4 Won't Start. Help!
Curtis Underwood replied to alexwv1863's topic in Suzuki ATV Forum
opps, Did not see your coment above. For some reason while I was writing my comment you last comment was not showing up. You are correct to set the valves at .06mm and .11mm Reason being to loose will cause lose of rpm and power. But to tight will cause blow backs in carburetor. But be aware of what I said above your CDI uses 12 volts and if this gets low it will make it not start or hard to start. -
Yammy and Dave may well have hit on your problem. I would like to add one thing. Checking a regulator/rectifier may check good ohming it out by the manual but be bad. I just had one on a Honda that checked good by the test methods used in the manual but was bad and would kill the battery after and hour or two. The rectifiers checked good but inside the rectifier/regulator there is 6 transistors also that control the voltage output and there is no way to check these and that is what was bad in the one I just repaired. It also had a light bar on it. I did not look into it but it may be the light bars draw more current then the rectifiers can put out and causes these regulator/rectifiers to go out.
-
1988 Suzuki Quad Runner 250 2x4 Won't Start. Help!
Curtis Underwood replied to alexwv1863's topic in Suzuki ATV Forum
I just had a Honda in for repair and found a problem that might be part of alexwv1863's problem. The honda came in with a charging problem. It would not charge the battery and would drain the battery if left connected. I started trying to figure out if the rectifier/regulator was good or bad. Lol 😂 The darn regulator checked good checking it using the method in the manual. All 6 Rectifiers checked .570 ohms forward and open reverse test. So I said must be the stator but since I am an Electronics tech I know that ohm tests do not allways prove true. I decide to check the Alternating voltage from the stator by starting the vehicle and measuring the voltage with engine running and that is when I ran into something that might be giving him a problem. You see by the time I had tested the system I had started the machine about 6 times and the battery was down to about 70 to 80% charge level(battery came in and was not full charge). Now It would not start (turned over fast) and acted just like he is describing his is doing trying and sounding like it would fire occasionally. Well I started trying to find out why the honda would not start and read the manual on what was supposed to read what on the CDI/ECM. It turns out that the CDI module on this honda has to have 12 volts supplied to it for it to fire and according to the print on alexwv1863"s machine it also has to have the 12 volts supplied. I measrued this voltage at the CDI and found it had while turning over only 9.5 volts. It stated in the manual it had to have 12.5 +- 2 volts for it to operate correctly. So it had low voltage. So I charged the battery and it started right up. I checked the voltage again at the CDI and it had 12 volts turning over and 13 volts at battery. The problem was the battery did not have high enough charge to prevent a voltage drop when the starter was turnung engine but it did show firing at the plug. I think what it was doing with the plug out was not dropping as much voltage and allowing it to fire but with the plug in the engine was harder to turn and so had a greater voltage drop. So it is possible that he has a voltage drop from his battery during turning over the engine causing it not to fire properly. BTW it turned out the rectifiers were good but the regulator part witch there is no check for in the manual, was bad so it was a bad regulator/rectifier. I proved this by checking the AC voltage from the 3 legs coming from the alternator to ground and got 37 volts AC on each leg. Then pluged in the old regulator to the stator with the battery connection disconnected at the regulator and check the DC out it had 6 volts DC output so regulator was bad. Bought a new one and fixed his problem. I am stubborn because I have to prove what is bad and why before I order parts. I am not just a part swapper. -
1988 Suzuki Quad Runner 250 2x4 Won't Start. Help!
Curtis Underwood replied to alexwv1863's topic in Suzuki ATV Forum
Davefrombc. Thank you. I have a degree in electronics and my Father was a master mechanic. I worked with him from time I was knee high to a grasshopper lol. I worked as a mechanic in service on hellicopters and then on trucks and cars for a few years. Then I decided I had enough of low pay(back then it was low) so I went into Industrial electronic. I am retired now, got burnt out doing electronic repair, 45 years of it is way to long and have a hobby that is trying to turn into a business of working on small engines. These electrical prints, ECM/CDI electronics are simple on small engines though the manufactures are tring to make them complex so shade tree mechanics can not work on them. I started out just doing some work on friends mowers and Atvs. I have never advertized but now have about 75 - 85 people that use me to repair everything, mowers, Atvs, motorcycles and Boats. But I draw the line and work only on smaller engines. I have had people wanting me to work on Trucks and cars because they know I know how but I am to darn old to do all the crawling around on them. As for parts and manuals I use the internet to hunt down what i need and sometimes I have to purchase those manuals. -
1988 Suzuki Quad Runner 250 2x4 Won't Start. Help!
Curtis Underwood replied to alexwv1863's topic in Suzuki ATV Forum
The timing chain has no marks on it and it does not matter how the chain itself is placed on the cogs. The timing chain being tight is not a sign that it is not bad or worn. You have a timing chain tensioner that tighens the chain this will have to be losened to make adjustments or to check the amount of wear on the chain. Consult the manul on how to check the chain. The marks on the cam cog, if there is two one on each side of the cam shaft or cog is the timing marks like so -o- they need to be aligned with them horizotal head or it could be just one mark and that would be aligned with a mark on the head. There is a small plug cover on the engine that is used to put the crank shaft into the correct position. You need to read the manual on the proper way to check the time. Different atvs use different markings on the crank and cam. Also you need to make sure it is on the proper stroke they can be set 180 degress out. The manual will give you the instructions on checking/setting the time. Those bolts being rusted is not that great a problem unless they are weakened where they would break. I would probably just clean them up good. I gave general information because it will be a day or so before I can check the manual and give you specifics. I am dealing with some personal family medical issues so when I can I will get back to you. -
91 trailboss grinds in engaging gears some times
Curtis Underwood replied to 97s-dime's topic in Polaris ATV Forum
If I remember correctly the Trail boss has a clutch adjustment. If it is set to tight it will cause it to grind. If it is not the clutch setting the you may have some bad syncronizers. If that is the case then the transmission would have to be repaired. -
1988 Suzuki Quad Runner 250 2x4 Won't Start. Help!
Curtis Underwood replied to alexwv1863's topic in Suzuki ATV Forum
I think this sounds like it is flooding. The fuel air mixture has to be right for it to run. Flooding can be caused by the wrong Idle jet, the float set wrong and/or the float needle not shuting fuel flow off. Try turning the fuel off and empty the bowl of fuel. Then check the plug and make sure it is not wet and is still firing. Then with plug out turn engine over to help remove any fuel still in the cylinder. Then Put spark plug back in. Do not turn fuel on. Take your starting fluid and spray for about 1 second into carb throat do this whille turning engine over it should start and run for a few seconds. I it doen't then you either have the valves to tight or it is out of time. -
1988 Suzuki Quad Runner 250 2x4 Won't Start. Help!
Curtis Underwood replied to alexwv1863's topic in Suzuki ATV Forum
There is one other thing you need to check. The rubber boot that the carb mounts to. that mounts to the intake on the head. Check and make sure there is no cracks in that boot. I have had them crack on older machines and allow more air flow which changes the mixture. -
1988 Suzuki Quad Runner 250 2x4 Won't Start. Help!
Curtis Underwood replied to alexwv1863's topic in Suzuki ATV Forum
If it is getting fire as you have indicated. Then davefrombc is correct. I would start with chapter 5 and go through the carb. Then I would go to chapter 3-3 page 40 and back the idle stop screw out so it is set at minimum idle(this screw forces the throttle needle up giving it more fuel when screwed in (this changes the amount of fuel it gets at idle). Then I would go to 3-3 page 41 and make sure the free play is correct. If this is set to tight it can open the throttle and since these start best at idle it could cause it not to start. This carbs air fuel mixture is set by gently screwing the pilot air needle all the way in(gently Do not tighten it will damage the needle) and factory setting is to back out 1 1/2 rounds. That is what the manual calls for. This sets the air not the fuel. What this pilot air needle adjustment does is to allow the correct amount of air for the amount of fuel that is being sucked through the idle jet(the only way to change the amount of fuel going throught the idle jet is to change the size of the jet, so the air is adjusted for proper mixture). Make sure you check the throttle valve needle this is what allows fuel for higher speeds(if it is not set correctly or is damaged it will allow fuel to pass at idle causing to rich of a mixture that can not be adjusted out using the Pilot air valve). On most ATV carburetor the Throttle needle has small cut out rings or slots that a clip fits into that is used to set the air fuel mixture when machine is running above idle. I do not know where the old carbs throttle needle was set at but the new carb needs to be set at what old carbs needle was set to. Also is the new carburetor a Original engineerd manufacturer (OEM) carb or is it one you bought that says it is a replacement carb? The problem with carbs that are not OEM is they most of the time are not set for the size ATV your buying for. These are made to replace a lot of different carbs for different size ATVs. Most of the time they are set mid range and have to be adjusted for each ATV. I have run upon some of these cheaper carbs that can not be adjusted to run correctly. I tried everything including using the old jets, setting the throttle needle to the setting of the OEM etc. When I run upon one that I can not get to set correctly I send it back and order from different manufacturer. One example is my own Yamaha 350. I had a float sticking causing it to flood. So I sent for a new carb off of Ebay. I tried everything. Oh I could get it to idle but not rev all the way and could not get the power it should have had. So I ended up finding a used carb off a 350 and rebuilding it. My old carb had a nonreplaceable seat for the float valve so I had no choice but to replace the carb. The new carb is still setting in a box with a lot of old carbs that I use for parts(the warranty ran out even before the carb came in) warranty starts the second you pay for it and if it takes 4 weeks to get it in then it is out of warranty. So 45$ wasted. -
1988 Suzuki Quad Runner 250 2x4 Won't Start. Help!
Curtis Underwood replied to alexwv1863's topic in Suzuki ATV Forum
Mech is correct. Answer these questions. When you lay the plug against the head with it removed and turn the engine over do you see a sparking as the engine turns over? Is the spark from the Plug's anoid(Center of ceramic) to the ground point. When you remove the plug after trying to start it, does the plug look black, brown, gray or wet? The color of the plug tells a lot. Here is a link that gives pictures of what to look for when inspecting spark plugs. https://besthomegear.com/how-to-read-a-spark-plug/ -
1988 Suzuki Quad Runner 250 2x4 Won't Start. Help!
Curtis Underwood replied to alexwv1863's topic in Suzuki ATV Forum
It sounds like it is not firing correctly. You need to get the service manual on it and follow the ignition check procedure. It could be anything from the Capcitive Discharge Ignition(CDI module), coil, sparkplug, Timing, valves setting, switches, Stator sensor or wiring. -
1988 Suzuki Quad Runner 250 2x4 Won't Start. Help!
Curtis Underwood replied to alexwv1863's topic in Suzuki ATV Forum
What I do is take a can of starting fluid and spray a little in the carb and turn it over if it starts running for a few seconds then it is in your fuel or carburetor. If it only backfires and does not run a little for a short time then it is in your ignition system. The carb, fuel line, fuel filter or tank could be stopping fuel flow. Air fuel misture is also important. Tis ingnition appears to kill the ignition by turning off the 12 volts to the CDI where most turn CDI off by grounding it. Hear is a print. That shows you the electrical and how it is wired. if you are getting 12 volts to the cdi on the orange/white lead and it is not firing then you have a bad CDI or you have a bad coil.
-
Timing on a 1988 suzuki quadrunner lt4wd 250
Curtis Underwood replied to timberwolf357's topic in Suzuki ATV Forum
Since they show from what you say then it is in time. -
Timing on a 1988 suzuki quadrunner lt4wd 250
Curtis Underwood replied to timberwolf357's topic in Suzuki ATV Forum
Not easy to set timing without the bottom cover and cam covers off but yes I have done it before. I do no recoment doing this because you might or might not get it right. First determine if the timing is off by lining the marks up. If they are off in either direction by one or more cam shaft chain links then it is out of time. You then determine witch way you need to move the timing and turn the crank until the marks on the crank lines up. Remove the timing chain tensioner so you have slack in the timing chain. Remove the cam sprocket slip chain over sprocket until marks line up while keeping the chain tight on the side opposite of the tensioner side then turn the cam to the position where the sprocket will line up with cam and mount sprocket back to cam then replace tensioner(The tensoiner can affect the time when setting if your chain is worn) and check to make sure it is in time. Repeat this if it is not in time. Like I said it is not easy to do. There is many things that can cause this other than timing. 1. Fuel air mixture is off. Bad or misadjusted carb. 2. Valves set to tight. 3 Airfilter not connected (has to be installed for machine to run correctly.) 4. Bad spark plug 5. Bad coil (not firing hot enough) 6. Bad CDI module (Ignition module) 7. Timing off one notch. 8. Stator ignition sensor not positioned in correct position(most unlikely unless an after market stator was used and it positioned wrong from factory) 9. Cam worn not opening valves enough. 10 Exaust system clogged not allowing proper exaust. 11 low compression. So understand it is hard to say just what the problem is so trial and error is the only method you have of detemining what the probelm is.