Curtis Underwood
-
Posts
59 -
Joined
-
Last visited
-
Days Won
3
Content Type
Profiles
Forum
Gallery
ATV Magazine
Events Calendar
Downloads
Store
Community Map
Everything posted by Curtis Underwood
-

Yongkang ATV Fixer upperer
Curtis Underwood replied to Kirsty's topic in Kids ATVs and Youth Off-Road
The manual does not have good set of electrical prints so here is what I used it is for a Tao-rhyno witch is one of these chinese made vehicles that is hard to find stuff on because they do not have serial or model numbers. The manual and print may not be exact but it is basically the same set up so wiring colors/numbers may be different.
-
Yongkang ATV Fixer upperer
Curtis Underwood replied to Kirsty's topic in Kids ATVs and Youth Off-Road
I had one simular to that one and not you can not find much on them But I was able to find an a manual on a 250 chinese made that I was told was basics for these cheap machines. 250.pdf -
Matman is correct about the rings one way to tell is if the ring on the outside edge has a beveled egdge if it is does this beleveled edge goes up otherwise you will have excessive wear on the cylinder wall(if it does not it does not matter which direction goes up this is usually on cheaper engines though). You need to dress the cylinder wall with a cylinder facing hone. This breaks the glase and allows the rings to seat. You will hear of people saying to use gasket maker on the head gasket don't just make sure head and cylinder is clean I use a very fine grit sand papper 1000 grit to clean it. As to #2 yes the intake valve can cause blowback(stop sucking thruogh the carb. If it is adjusted to tight then there will be blowback. Some other thing that can cause blowback is carb running to lean or to rich, timing is off a little and the ignition system having an issue with stator or sensor.
-
1997 Polaris xplorer 500 bogging and popping out of carb
Curtis Underwood replied to spr203's topic in Polaris ATV Forum
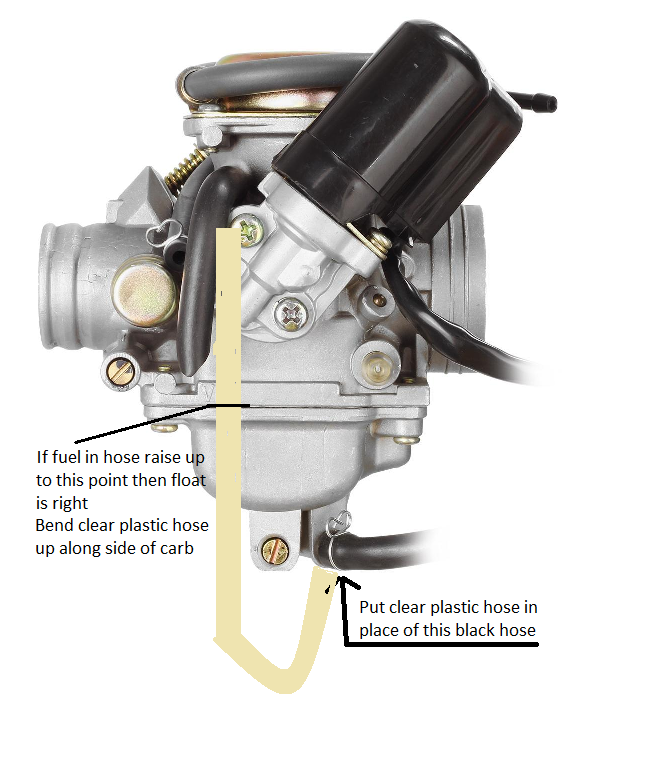
Mech you might be interested in what I meant to say and did not because I got side tracked about then by my wife lol, it was in the comment I made with the picture showing the setting of the float by use of a clear tube. That you can leave the drain open and actually see the fuel level in the tube that represents the level in the bowl with machine running. What I usually do is put a clear hose on and use a wire tie on tube to make it so it stays in the rasied position and check the float level then I start the machine and watch the level in the tube if running at full rpm it does not drop lower than about 1/8 to 1/4 inch then all is well with the float and fuel supply. I got this from some manual or from someone online don't remember which and it said that it could be used to see the level while machine is running. -
1997 Polaris xplorer 500 bogging and popping out of carb
Curtis Underwood replied to spr203's topic in Polaris ATV Forum
Mech I agree with you we need the history of the machine it will tell us a lot. I agree it could be to lean of a mixture. But from experience I don't think it is with him saying he has moved the c-clip. Moving the clip to a notch above moves the needle down which give it less fuel and moving the clip to a notch below moves the needle up which makes it richer. So sounds like he has tried doing both with no or little effect. It could be just a bad carb too that has something wrong from the factory. -
1997 Polaris xplorer 500 bogging and popping out of carb
Curtis Underwood replied to spr203's topic in Polaris ATV Forum
We most of the time think that this is going to be one problem when it can very well be a combination of problems. I had a 350 yamaha come in several years ago. It would not start. So I used some starting fluid and it ran for a few seconds. This told me it was a carb or fuel issue. I cleaned the carburetor, replaced the fuel filter, and drained and cleaned the tank. It started up and idled good but blew back and back fired or popped. I found the timing chain off by one knotch on this machine that was causing the problem too. So you could have several issues at the same time causing this. It is not very often that you have multible issues causing same problem but it happens. Mech way is a good way to check flow from pump. But if you have a full bowl using the check I showed (if the bowl is full when you start the engine and revve it as soon as it starts it should revve correctly until the fuel in the bowl is used) if it does not rev up to full rpm then it is not fuel flow problem. He also had a another good thought and that was the exaust system is blocked. The muffler can build up with carbon and stop up. Some mufflers have a tube with holes in it that the exuast passes through and these can stop up with carbon. What we have not metioned is fuel filters. Some fuel systems have a filter or screen in them at a on/off fuel valve in the tank which valve has to be removed to clean or replace, an inline filter or on the carb that has a valve built into it with a filter. If you do not get good flow replace the filter or clean it. Filters can restrict the flow to a point that it will not run at high RPM after a short time. From what you have said I do not think it is a fuel flow problem. What I think is it is going to end up being is either as Mech said the jets in the carb is the wrong size , the intake rubber adapter from head to carb has a leak, the carb has some tube where fuel flows that has stopped up, intake or exaust valves leaking by or low compression. The problem is we are not there and can only guess and say what we have run upon. -
1997 Polaris xplorer 500 bogging and popping out of carb
Curtis Underwood replied to spr203's topic in Polaris ATV Forum
That machine I told you about that had a valve problem idled good but because of the valves were sticky, when it was revved up it would blow back and had a loss of power. Without being there there is no real way to tell. All we can do is to tell you what we have run up on. Since Mech said to check to see if enough fuel is getting to carb then the best way is to put a clear plastic hose on the overflow line and open the drain plug some. Hold the plastic hose up along side of he carb and if the fuel comes up to where the bowl meets the carb then the float is set right and you have plenty of fuel getting to the carb. As Mech said if it is an after market carb it could very well be the jet sizes. Take the jets out of your old carb and get a set of torch tip cleaners (start with the smallest tip cleaner and go up in sizes until you get one that will not fit threw the jet) and this is to make sure it has no build up in them. This is only way I have found to make sure a jet is fully open. Then set the c clip to the same point as the c clip is set on the old carb needle. I have found in most cases the needles are the same lenght and size as the original.
-
2003 Polaris Sportsman 500 no start help
Curtis Underwood replied to Wilkechr's topic in Polaris ATV Forum
What I do when one will not start at all is to take the air filter off and use a little starting fluid to see if it will run at all. With starting fluid it should crank and run for a few seconds if it has compression, the timing is correct and it is firing. If it does not start this way then it is not a fuel problem because the starting fluid is easier to burn. If it does not start at all using starting fluid then you will probably need a service manual. You can not check the firing with a volt meter. The cdi output to the coil is to fast to read. You will just see a slight increase/decrease or jump on the meter. If you take a known good spark plug and plug plug wire to it and put the base of plug against ground(I use a ground wire and aligator clip to ground plug) then turn engine over and see a good spark then it is firing. If it is firing then I would check compression, valve settings and make sure valves are opening/closing properly and not sticking. The timing also could be the problem, It could have jumped time. After the machine has been run this many years the timing chain may have become worn and let it jump time. If you have a service manual it will tell you how to propery check the time. Other wise you will be trying to check time using someone elses methods and this does not always work, but if you use the method in the manual you will be assured of it being correct. -
1997 Polaris xplorer 500 bogging and popping out of carb
Curtis Underwood replied to spr203's topic in Polaris ATV Forum
The problem with these carburators you get as replacement is they are set for a certain machine size and if you use them on a larger or smaller machine they have to be reset. I have used these and on a couple of machines not been able to get them to adjust to where machine would run good. but I was able to get the backfiring/popping/blowback to stop just could not get full power at same time. It could be it is just the carb with something that will not let it work on your machine. If there is not an air leak I suspect since you have changed the c clip settings with little change in blow back that you have a valve sticking problem or a vlave that is not closing all the way. When the cylinder comes up on compression stroke if the intake valve leaks by it will cause blow back and you will have that backfire popping sound. I worked on a Honda 650 (now it was not a two cycle engine) but it had this backfiring or popping/blow back problem. I tried everything from a new carb (OEM to new igintion modules, coils, plugs etc.) Then someone metioned valves again and I had set them but I went back and did a check and found the intake valve was sticking and not closing all the way. I took a hammer handle pust valve in to force it to open and release it and watched it as it closed. It did not just spring back fast it close but seamed slower. So I pulled the heads and removed the valves. I found carbon build up on valve stims causing the valves to bind(almost did not get them out of head because of the build up). I cleaned the stims and bushings in the head, ground the valves and put new set of seals on it. Then because I had it tore down I went ahead and replaced the piston rings. I put it all back together and made sure timing was on, valves were set to specs, and it started and ran perfect. So your valves sounds like they may be sticking or maybe even have a burnt valve. -
1997 Polaris xplorer 500 bogging and popping out of carb
Curtis Underwood replied to spr203's topic in Polaris ATV Forum
First question did you buy new carb from OEM or just one off ebay that is a replacement? If it is just one off ebay then lower or raise the needle by one notch this sets the air/fuel mixture. The repacements carbs that are no OEM are sold for machines that vary in size. I bought one for a 450 cc and it said it fit 250cc through 650. It did same thing as you discribe so I justed the needle in the carb up and down until I found best running position. But carb never ran perfect on that machine, So put it on a 350 machine and it ran great, so I went back and bought OEM and it fixed problem. Second thing that does cause this is the rubber intaker manifold beteween carburetor and head. If it has a air leak it can cause this to happen. They often crack and the crack is hard to see, slightly twisting them some times show the crack. Even if the valves are adjusted to specs sometimes you have to losen them by a thousandth. The valve specs give a range adjust to highest of the range on the intake. Also if the valves are sticking and not moving open and closed freely it can cause this. Any valve problem can cause it to act like the timing is off. Next check to make sure it is in Time. The air cleaner has to be on these small engine for them to run properly. -
2004 Arctic Cat 400 very hard start random dies
Curtis Underwood replied to Chad Dickerson's topic in Arctic Cat ATV Forum
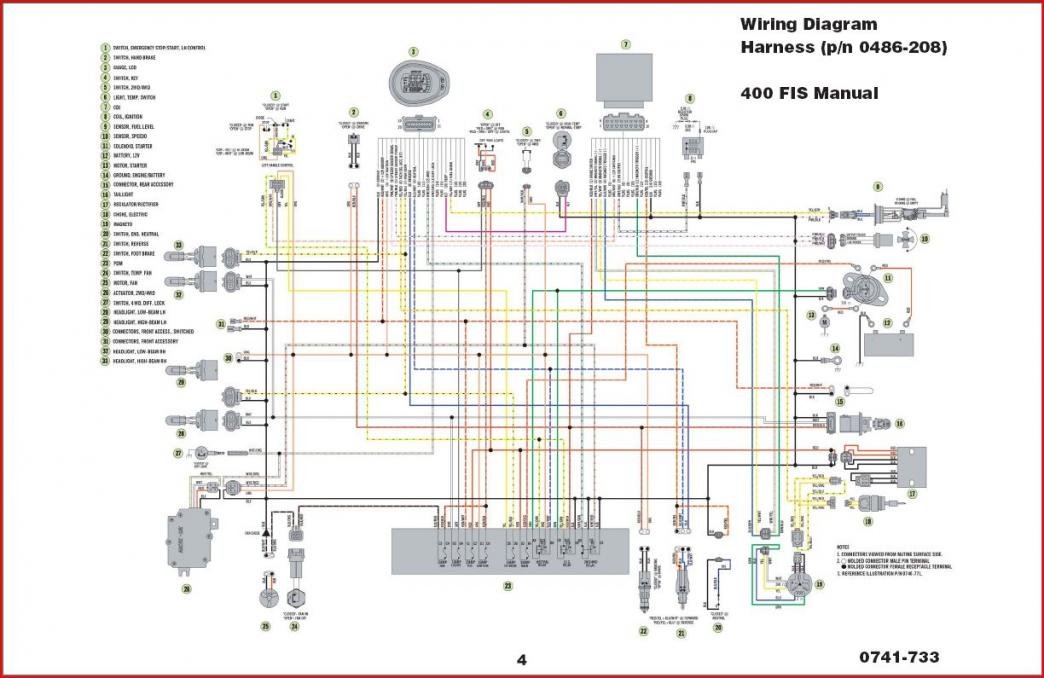
With a firing problem that is difficult to find, you will need a good meter and the electrical prints even if you have to buy them. The problem with trouble shooting without prints is you either have to follow the suspected wires from one point to another so you will know what connectors it goes thru, switches it goes to, and componets it hooks to and these wires are bundled with other wires of the same or close colors. A print will indicate connector, switches and other comonets such as cdi and coil.The problem is the cdi is powered from the ignition portion of the stator The first thing I check is the CDI voltages and cdi kill volatge which is only grounded in kill mode. If any of these are intermittent during this misfiring then you have to trace it back to where your losing the connection. It will be either the cdi unit, safety switches, on/off switch on handle bar, Main switch or wiring connectors causing issues like this to happen. Here is a not so good diagram of a 2004 400 articat. So as you can see this is a complex wiring system that without a correct wiring diagram it is next to impossible to troubleshoot. The firing is controled by the CDI but the Cdi gets it signals from the stator, sensors thruogh switches ets. You might print this out and have a better view of it.
-
opps mistyped the type wire used it should be 5356 aluminum wire.
-
It migtht be as Dave says frustrating but I have done it before on aluminum parts but I did have the tools to do it with. I never said you could weld it without using a welder with argon gas, 3656 aluminum wire and a size bigger wire tip then called for for that wire size( BTW these are oldtimer tips bigger tip allows expansion of wire and 3656 is stiffer then what is recominded for wire welders). As to grinding that all depends on your grinding rocks. You can clean the rocks by grinding metal or using a brush. But as Dave said get the engine running before you spend time on repairing anything you don't have to, to run the engine. Also make sure the transmission shaft is not binded up in some way, and rear end is not locked up and is not binded up in some way. The problem is you do not know for sure why it was parked in the first place. It could have been something simple or it could have been something major like the engine smoking, tranmission striped out or rear end bad. For an example I had a 2014 Honda 450 brought to me to repair. The customer bought it from someone else that said it only needed carb cleaned. I first drained the fuel that was in it becaused it smelled old and put new fuel in it. Then I tried starting(it had just enough power to energize the electroinc display). I put one of mine on it, whille I put it on charger which found out it was bad. I starter trying to start the motor and it started up after using starting fluid. Motor ran but was missing some. Then I tried it in reverse and wow sounded like it was coming apart. Ended up having a broke rear axle, bad worm gear and all the bearings in the rear end bad. So rear end had to be rebuilt since I could not find a good used one. It cost him around 650$ parts and labor, Axle cost 60$, the gears cost 100$, the bearings 4 of them 30$ each, seal gasket kit 75$ and new baatttery 70$. I got it runing good and everything working. He rode it for about two months and brought it back. It had quit shifting using the electric shift so I adjusted clutch first thing and it worked but not as it should. I checked solenoid, shift mechanism and greased them but this did not help. It turns out it was in the synchronizers that was worn. The estimated cost to repair this was around 800$ because engine had to be pulled and disassembled and transmission rebuilt, he decide to use the foot shifter lol. The reason I told you this is you can get into more then the 4x4 is worth real fast. I have two I got in trades setting here right now that even though I could repair them it would cost more then they are worth. so check it out good before putting any real money in it.
-
The belt is bad period. Look at third pic down about a 1/4th way from top and you will see gray area on the right side of the belt this I think is a narrower width than the rest of the belt. The width for the belt should be the same all the way around the belt if it isn't it will cause a large vibration. This indicates the engines was running at some point with the driven side not turning and wearing the belt down at that point. The picture of the wiring is about usual for an older bike or one that has been setting up a while. For the wiring I would first pressure wash the bike including the wiring but disconnect battery first. Then inspect the wiring for chewed or broke wires. Unplug each connector and insure they are clean and have the electrical lubrication still in them. If they do no need of anything else. If they are corroded or dirty then use electricaal cleaner to clean and get a tube of electrical lube to use in the connector. Then if you have problems with electrical get the service manual for the bike they will have electrical prints in them.
-
One thing if you have a machine shop buddy or one that would not charge you much they can build them up and balance then for might be cheaper then buying some.?
-
If you build weld up and grind it back down to the same size it was it should be pretty close but if you have vibration from them you can balance them it by spining them up on a lathe. This is what i would do. I would weld them up and grind then sand them smooth to original shape and size. Then I would take them to a machine shop friend and we would spin them up and if it the vibrated we would use tap die ink on a stick ands just barely touch them as it is spinning. Where the ink shows is the heavy side so take a little off at a time until balence is achieved.
-
After looking at the pics and reading the discussion there is a way to save these clutch assemblies. That is by welding or brassing the real bad areas and grinding/sanding them back down to smooth(any roughness or pits will wear a belt out fast). This could save you money. As to the case it is about 1/4 " thick at it's thinnest area. I would clean it real good and use JB weld in the areas that have deep pits to help prevent any futher damage. As to the belt that there is no picture I can only say that if it is just weathered then you could try some Renue, Rejuvenate and Restore Rubber Belt chemicals (I have never used any but have heard of others using it with varing results) other then that there is nothing much you can do but replace it. I have worked on these machines and had them torn all way down to repair transmission, so as long as there is no oil leaking from the case your good. But it does not need to corrode any further.
-
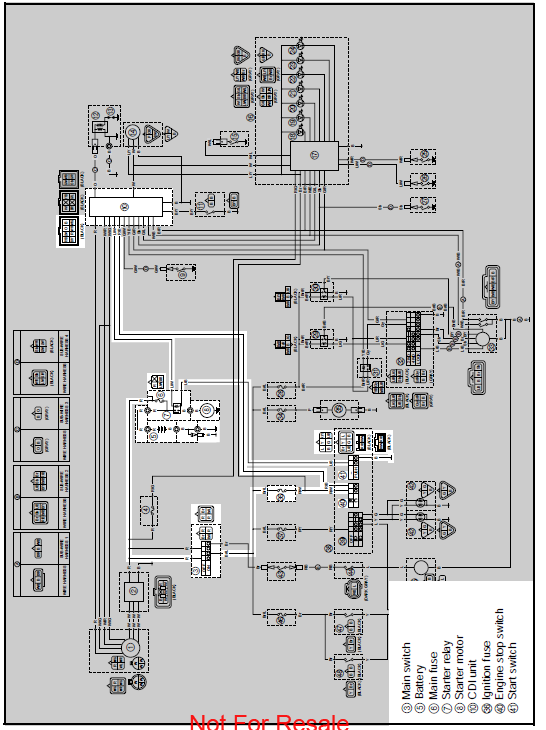
I downloaded it and it is a complete service manual. It does have the electrical prints. I work on different types of 4 wheelers so I will put this one in my saved files. If you need help, I will help as best I can. Here is an electrical print from the manual. The white area is the ignition and start system. This manual has the prints separated into sections for the area you are troubleshooting.
-
Suzuki ltr450 trouble with getting it to start
Curtis Underwood replied to Peck's topic in Suzuki ATV Forum
Here is a guide I use to find out just where to start looking. The first thing I do spray a small amount of starting fluid in carb and turn over if it starts and run for a few seconds then ignition system is good. If it dies right out then you have one of several things wrong. Remove fuel line from carb and turn on fuel valve if you have fuel flow out of the line, then it is in the carburetor. Remove carburetor and clean. When you remove the carb bowl look at the needle vale and see if it moves when the float moves it it does not then it is a stuck needle and the carburetor will most likely have to be rebuilt or replaced but if it moves a good cleaning might fix it. If spraying starting fluid did not give a short engine start then the ignition system is the problem. Chek in this order. 1. Spark plug (I usually replace it) 2. Check coil using the service manual procedures. 3. Check ignition switch (have had a few of them not open the kill contact when it is turned on) 4. There could be a wiring problem with the kill portion of the wiring. What I do is goto the CDI and find out which wire grounds out to kill it and check to make sure it is not grounded with the switch on. There is on some machines a safety kill switch on the handlebar this also can short out causing it not to start (witch is a part of the kill grounding circuit.). Last thing is to replace the CDI unit. -
I have worked on so many of these carbs it is not even funny. There is a list of things that I go by to find the and fix the issue. 1. Clean the carb 2. Check for air leaks at intake manifold (if it is rubber metal ended, found a lot of them that you cannot see unless you slightly twist the manifold and then you will see crack if it has one) 3. Float valve 4. Ignition system 5. Air filter system (has to have the air filter in place for carb to function correctly). 6. Check engine valves clearances both intake and exhaust 7. Check compression Your problem sound to me like you have a faulty float valve or the Oring under the valve seat is leaking by. The easiest way to find out is with the carb off. Hook the fuel line up. Hold the carb level and turn the petcock on. Hold it in the level position for at least two minutes. If any fuel comes out of carb, then the float is leaking by. As to the fuel blow back when the carb is on without the air filter on it you will have some at full throttle but should not have any at mid throttle. This indicate the fuel mixture is a little too rich, but I have found on some carbs the machine will not run at full RPM without having a little. I do not rebuild any carb that has a float valve problem. The main reason is the rebuild kits are not specifically for that carb. They are always for several different carbs and says they will work on that machine. But I have found they are not exact. Best to buy new carb from OEM for the machine. I know the OEM are more expensive but you get what you pay for. I think I went through buying about 3 carbs for my Yamaha before biting the bullet and getting one from Yamaha. The ones they sell online for cheap price most likely will not be setup for your machine. If you notice in what they will fit is a range of different size machines.
-
1986 Kawasaki Bayou 300 No Power
Curtis Underwood replied to Nickpeterkin1981's topic in Kawasaki ATV Forum
Most have a fuse in the lead coming from the battery going to the main on off switch or it sometime on to the starter solenoid. If you have an operators manual or service manual it will have it listed and show you it's location. If this is good you will have to check the main on of switch. If this fuse or main switch is bad you will not have any power to anything. -
2006 Kawasaki Bayou 250 Chain Replacement
Curtis Underwood replied to Wil's topic in Kawasaki ATV Forum
The cam sprocket has to be put on the cam with the chain on the sprocket. You have to put chain on sprocket then put sprocket on the cam. Make sure to set your timing according to the service manual. Also the tensioner has to be off the engine. These chains are made to fit almost perfectly with very little chain for the take tensioner to take up. -
I bought a Everstart Max from Walmart. Think it was 39$. It does the job but like I said if the battery gets too low on voltage, instead of recharging it will try to recover it. What I do when this happens and I know the battery is ok I use my old charger to fully charge it. Then I will let battery set for a day then put the conditioner on it and if something is wrong then I let the reconditioner stay on it for 24 hrs then recharge and test it again. If the battery is solidified it will lose charge pretty fast just sitting on a table.
-
Is there any blow back at filter(popping, backfiring, coughing, spitting fuel back etc?)?. If There is you need to check valve clearances to make sure they are correct. You then need to clean the carburetor. The second thing to check is the ignition system. I have run upon the following that causes the plugs to fowl out. 1. Bad fuel system or carburetor. Example had a Honda fowling plugs, coughing with reduced power and otherwise ran ok. I replaced the carb and it still did same thing and worse. So I took old carb apart cleaned it and adjusted it by the manual. I put it back on and machine ran good. So do not think because you buy a new carb it will always be a good one, especially these after market carbs. 2. Valves. I had one machine that backfired when you let off the accelerator, fowled out the plugs etc. The valves were to tight causing this. 3. Ignition system. Coils, CDI modules and ignition stators can be bad causing the plug not to fire hot enough. This will cause plug fowling. Had a running machine with a CDI module that was bad causing it to run a while then it would get hard to start. I removed plug and it was partially fowled out(it was still firing but not 100% so it was hard starting. I also had a machine that had a resistive ground that caused the ignition not to fire hot enough. 4. Engine cylinder compression. If the cylinder compression is low it will also cause plug fowling. There is many many thing that can cause plug fowling. Hope this info helps you find your problem. There is in the service manuals a troubleshooting guide that will help you locate the probable cause. I suggest you get a service manual and read it. Even though I am familiar with ATVs I always get a service manual when the problem is more then just a bad switch or lose wire.
-
HI, I am by no means an expert but sounds like you have to rich fuel mixture. Three things can cause this, Air filter clogged, Carburetor fuel air mixture set wrong or float sticking. Adjustments will depend on the which ATV you have and you will need the service manual to adjust it correctly.