Gwbarm
-
Posts
3,177 -
Joined
-
Last visited
-
Days Won
185
Content Type
Profiles
Forum
Gallery
ATV Magazine
Events Calendar
Downloads
Store
Community Map
Everything posted by Gwbarm
-
I get OEM or Wix on Amazon.
-
I use either OEM or Wix oil filters, but there are some good brand filters, I would stick with reputable names Fram, stp , purolator.
-
Finally got back around to the Big Bear, between all the rain and other priorities time has been limited, I keep up three properties so the John Deere has been getting a good workout, got the new Mikuni installed all the hoses routed where they are supposed to go, that took a minute, put in new fuel gauge, the other one wasn't even there , it must have rotted off and fell in the tank, so previous owner removed it. Buttoned up a few more loose ends and started it. I will have to say im very impressed with the new Mikuni glad I found one cheap enough to buy on Ebay. I learned the hard way , but I do believe in OEM carbs, I may scrimp on other aftermarket stuff, but wont on Carbs anymore. Oh, one other thing, when you buy an aftermarket petcock pay attention to the nipple size, even when the add says it fits 2000 Yamaha Big Bear, and don't get one smaller than your carb nipple, ask me how I know. This video is the first start with the new carb: IMG_3760.mov It takes throttle very well and smoothly without stumbling a tad, which I what I would always get with Aftermarket. This video is after its been running for a while, no smoke, but the engine sounds a little pingy, im going to pull the valve caps to make sure its oiling correctly, but this is my first Yamaha it might be a normal sound for them, what do you guys think. IMG_3762.mov
-
The only thing I can think of that would pull that much juice that fast is an internally shorted starter. The stator may not be recharging the battery, you can check that with a volt meter while its running.
-
Sorry! I got confused, seems to be happening more as I get older.
-
Oh, OK, so this wasn't the Polaris it was the Moto 4 you were riding.
-
I posted a video of a guy on u tube installing one on a Vinson, his seemed to work out well, but I haven't had good luck with them, I am in the process of going back to OEM on all my bikes that I bought used with Aftermarket carbs on them. Hope yours is good.
-
Thanks for posting that Mech, I was just looking for it.
-
2004 Bombardier Outlander 330 How To Remove Stator
Gwbarm replied to rgeiser's topic in Can-Am BRP ATV Forum
Thats crazy, I don't even consider 2004 old, as long as they can still get parts they should work on them -
Are you new to the site? Where are you from?
Gwbarm replied to DrtyGrlKristin's topic in New Members Area!
Sounds like your hands are already dirty just loading them, will be a couple of fun projects, keep us posted on your progress. My wife ignores mine, so you are in good shape. -
So you got it going how much did you end up replacing.
-
Are you new to the site? Where are you from?
Gwbarm replied to DrtyGrlKristin's topic in New Members Area!
It might be a good idea to create your own thread on this no spark issue, might get more responses, just a thought. -
Are you new to the site? Where are you from?
Gwbarm replied to DrtyGrlKristin's topic in New Members Area!
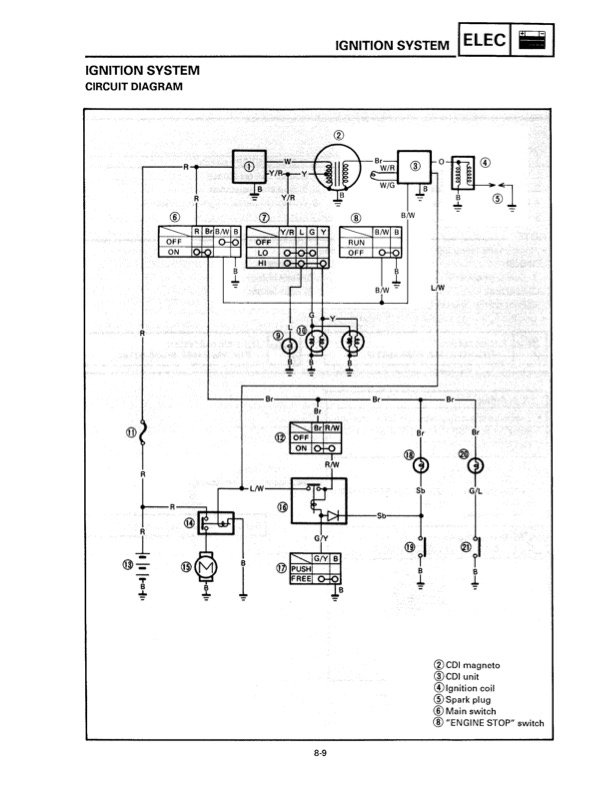
Schematic for 92-98
-
Sorry to hear that hopefully its not too bad,
-
Admin, Weekly newsletter missing ?
Gwbarm replied to Fishy09's topic in General Talk - Anything Goes!
Still not getting the newsletter, also I used to get emails telling me that someone had replied or reacted to one of my posts, im not getting those anymore either. Never mind, for some reason they all started going to my junk email folder. -
'01 Suzuki King Quad 300 - Won't start but has spark
Gwbarm replied to unirambler's topic in Suzuki ATV Forum
It does sound like you have a stuck or broken ring, the only other thing I might try before teardown is pour some carb cleaner into the combustion chamber so the rings get soaked with it, helps remove varnish and crust sticking the rings to the piston, I use pretty strong stuff Berryman Chemtool. The only problem with that is that it does seep through and dilute your oil some. Sometimes it works, sometimes it doesnt, then pull the jug. -
Good morning all, I have a question
Gwbarm replied to gatorschevy's topic in General Talk - Anything Goes!
I have not tried that, been tempted several times, I thought it might be a rough surface to keep clean, glad to know it works. -
Update: I am also working on a red one not a priority at this point, plastic was badly faded red I was thinking I was going to have to paint it, sanded a little and sprayed Armour All on it heavy and let it sit, every time I would walk by I would notice the armor all was gone so I didn't think anything about it, thought it just evaporated, and would spray it down again. I did this for about a week and noticed the Amour all was not disappearing like it did at first, and the red was really coming back brilliant red, and I kept this up for about two weeks, my conclusion was the protectant was replacing a lot of the lost moisture from the plastic and bringing it back it just takes some time, I had never left it on one this long before. This was just the small tank cover, im going to try it on a larger panel and see how it does there. In fact I was thinking these plastics had been painted because every time I would sand my sandpaper would gum up with red color. Of course I know that no one has two weeks to wait and see if protectant helps, and I never have either, but just started working on the next projects plastics early.
-
Thats great you got it fixed, I was suspecting the CDI, but I hate to tell someone to buy a very expensive part when im not positive thats the problem.
-
Are you new to the site? Where are you from?
Gwbarm replied to DrtyGrlKristin's topic in New Members Area!
Let me see if I can get a schematic I will take a look , what year is it. -
'01 Suzuki King Quad 300 - Won't start but has spark
Gwbarm replied to unirambler's topic in Suzuki ATV Forum
Oil is cheap but smoke is annoying, probably good to go ahead and check it out, if its smoking that much something is definitely wrong. 123 is not that bad compression wise, iv run some with less than that that didn't smoke, probably one of your rings is stuck and might pop back out after running it for a while, but if the ring is broken that's not a good thing to do. Does the smoke get worse or better the longer you run it. -
Good morning all, I have a question
Gwbarm replied to gatorschevy's topic in General Talk - Anything Goes!
Thats my vision but it hasn't been 20/20 in many years, so for 20/20 maybe a 10 footer. -
'01 Suzuki King Quad 300 - Won't start but has spark
Gwbarm replied to unirambler's topic in Suzuki ATV Forum
My thoughts were the fuel might cause an inaccurate compression reading, but maybe not, I would try a new plug and see how quickly it gets black from running it, black can be a combination of oil burning and running rich. -
Wik said he had the same problem, maybe its problematic in those transmissions, if that's the case, damage may have happened after it broke.
-
Are you new to the site? Where are you from?
Gwbarm replied to DrtyGrlKristin's topic in New Members Area!
I really like the Timberwolfe, don't own one but been meaning to pick one up, too many other projects right now, they are light and powerful and easy to maneuver, fun to ride.