Quantcast
Jump to content

Recommended Posts

Posted

A couple years ago I was given an old warrior. My kids had a hard time riding it, so we decided to make it into a 2 seat off road gokart. I am currently one off the Venturing Boy Scout advisors, so I enlisted the help of the boys to work on the project.

We started the project in October but I forgot to take pictures till last week. We dont make fast progress since we get together at most once a week and not every week.

We have the quad mostly stripped, I have gotten most of the plans worked up for the frame, and we have most of the main frame pieces cut and bent, some welded.

I will post some pictures tonight is I get a chance.

Posted

Ok got some pictures. Let me know if you cannot see them and I will try to post them a different way.

Here is the 89 Yamaha Warrior after some young guys were done with it.

180459_200871406590433_100000027258614_772125_2576404_n.jpg

Here is the engine. I will probably need some work like a carb rebuild.

180459_200871409923766_100000027258614_772126_6592534_n.jpg

Frame laid out on table.

180459_200871413257099_100000027258614_772127_3551150_n.jpg

Grinding pipes for fitment

180459_200871416590432_100000027258614_772128_4118675_n.jpg

Of course we have it perfectly square :no:

180459_200871419923765_100000027258614_772129_7752954_n.jpg

More grinding and then some more.

181933_200871673257073_100000027258614_772135_2644726_n.jpg

Rear roll bar in position

181933_200871676590406_100000027258614_772136_5599310_n.jpg

Rear roll links in place.

181933_200871679923739_100000027258614_772137_8167795_n.jpg

Trial fit of the front roll bars - they don't fit as good as it looks like they do.

181933_200871683257072_100000027258614_772138_1776376_n.jpg

One front bar tacked in place. A good stopping point for the evening.

Better take it for a test spin.

181933_200871686590405_100000027258614_772139_7688297_n.jpg

I was the guy in red in the 4th picture, but here is another for good measure that I did actually do some work. (Looks like facebook forces landscape)

182205_200873753256865_100000027258614_772168_7607335_n.jpg

Well that is all for tonight.

Posted

I was thinking the same thing, those motors make less than 20hp, and that looks like it will be a pretty big machine. Not only would it be a bit underpowered, but I would suspect that the clutch may not hold up. If it were me, I would throw that motor up on ebay along with all the other parts you aren't going to use and look for an old snomobile motor, something that was meant for running under a heavier load. Just my 2 cents. The build looks good though, it isn't easy bending cages. I don't know what you use to saddle the ends of your pipe, but I find that a hole saw works perfectly.

  • 2 weeks later...
Posted (edited)

I have been thinking that the engine might be too small for it. But I think I will give it a try and see how it works. Then I will have an idea of what I need. One thing I need is reverse. Do snowmobiles have reverse? Even if it were slow that would be fine, as long as you could back up when you get in a jam. There is no way I want to get out and pull on it.

It seems like inorder to get the frame stiff I need to add a lot more bars.

Here is a shot of the CAD design so far.

184941_203300719680835_100000027258614_786937_2743782_n.jpg

The actual project is varying a little from the design, but some of the stuff I changed the design to match. Other things I changed on the design to look better should I rebuild something later.

Here is the nose cone in an early state. I accidentally made it 4.5 inches wider than it was supposed to be, so I had to rebuild it.

183057_203302359680671_100000027258614_786946_6057389_n.jpg

Here is a shot of the final length of the kart. It is sitting on a 4x8 table.

183057_203302363014004_100000027258614_786947_3574470_n.jpg

Thanks for the comments. I am using a hole saw and a notcher to saddle the pipes, but it is impossible to get the exact angle. It is also really hard to get the pipes bent to the correct angle and maintain a flat plain.

Edited by Bugzuki
Posted

I know exactly what you mean, bending pipe while keeping everything in line is a real pain. I do know that some snomobiles have reverse, I don't know how common it is on older machines though. That snomobile in the link would be a perfect powertrain donor IMO. I also noticed that it is in Bonney Lake, WA, coincidentally, that is where I live. Are you here in Western Wa?

Posted (edited)

Yep, I am in Monroe Wa. Just off Hwy 2 East of Everett. The owner of the snowmobile said that it does not have reverse, but there is some kit for it.

The exhaust would be much harder to modify then the Warrior 350 exhaust. Looks like the snowmobile has 3 individual pipe off the engine. What a pain.

Edited by Bugzuki
Posted

I am familiar with Monroe, I have been lucky enough to have a job that required me to visit your fine penitentiary a few times.

When you have 3 cylinders instead of one, the exhuast definately gets more tricky. The Warrior exhuast should be much easier to modify. Changing the lenth a little on a four stroke motor isn't going to have much of an effect. If you change the dynamics of a two stroke expansion chamber even slightly, it can have dramatic effects on enginge performance. For simplicity, it you were to ever try a snomobile engine, I would try to find an air cooled twin cylinder. The exhuast would be easier to deal with, and no need for a radiator. For the Warrior motor, one thing I would definately do is find a heavy duty aftermarket clutch and the stiffest springs you can find for it.

  • 2 weeks later...
Posted

We got a couple more bars in place. Up to this point I have mostly been tacking the bars in place. I now have everying on the frame fully welded.

There are some slight issues with the frame. I think it has to do with trying to teach teenagers how to do metal fabrication. Measuring and keeping attention to detail instead of goofing around are a big issue.

But I think everything so far is workable.

Here is how it sits now.

188737_206618369349070_100000027258614_806037_4423630_n.jpg

Side view.

188737_206618372682403_100000027258614_806038_8024311_n.jpg

On the engine. I sold an Explorer engine so I have a couple bucks. I found a 93 Arctic Cat Panther for sale in Lake Stevens. I was told that it ran upto a couple years ago when they broke the pull rope. It has been parked since. It has some other issues but mostly dealing with the chassis and stuff. I think it has the 440cc air cooled 2 cylinder engine. It also has reverse. I will go look at it this weekend maybe. He was asking $399 for it, I offered $300.

Thanks for the suggestions.

Now I just need to figure out how to sell my 350 yamaha engine.

Posted

The guy with the snowmobile has not gotten back to me and my money for it is disappearing. I will have to sell some stuff. Hopefully I will be able to get it sometime.

I am planning on using the Warrior front suspension for starters and building suspension for the back. We will see how it handles and go from there. Maybe I will put it together with the warrior engine first and then put in a Snowmobile engine if I ever get one.

Well, we going to work on it some more tomorrow evening.

Paul

Posted

Well, we made some more progress on the cart. We got some more pipes bent and welded/tacked on. I will take some more pictures.

The guy with the snowmobile got back to me last night. We went and looked at it. It was pretty rough, but the engine turned by hand, so I am hoping for the best. He took 250 for it. I go to pick it up on Saturday. It has the Suzuki 440 2cylinder 2 stroke air cooled engine in it. I did not look real close but it looks like the secondary drive pully is really big.

Posted

Here are the updated pictures I promised.

Current state of the nose cone.

199628_208270159183891_100000027258614_815353_1351825_n.jpg

Side view with the side rails started:

199628_208270162517224_100000027258614_815354_7961725_n.jpg

Mock up of Yamaha 350cc engine. This is what it would look like if I keep it:

199628_208270165850557_100000027258614_815355_8094315_n.jpg

Here is a look at the passenger space. Looks like there will be plenty of room.

199628_208270169183890_100000027258614_815356_4192486_n.jpg

I go to pick up the snowmobile on Saturday. I will post some pictures of it after I get it. It should be a nice addition.

I also remembered that I had a 1 liter 3 cylinder turbo charger tucked away in the shop. Do 2 stroke engines do very well turboed? I think it should be small enough to do nicely on the 440cc snowmobile engine. :biggrin:

Posted

You can put a turbo on a two stroke, and it can be very difficult to properly tune them though. You need to have a real good idea of where to start on jetting, you will probably need to run larger carbs to allow for the extra air that the turbo will be pushing. Then you have to figure out how to tie in in to the exhuast. If you want to do it, I would do your homework, you want to make sure you get it right. If you don't have enough fuel to go with all the extra air, that motor will burn up in no time flat.

Posted

I guess I will hold off on the Turbo for now, maybe for ever.

Here is what I got done Yesterday. The boys were all busy, but we needed to get things done to hopefully have the Hot Rod done by summer.

Here is the rear triangulation brace in place. It is nice that it ended up not crossing right through the center at the back, this will give me more engine/exhaust choices.

189838_210633788947528_100000027258614_833671_7718041_n.jpg

The front suspension tubes are in place. Turns out the rear support bar is a little low on the passenger side, so the bar is a little low. I probably should not point out all the mistakes and just let you think it is coming together perfect.

189838_210633792280861_100000027258614_833672_8062616_n.jpg

Side view: shows the center floor cross beam.

189838_210633795614194_100000027258614_833673_2305891_n.jpg

Straight on front shot.

189838_210633798947527_100000027258614_833674_134815_n.jpg

Here is a shot to show the welding for all those that are wondering. I use a Miller Dynasty 200DX TIG welder. In this picture I welded the right side with my right hand and the left side with my left hand.

189838_210633802280860_100000027258614_833675_7512564_n.jpg

Of course not all the welds look like that, but I am not going to show the bad ones.

Some front suspension pictures coming.

Posted

Here is the front tacked together:

196231_210639745613599_100000027258614_833773_7618991_n.jpg

I still have to add some to stiffen the bracketry.

Closeup of Driverside

196231_210639748946932_100000027258614_833774_4856892_n.jpg

Passengerside closeup

196231_210639752280265_100000027258614_833775_7731896_n.jpg

Here is a mockup with the rear wheels and seats

196231_210639755613598_100000027258614_833776_8387823_n.jpg

One more shot for good measure.

196231_210639758946931_100000027258614_833777_4696195_n.jpg

The front seems to be able to hold 2 kids in the seats and me bouncing on the front ok. If the wheels do drop all the way the front tires hit the upper side bar when turned. I will have to figure out if that will be a problem.

Posted

Looks good, I think the brakes and a-arms will work well, you may find the shocks to be a little soft when everything is done, and with 2 people in the kart. The shocks are made for a much smaller machine and one rider at approx. 160lb or so. On the other hand, it seems like the weight will be biased toward the rear, so that may lighten the load up on the front end enough. If it does feel soft when you drive it, you can move the lower shock mount toward the wheel, it will stiffen up the ride a bit. You lose suspension travel, but it will be cheaper than replacing the shocks so... If there are clearance issues, a smaller tire may solve the problem there. The cage looks to be coming along quite nicely, how do you like that Miller Dynasty welder? My friend has a Syncrowave 200, its not a bad machine, but it lacks proper adjustment. It does well on steel or stainless, but alluminum is a real pain, no frequency adjustment.

Posted

I was thinking about the front springs being a little light, but figured I would give them a try and see what actually happens. Trial and error, not just upgrade incase.

Moving the shocks out is a good idea to try.

Thanks for the comments, it has been fun and I think it is looking pretty good to.

I like the Dynasty. It is much smaller than the Syncrowave. It does nicely on steel, and I can weld aluminum, but have never tried adjusting the frequency. I just switch it to A/C. Maybe I will look into adjusting it, maybe that would get my Aluminum welds a little better. One of the reasons I got the DX model over the standard is that it had more adjustability options. I guess I am still an intermediate welder.

Posted

Alluminum welding works better with high frequency AC the higher the frequency, the narrower and deeper penetrating the arc will be. Obviosly, you want to find a setting that feels most comfortable to you. If you run too high, the arc gets too narrow and you are more likely to burn through your metal. If you have the option of a square wave AC setting, that is nice too, you can use a ceriated tungsten electrode and grind the tip to a point for better arc stability instead of having to put a rounded tip on the tungsten that makes the arc wide and more likely to wander. Adjustable balance lets you tune your arc for better cleaning or more penetration.

Posted

Those extra adjustments are really nice, you can taylor your machine to fit your personal welding techniques and preferences. It takes some time to get used to what each adjustment does for you, but once you get it figured out, you can dial it in just the way you like it.

  • 3 months later...
Posted

Sorry for not putting an update for so long.

Here is where I am now:

Got a piece of Aluminum to use as the floor. 1/8th inch thick might be overkill, but hopefully it will last forever.

252178_252692161408357_100000027258614_1038919_3803308_n.jpg

Here is the back. We made some cutouts for the sprockets and rotor to poke through. Now, I have to make some hats to put in to cover the components.

252178_252692164741690_100000027258614_1038920_6453566_n.jpg

Here is the underside.

252178_252692168075023_100000027258614_1038921_125041_n.jpg

Got it on the trailer to take it for the State Patrol inspection for the vehicle identification number.

267337_252692998074940_100000027258614_1038925_559305_n.jpg

267337_252693008074939_100000027258614_1038926_7859603_n.jpg

267337_252693018074938_100000027258614_1038927_2587921_n.jpg

Got the VIN tag.

267337_252693021408271_100000027258614_1038928_4223804_n.jpg

Doing a pretend victory test lap.

267337_252693024741604_100000027258614_1038929_2397203_n.jpg

Got the brakes hooked up and working last night. The first master cylinder I put on was busted so it was not pumping fluid. That was frustrating. At least I had a second Miata that I am working on to pull another cylinder from.

285401_252695624741344_100000027258614_1038934_2197253_n.jpg

Here are the brake line splitters. I split one line into 3. 1 for each front wheel and one for the back.

285401_252695631408010_100000027258614_1038935_7251165_n.jpg

I got the kart running and have a major smoke issue and it does not idle very well. I also placed the engine in the wrong position so the belt is too loose. I followed the owners manual, but just reallized I must have skipped my finger up a line and put it at 10.2 inches instead of 12.2. So, I am going to pick up the other Arctic Cat belt and hope for the best.

Here is a Youtube video of it running.

[ame=http://www.youtube.com/watch?v=1vTCGI8Ra60]‪gokart_running.MTS‬‏ - YouTube[/ame]

Let me know if you have any suggestions.

Join the conversation

You can post now and register later. If you have an account, sign in now to post with your account.
Note: Your post will require moderator approval before it will be visible.

Guest
Reply to this topic...

×   Pasted as rich text.   Paste as plain text instead

  Only 75 emoji are allowed.

×   Your link has been automatically embedded.   Display as a link instead

×   Your previous content has been restored.   Clear editor

×   You cannot paste images directly. Upload or insert images from URL.


  • Popular Now

  • Similar Forum Topics

    • By quadnut20
      23 friends 5 days great weather in Wyoming riding Sand Dunes & trails !!


    • By quadcrazy
      Mud riding is one of the most popular forms of ATV riding, but the wrong tires can leave you stuck fast in deep ruts and swampy trails. Choosing the best ATV tires for mud can dramatically improve traction, steering control, flotation, and overall off-road performance.
      Whether you ride trails, mud parks, swamps, or backwoods terrain, this guide covers some of the top ATV mud tires available today and what makes them stand out.
      What Makes a Good Mud ATV Tire?
      Mud tires are designed with aggressive tread patterns and deep lugs that help clean out thick mud while maintaining traction. The best mud tires usually feature:
      Deep tread lugs Wide spacing for self-cleaning Strong sidewalls Taller tire sizes for added clearance Durable construction for rough terrain 1. Maxxis Zilla

      The Maxxis Zilla is one of the most popular ATV mud tires because it balances mud performance with trail comfort. It is lightweight, aggressive, and performs well in a variety of terrain conditions.
      Why Riders Like It
      Excellent mud clean-out Lightweight design Smooth trail ride Available in many ATV sizes Best For: Trail riders who also spend time in mud.
      2. ITP Cryptid

      The ITP Cryptid is designed for serious mud riding with deep tread lugs and strong sidewall construction. It provides excellent traction in deep mud while remaining durable on rough trails.
      Features
      Deep aggressive tread 6-ply durability Strong side bite traction Great for lifted ATVs Best For: Deep mud and swamp riding.
      3. Outlaw 2 ATV Tires

      The Outlaw 2 has become a favorite among hardcore mud riders thanks to its massive lugs and impressive pulling power in thick mud.
      Pros
      Extreme mud traction Large tread design Excellent forward bite Popular in mud parks Cons
      Rougher ride on trails Heavier than trail-oriented tires Best For: Dedicated mud machines and mud bogs.
      4. STI Out & Back Max

      The STI Out & Back Max offers a solid balance between aggressive mud performance and everyday trail comfort.
      Highlights
      Durable sidewalls Great traction in loose terrain Smooth handling Long tread life Best For: Utility ATVs and hunting machines.
      5. SuperATV Assassinator

      The Assassinator is built for extreme mud riding and features huge paddle-style lugs capable of digging through the nastiest swamp conditions.
      Features
      Massive tread depths Extreme mud traction Available in oversized setups Designed for hardcore mud riders Best For: Extreme mud builds and dedicated swamp riders.
      Choosing the Right Mud Tire Size
      25-27 Inch Tires
      Great for stock ATVs Less drivetrain strain Better acceleration 28-30 Inch Tires
      Balanced performance More ground clearance Popular for trail mud riding 32+ Inch Tires
      Maximum mud performance Best for lifted ATVs Ideal for deep swamp riding Larger tires may require clutch upgrades, lift kits, or gear reductions depending on your ATV.
      Bias vs Radial Mud Tires
      Bias Ply Tires
      Stronger sidewalls Better puncture resistance Popular for aggressive mud riding Radial Tires
      Smoother ride quality Improved handling Better trail comfort Most serious mud riders prefer bias-ply tires because of their durability in harsh terrain.
      ATV Mud Tire Maintenance Tips
      Wash mud off after every ride Check tire pressure regularly Inspect sidewalls for damage Rotate tires periodically Avoid excessive pavement riding Lower tire pressure can improve mud traction, but beadlock wheels are recommended for very low PSI setups.
      Final Thoughts
      The best ATV tires for mud depend on your riding style and terrain conditions. Riders who split time between trails and mud often prefer versatile tires like the Maxxis Zilla, while hardcore mud riders typically choose aggressive options like the Outlaw 2 or Assassinator.
      Before upgrading to oversized mud tires, make sure your ATV can handle the added weight and drivetrain stress. Proper setup can dramatically improve your ATV’s performance in deep mud and swamp terrain.
      Visit QUADCRAZY ATV Forum for ATV tire reviews, mud riding discussions, builds, and technical advice from fellow riders.

      View full post
    • By mikeexplorer
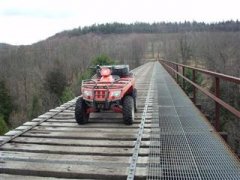
      I took this video back in 2007. Recently the trail (old railroad grade) I was riding was converted into a walking trail (obviously no more ATV riding on it) 👎 I dug up this old video and put it together since it shows the entire section and what it used to look like. The quality of the video is lacking, but this was from 18 years ago. Image stabilization didn't exist back then so I wore the camera on my helmet. (mounted to the quad was useless with all the shaking) so there is some annoying frames of me looking around. I noted any historical items from the railroad in the video. There is a section where the railroad grade is wiped out due to erosion so I had to jump off it and ride an abandoned road for a section to get around it. 
       
    • By Rick Shropshire
      I recently picked up a  2000 warrior 350 and it doesn’t have the air filter box so I was thinking about using a clamp on filter directly on the carb.  Anyone know what I need to get or where I can find it? The one I ordered goes in the box and won’t fit directly on the carb.
    • By BuckBilly
      I like to ride in wooded and grassy areas. It takes my mind off the everyday routines and helps me deal with my father's cancer. Also gives me a reason to get involved with forums like this one.
×
×
  • Create New...