


Leaderboard


Popular Content
Showing content with the highest reputation on 02/09/2024 in all areas
-
I am working on a basket case for a friend. It is a 98 Big Bear (YFM350FWB). It came with a parts machine which is a 96, which I am coming to find out is VERY different from his machine. Anyway, first thing is first. I checked compression, 150psi. Valves are set correctly, and the engine is in time. I cleaned the carb, and there was some junk in the passages. It is a chinese carb, which I figured from the lack of markings or lettering altogether. The bike runs. It idles ok, but breaks up badly under acceleration. Pulling a new spark plug shows it is running lean. White strap, with no black whatsoever. So I have the carb adjusted with the mixture screw out way too much (about 5 turns), and the diaphragm needle lifted to the top slot. It is still not getting enough fuel (or too much air). It backfires through the carb, and cannot get above idle without carrying on. The carb boot is in good shape, so it isn't pulling any air there. I did test this as well by spraying ether around the boot when running, looking for intake leaks. Anything big I am missing here? I am starting to believe that this chinese carb is the issue. This quad came with the original carb, which I would like to rebuild and use, but the mixture screw is totally stuck, and stripped way down in its recess. Thanks for any assistance.1 point
-
You should put your hand up Quad.. You sound like you'd be the man. If they are all as bad as you say, you'd be a sure bet surely.1 point
-
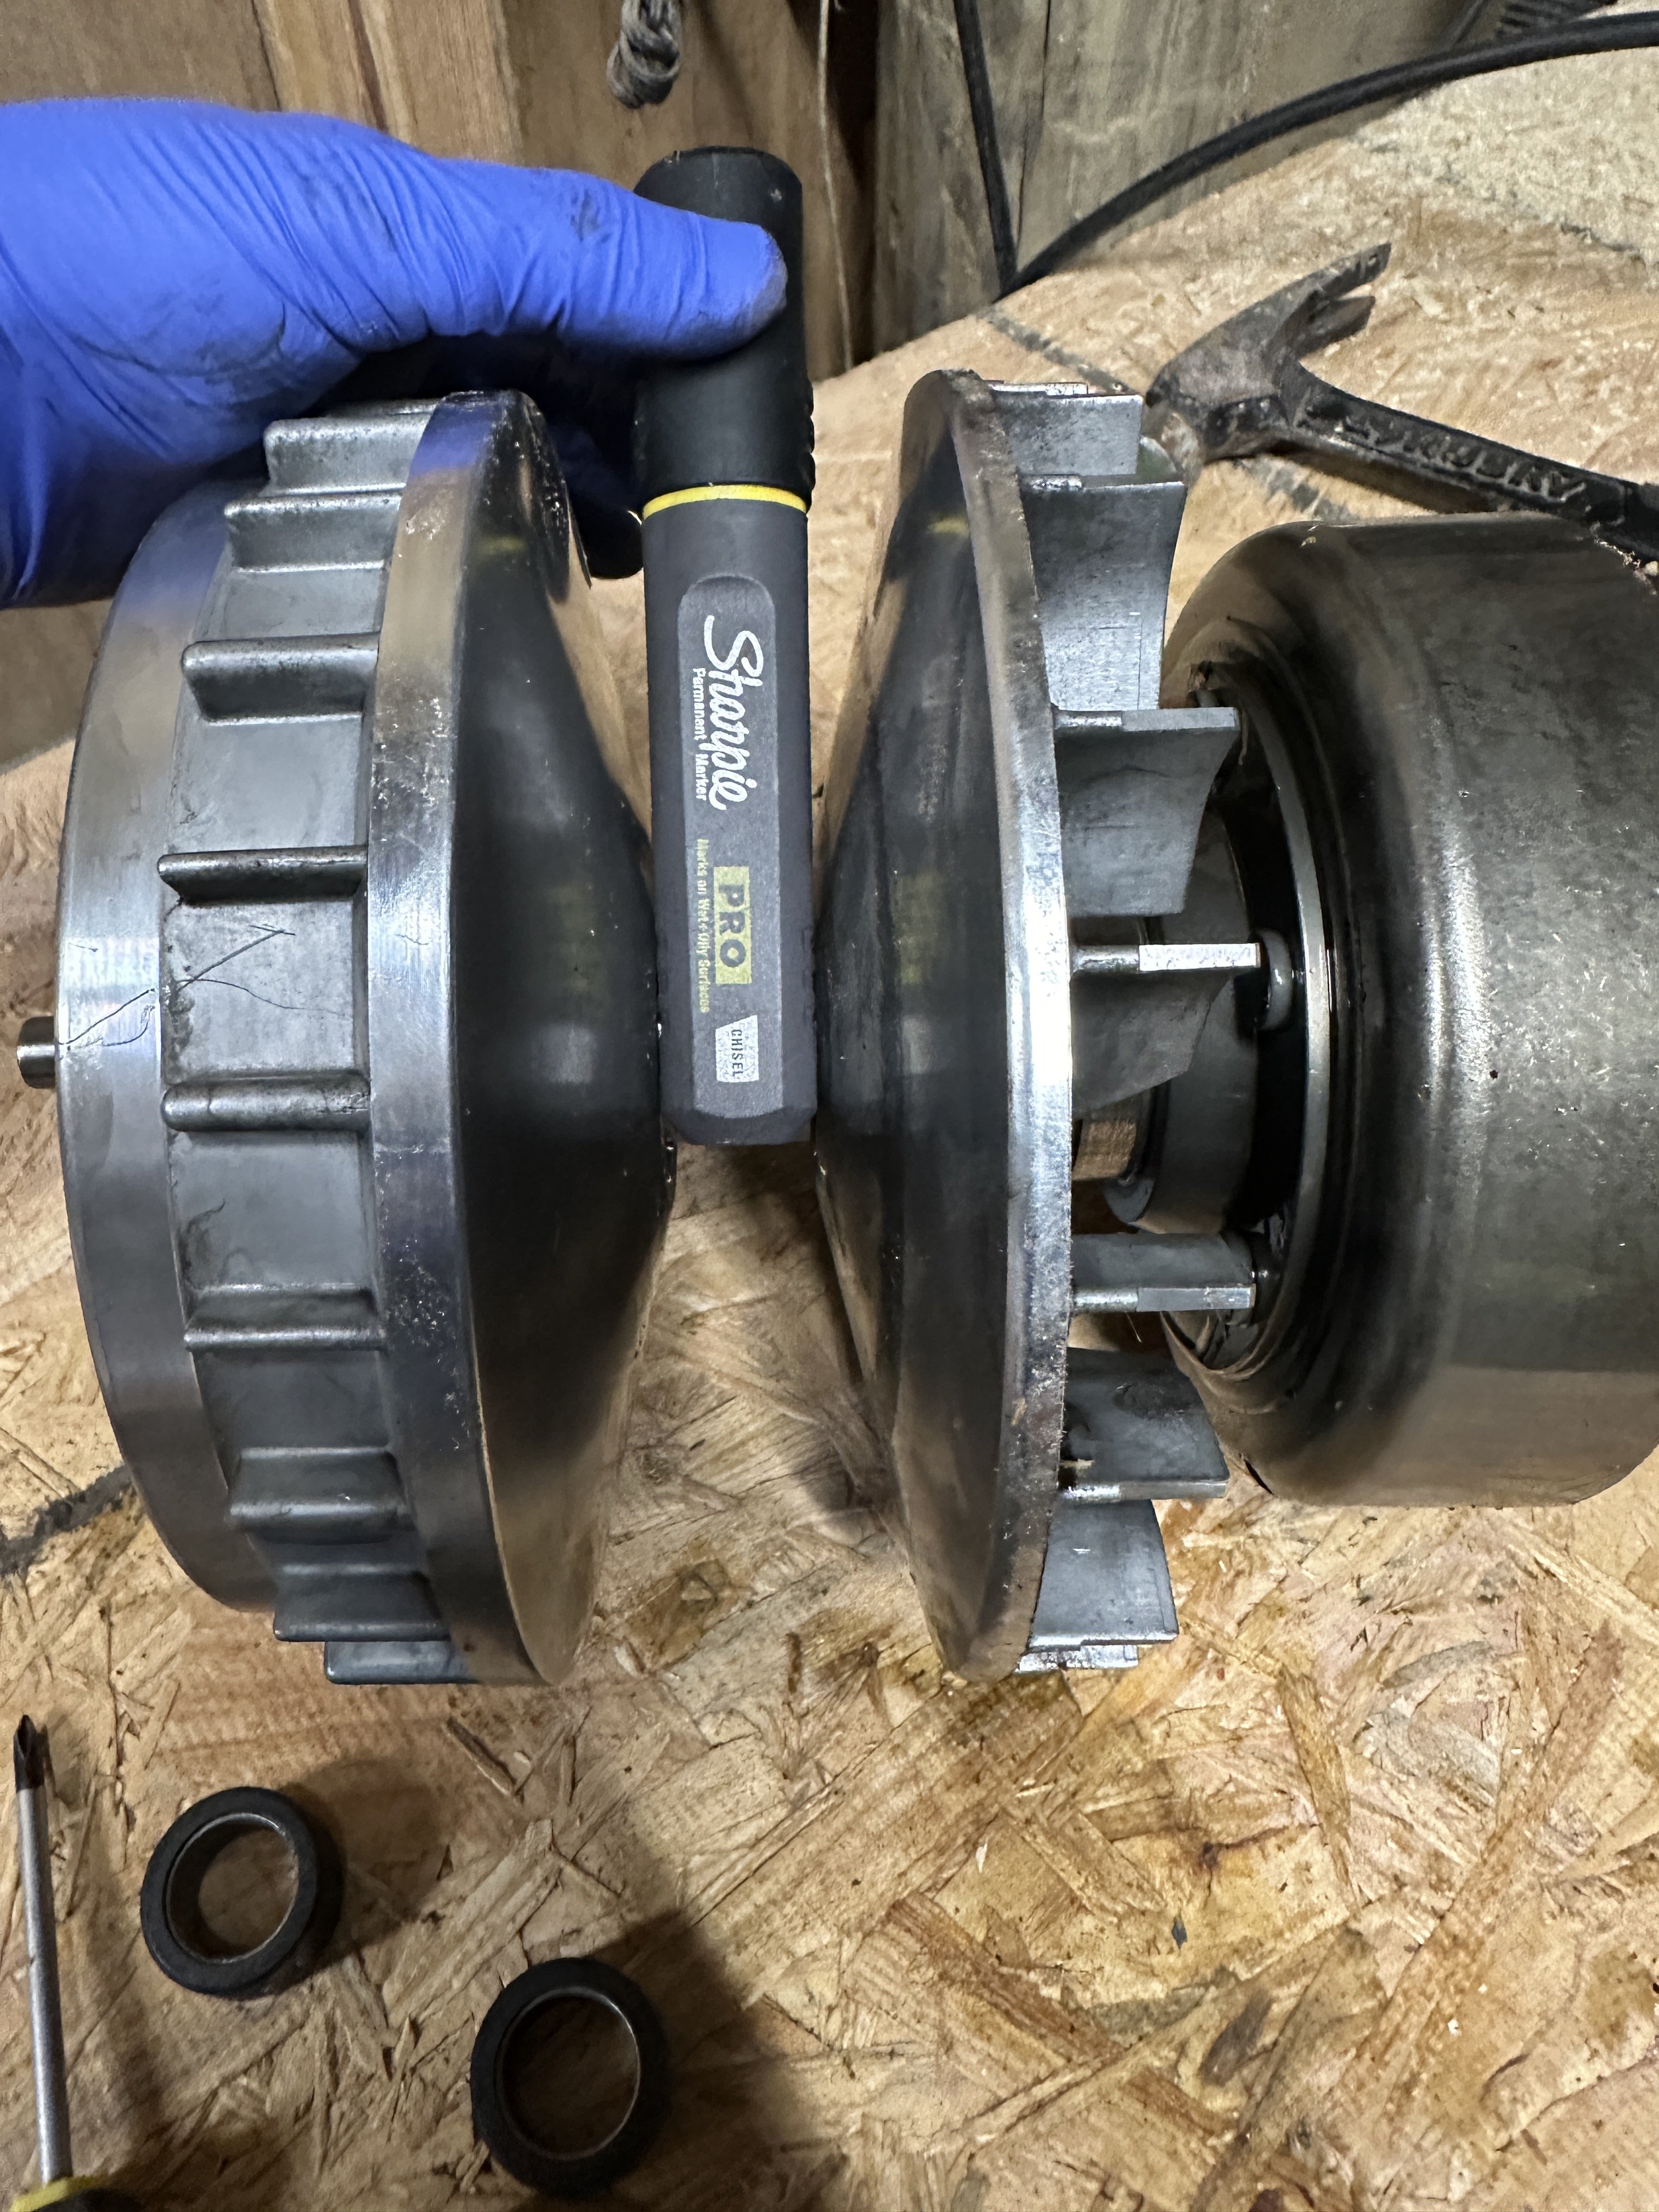
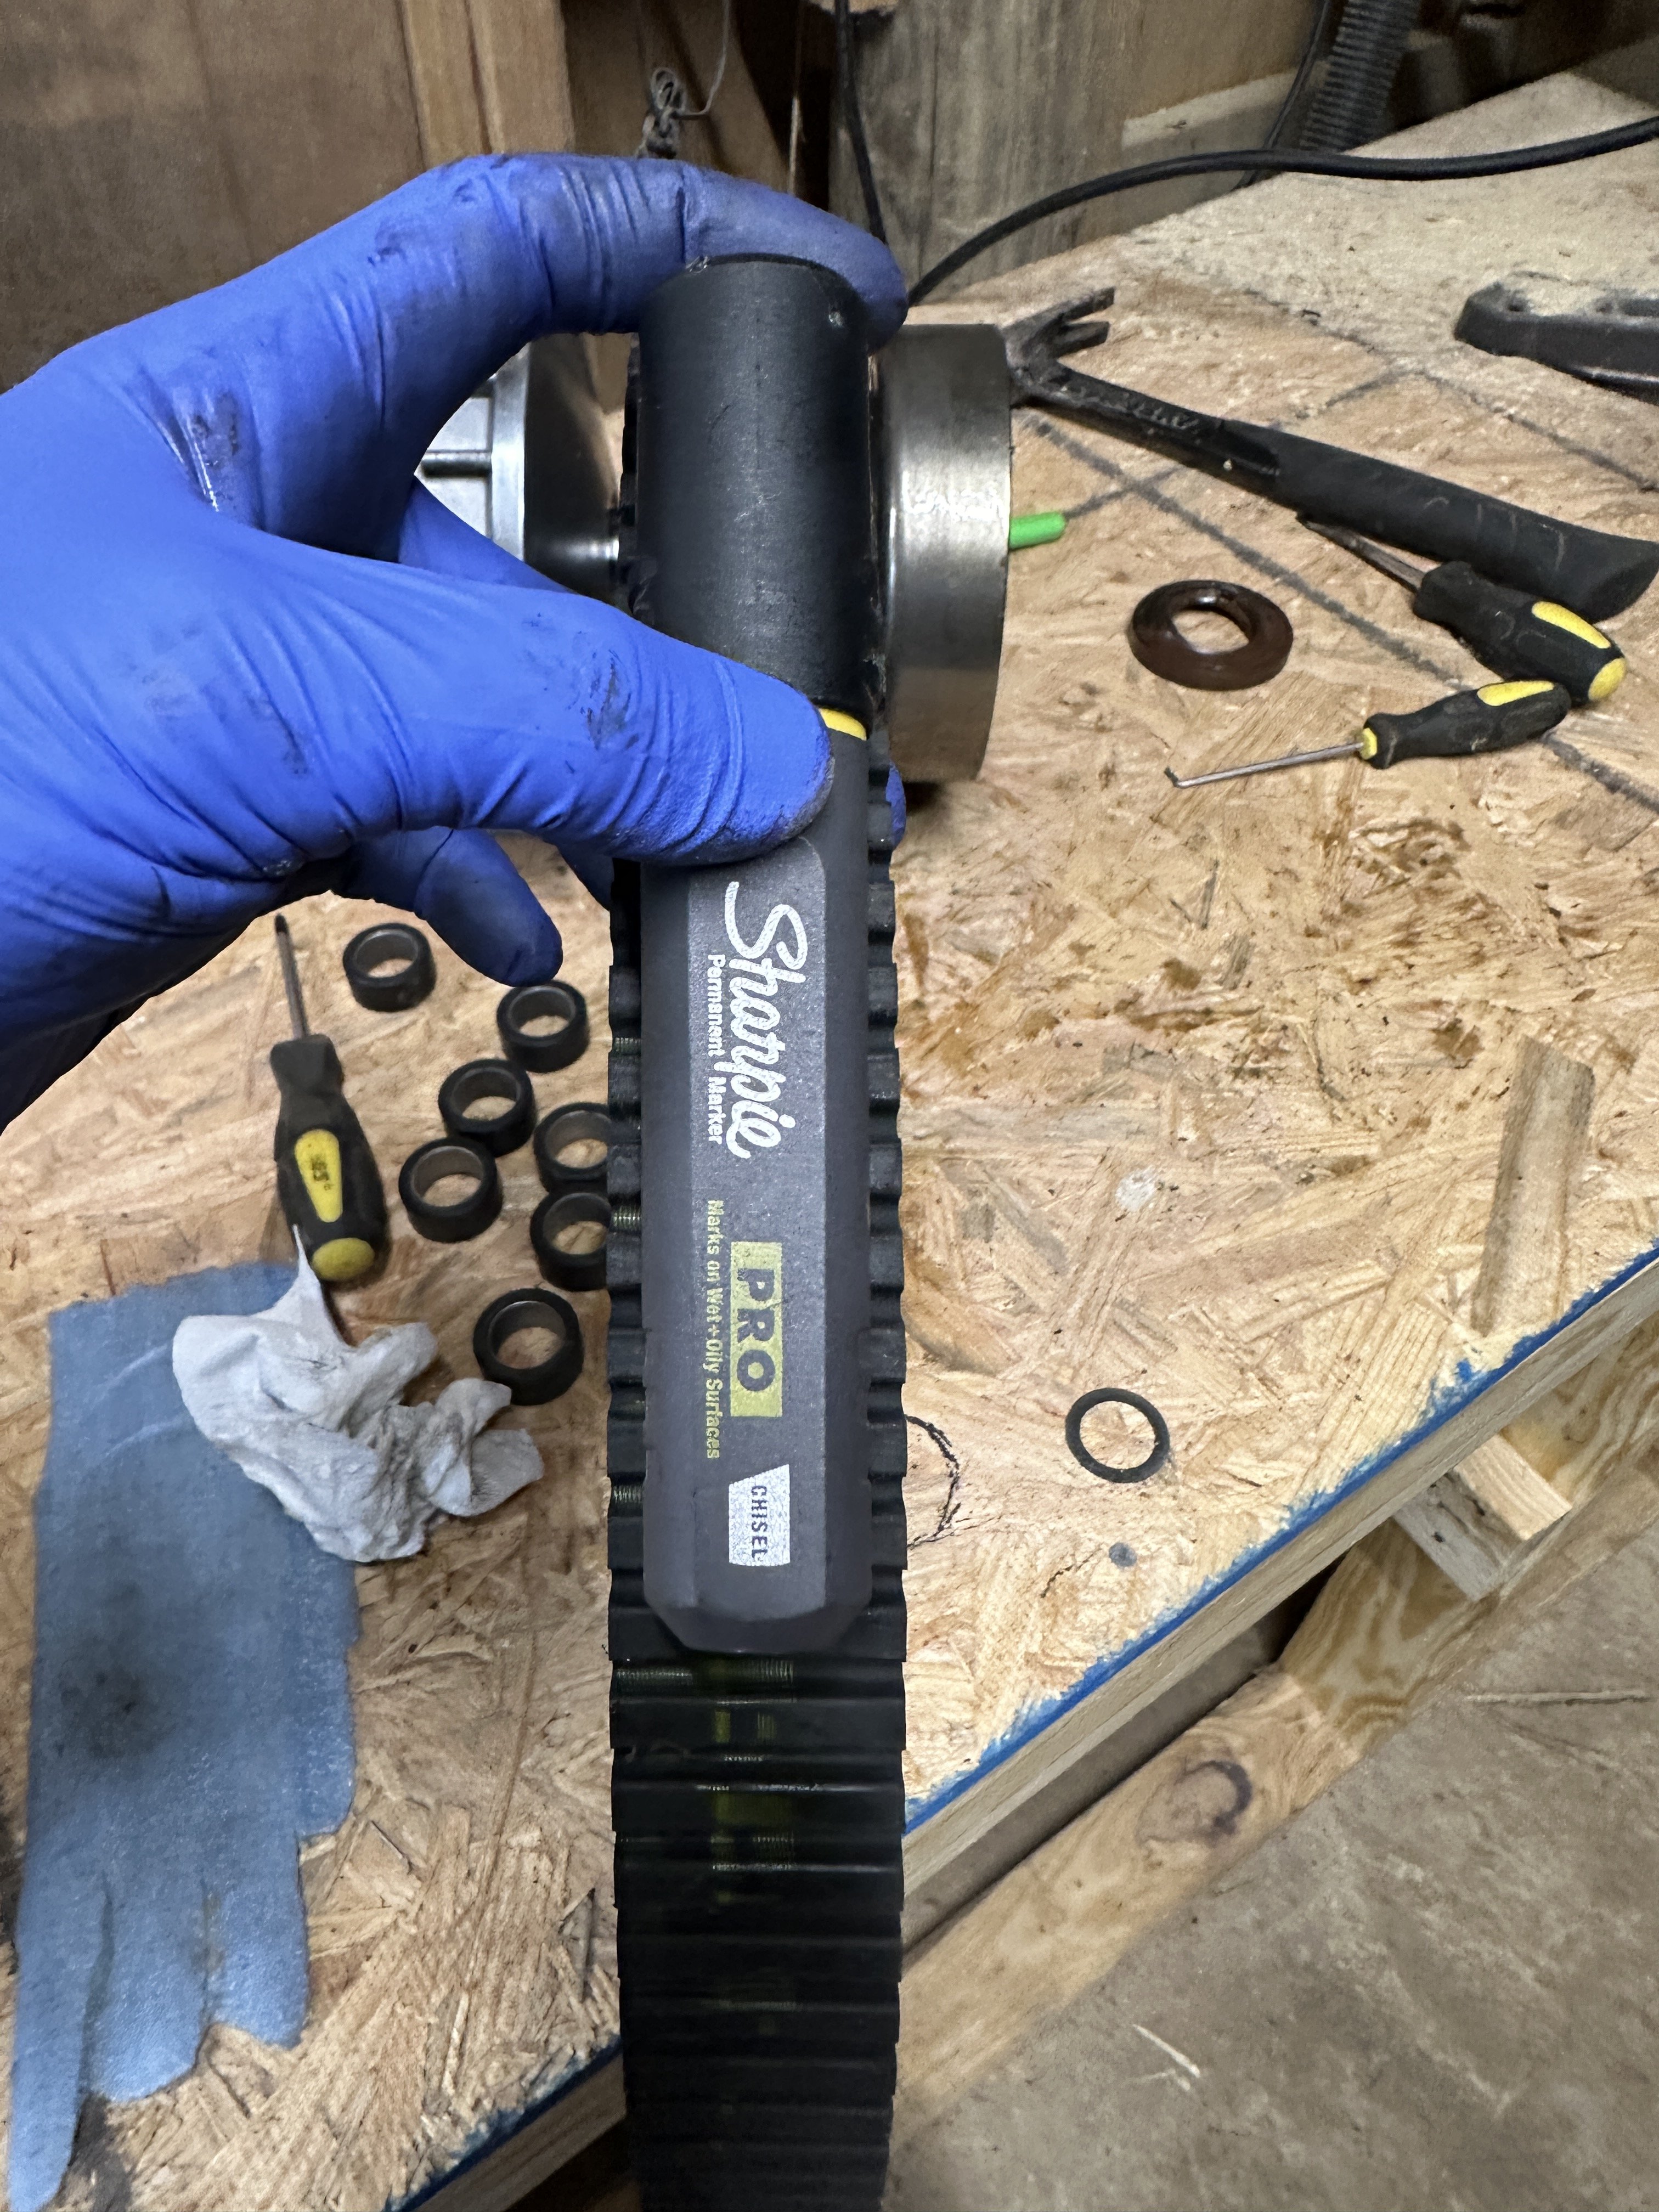
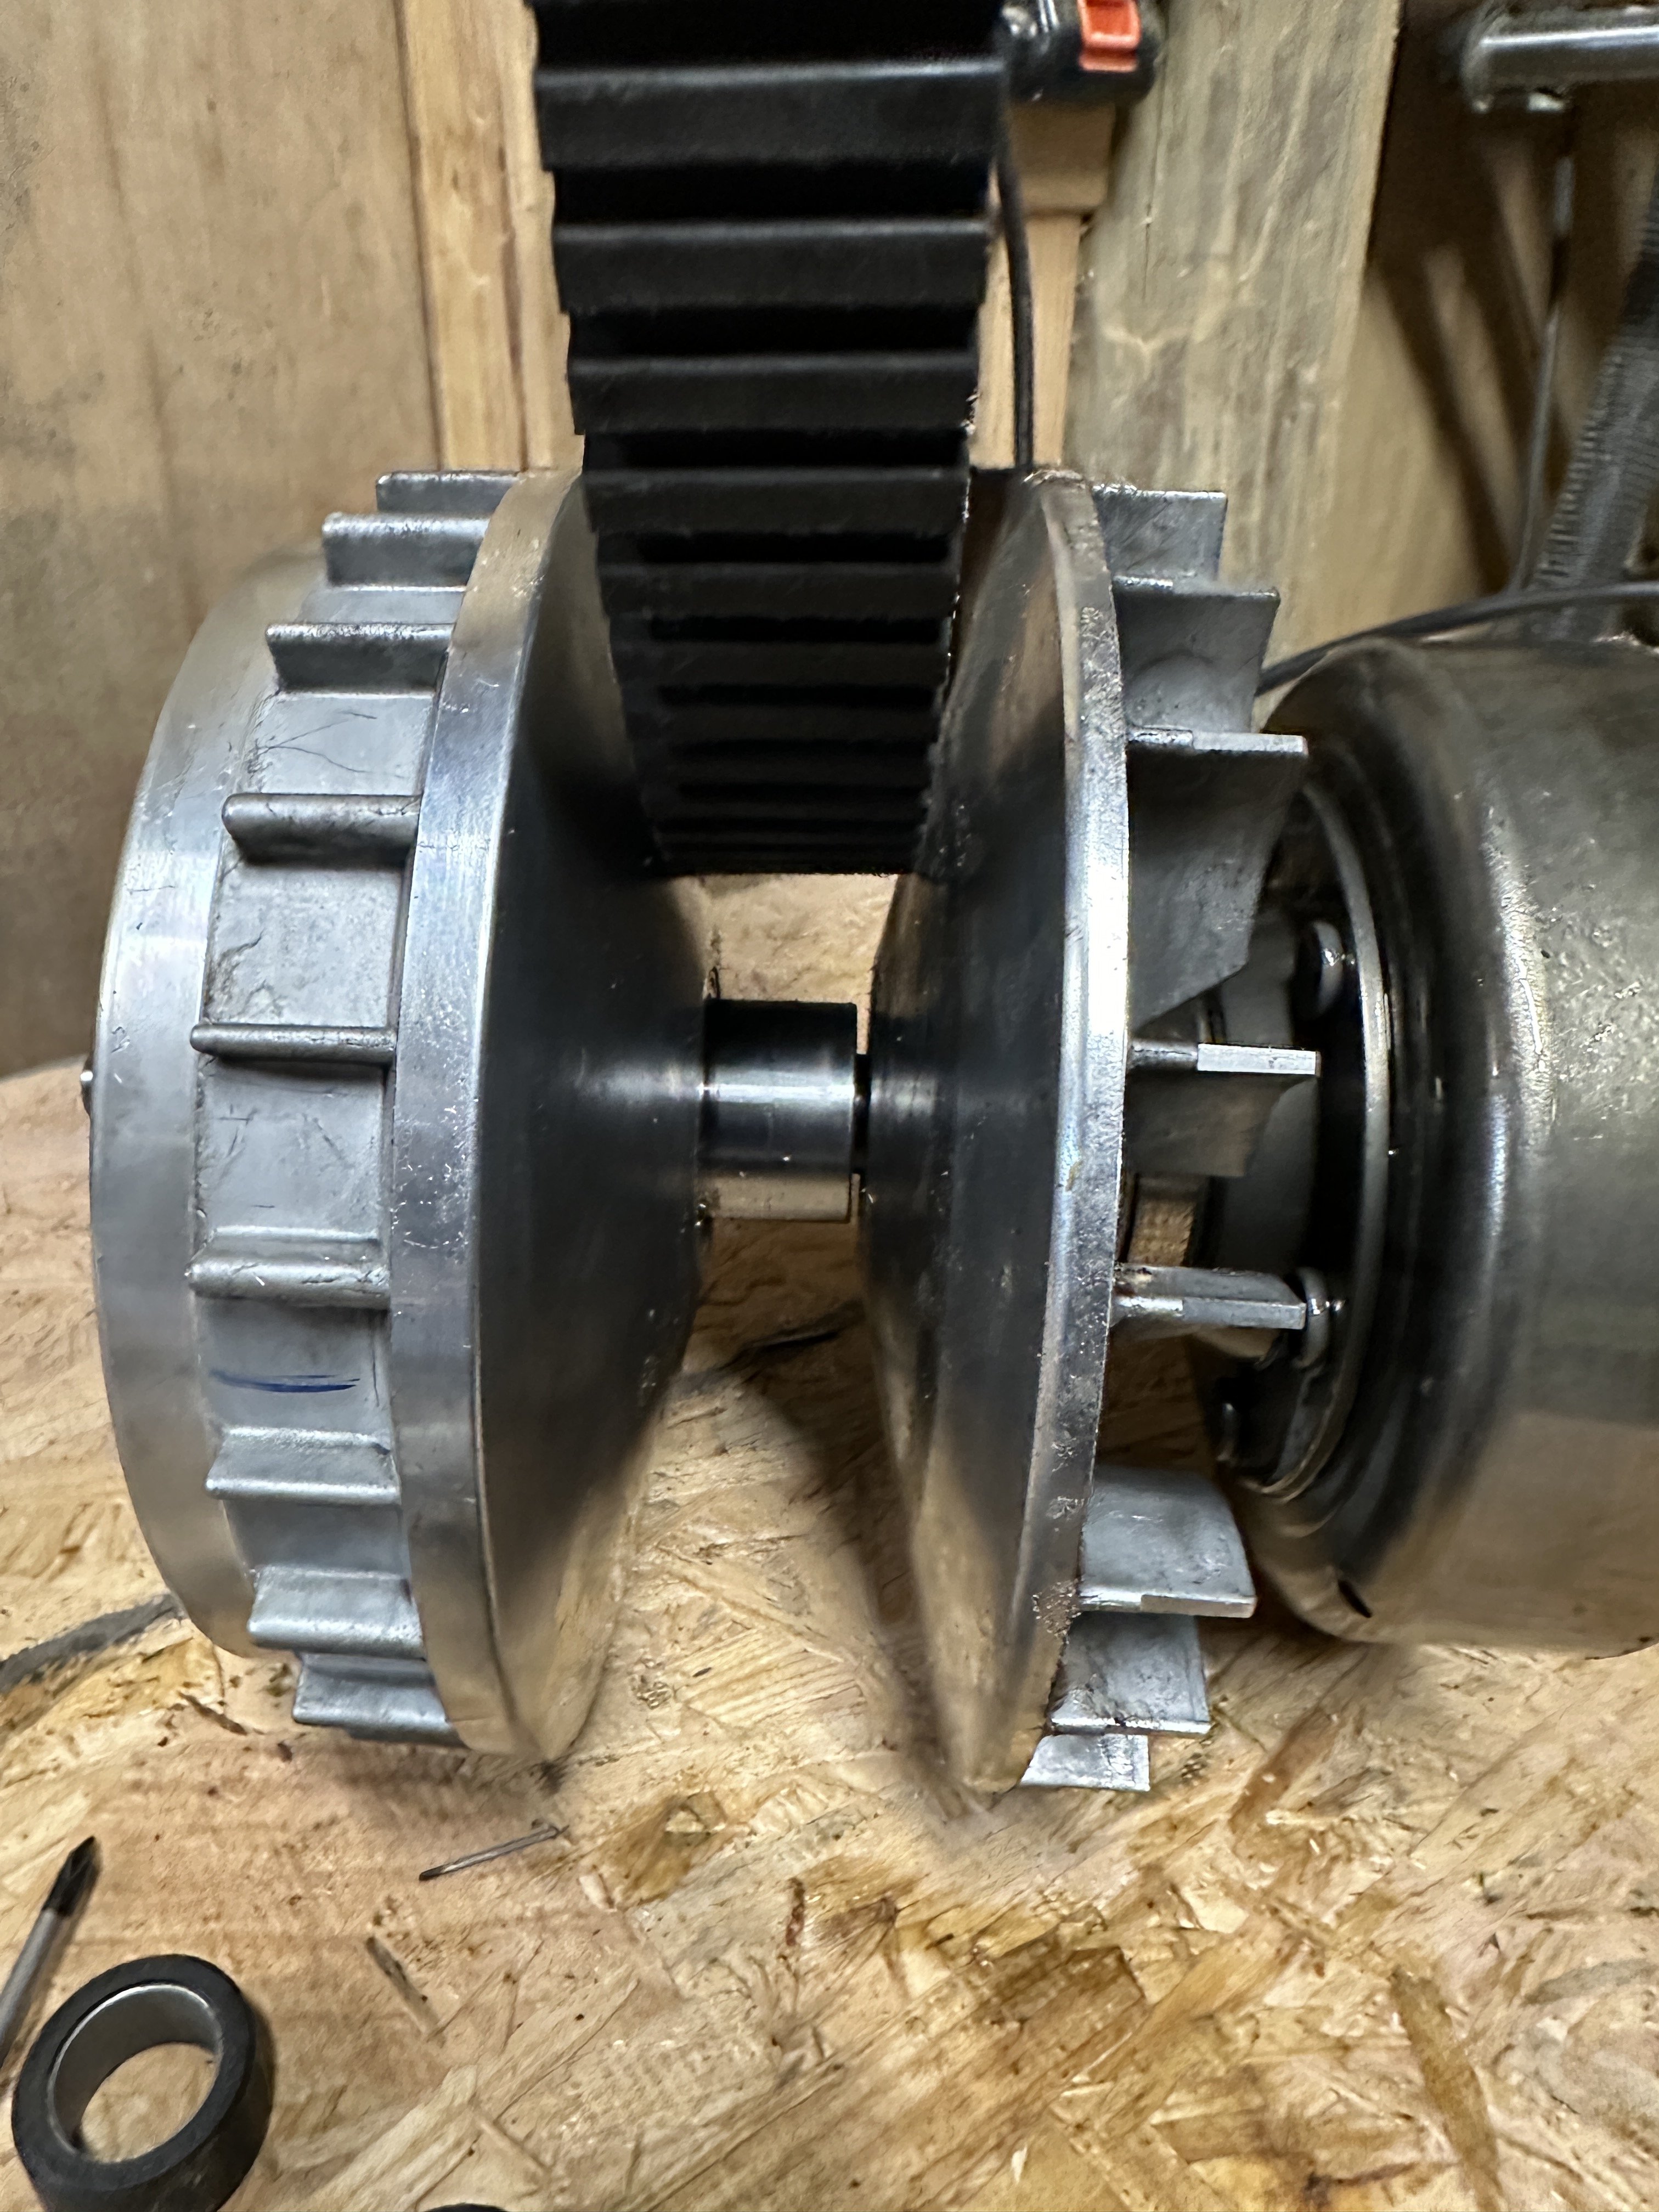
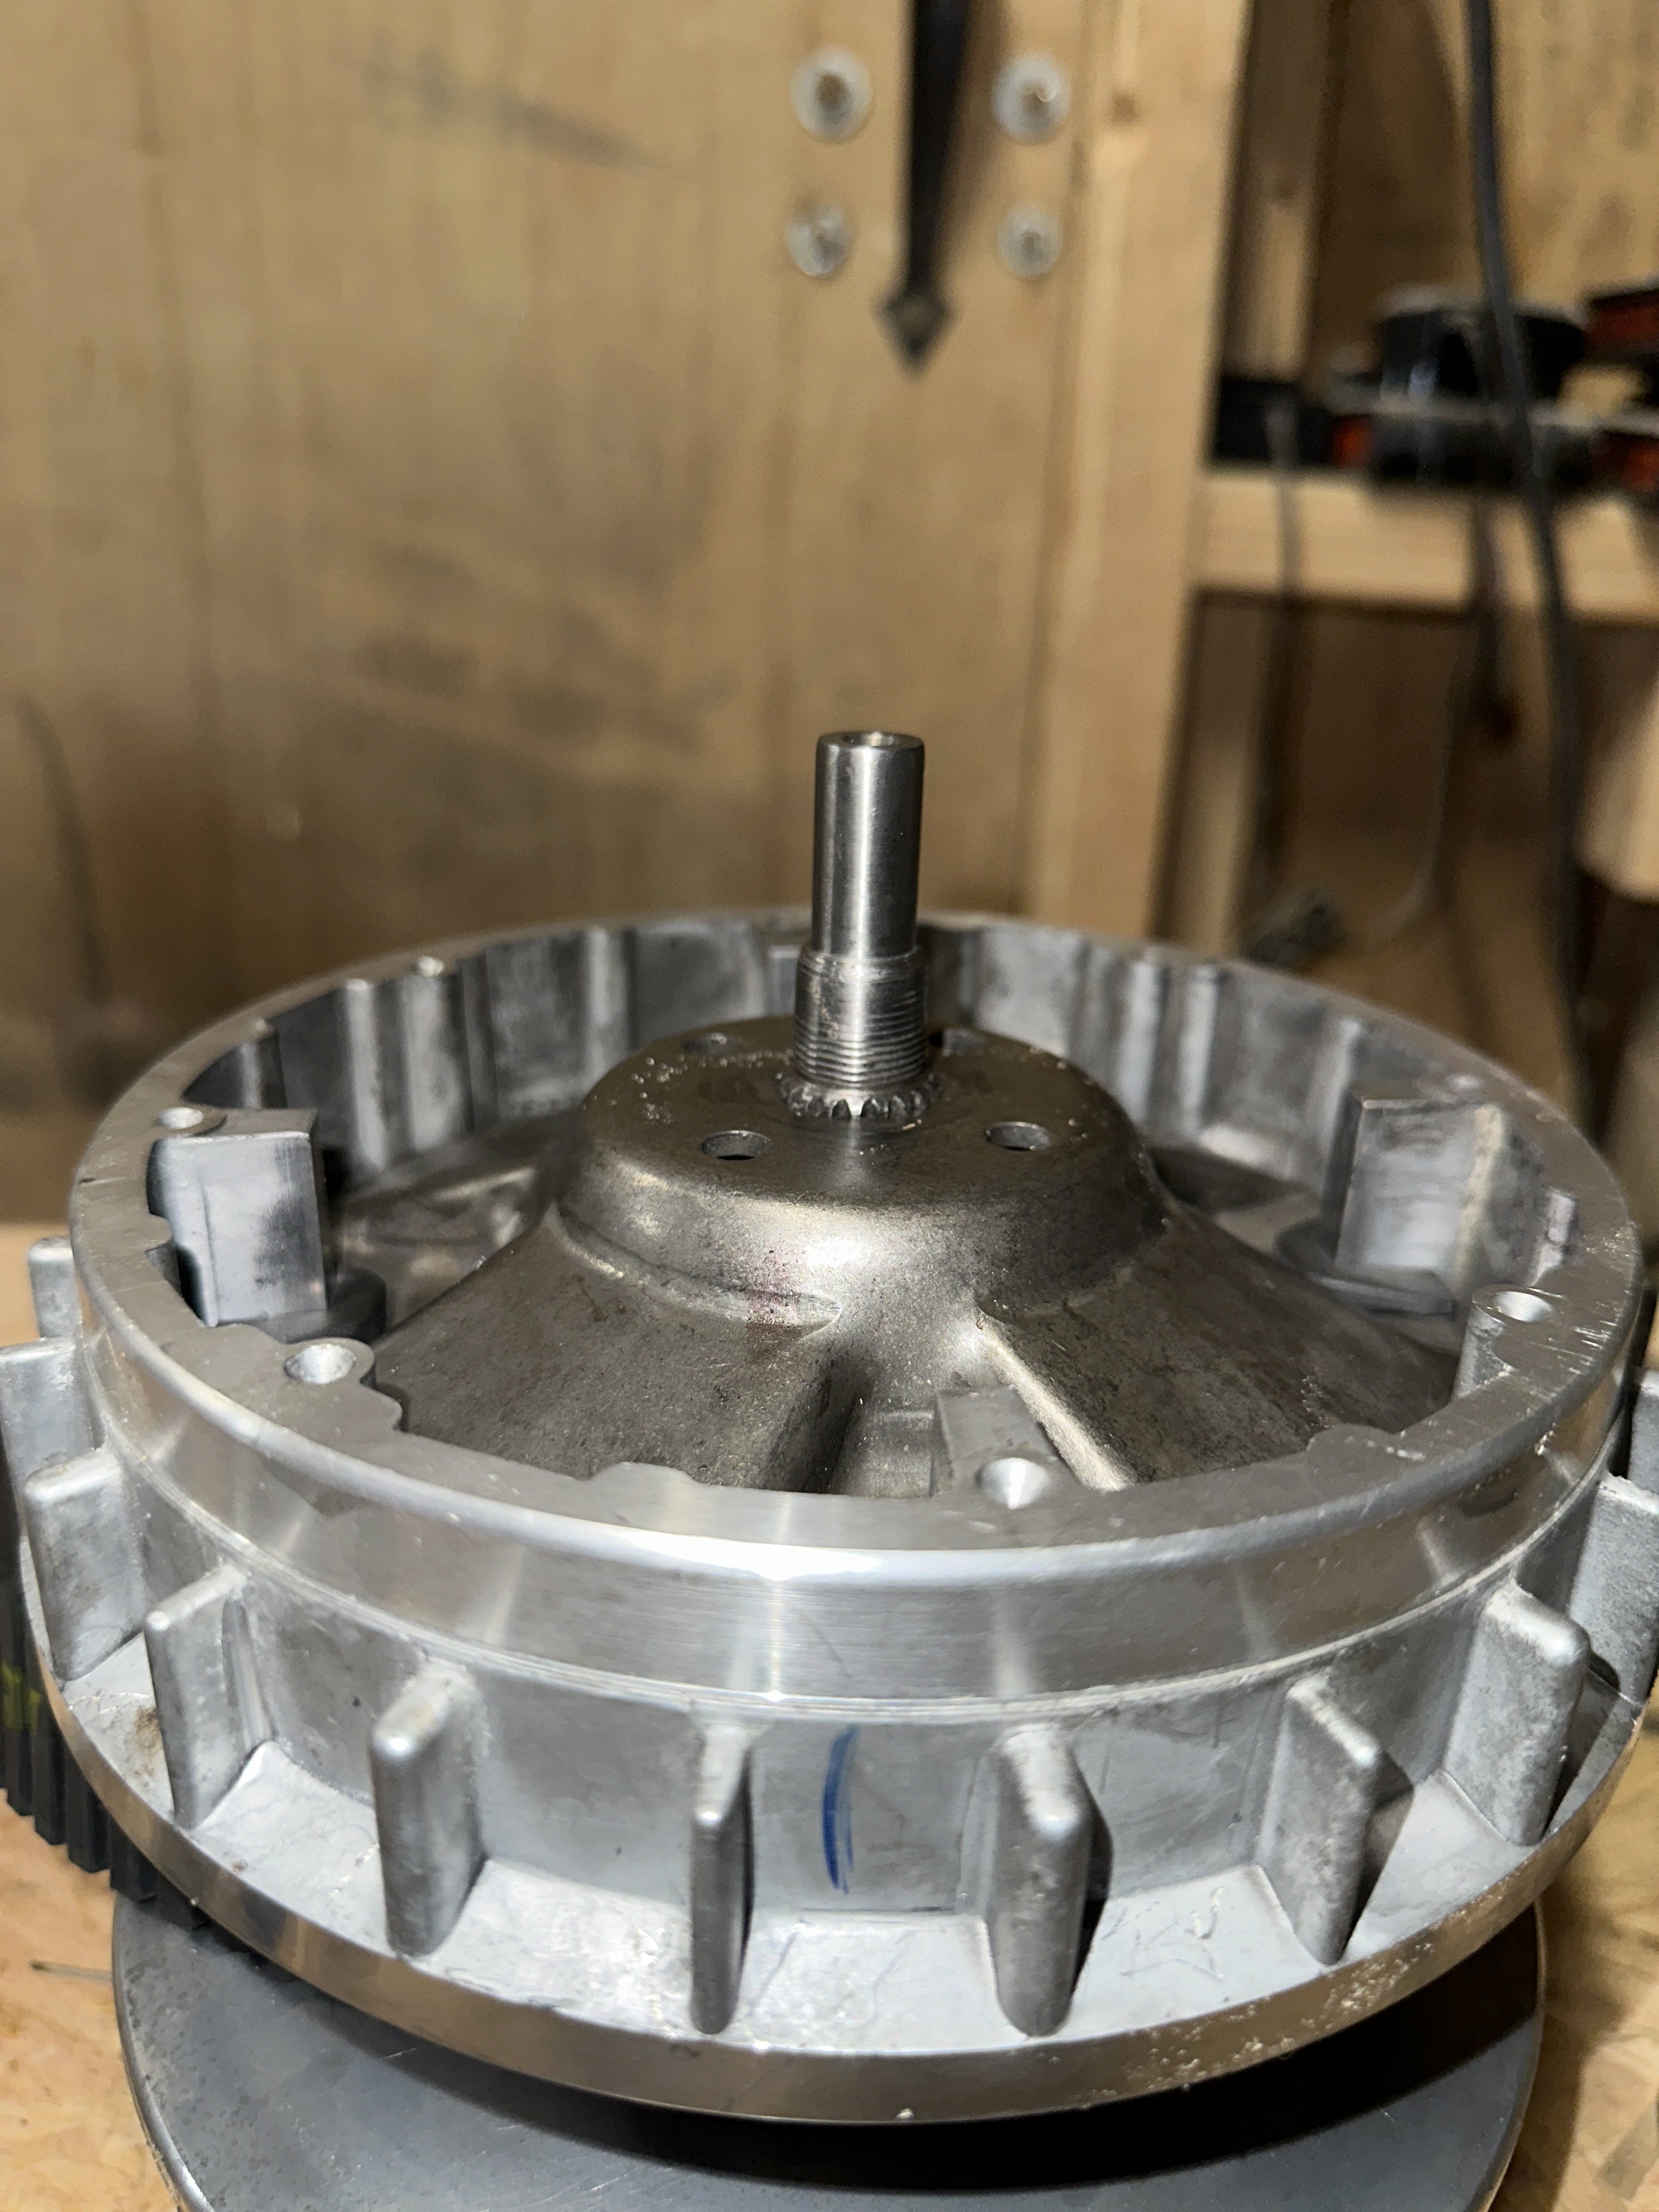
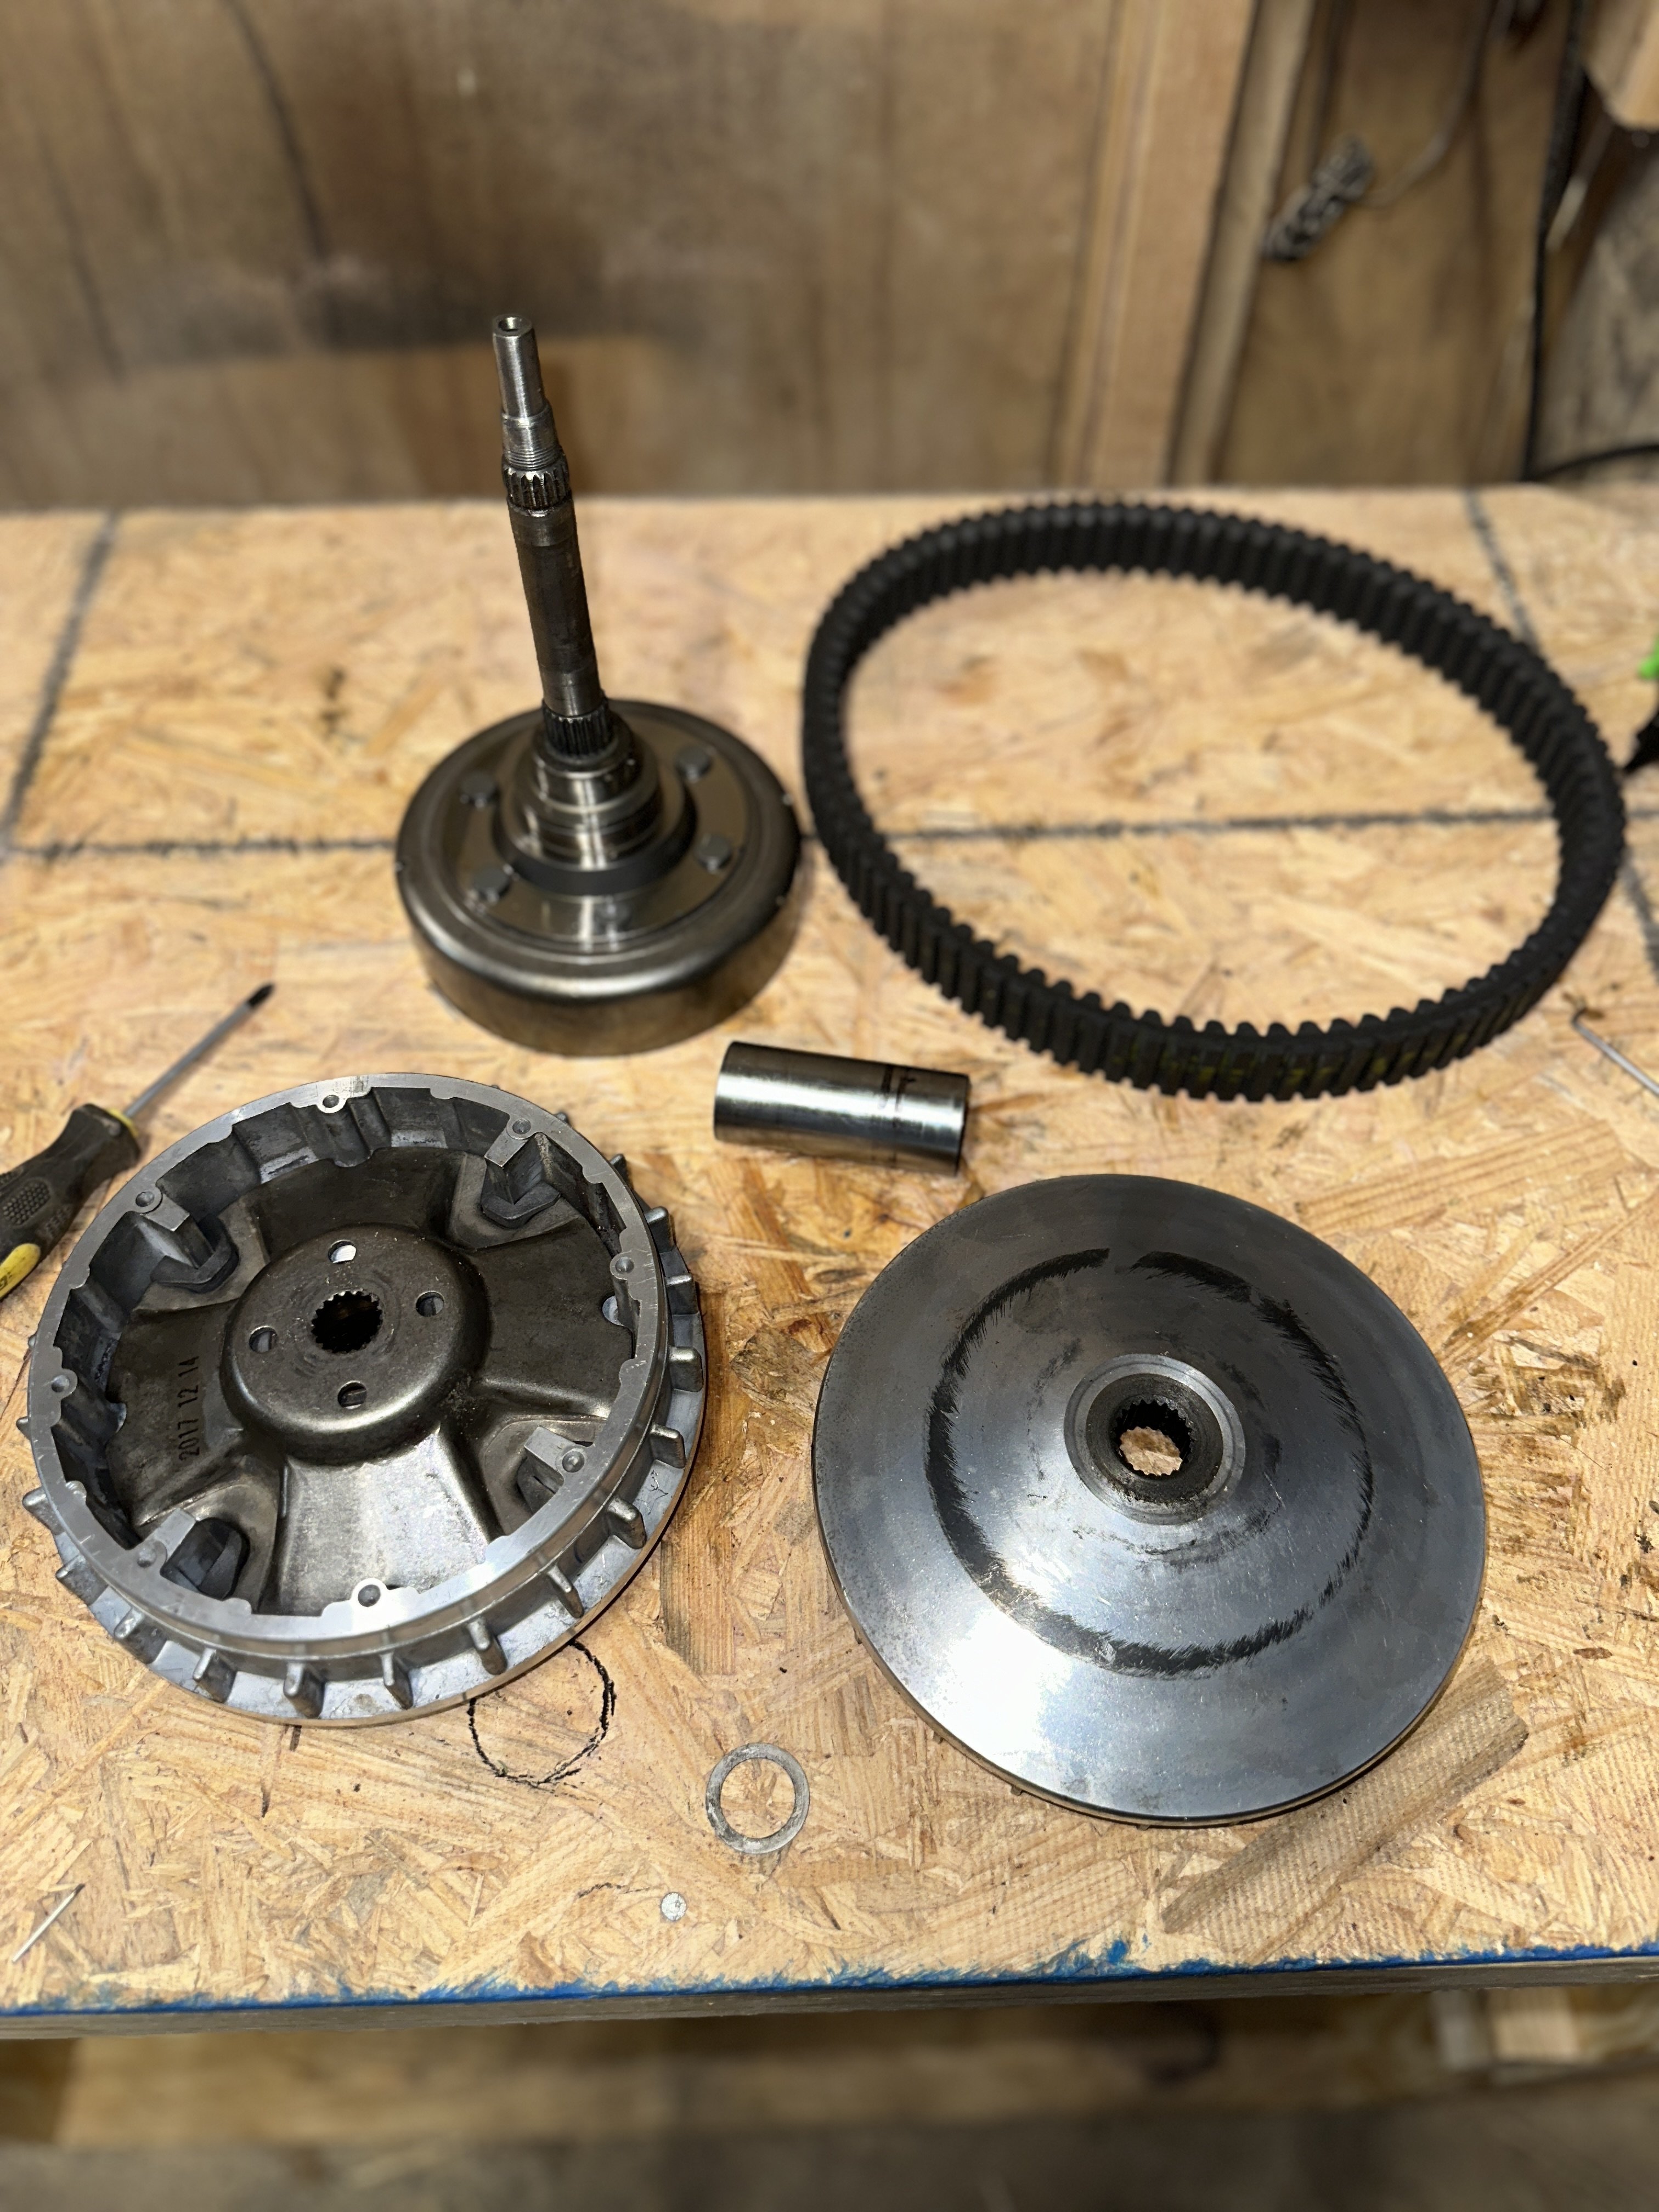
So I've got a Hisun 550 (clone of a Yamaha Rhino 660) that I was doing some work on that required removing the CVT and it's housing. Upon attempting to reinstall the clutch, sheaves, etc, I found that the belt no longer fits - it's far too wide. None of the parts have been replaced, they're all OEM. Exactly the same parts as what I took off a few weeks ago. To be more specific, my belt is 1.25in wide, but the gap between the clutch and the primary sheave is only 7/8in wide. I'll include a few photos to explain. Has anyone ever experienced such a bizarre problem? Any help at all would be appreciated, I've been stuck on this for a month. I'm open to just about any suggestion. Photos:
 1 point
 -
Well if it's the same belt, and same parts that came off there, there's only one conclusion I can come to.. You've assembled it wrong. Take it apart and inspect every part for wear marks that might coincide with some other wear mark and indicate where it had sat before. There's generally some visual indication that parts have been in contact before. Then if you can't find anything, reassemble it following the diagrams. If the service manual doesn't have a very clear diagram look it up in a parts place online, they usually have good diagrams, and sometimes they say what thickness washers etc are. Other than that, see what there is in the way of spacers or sleeves that have got muddled and could/might account for the 3/8 discrepancy.1 point
-
That is strange it doesnt fit, unless there was a spacer that fell out, you tighten the bolts to move the shieves father apart.1 point
-
Here's the instructions for the 550.. Hisun..pdf1 point
-
Yes that makes sence, if the stator is from a newer warrior, as far as i can tell the newer ones did have an 8 and 6 pin CDI connector. I tryed looking up the newer warrior OEM part but it only showed a CDI at an angle that you couldnt see the pin configuration. I revisited your ebay purchase and it does seem right for the 97-2001 warrior, didnt see a link for the harness you bought but if it plugs in it may be compatable. I dont see warriors very much, but it appears the later years went to the 8 and 6 pin configuration just like the big bear 400, i have never seen a 350 with that confuguration. Just reviewing everything I would have bought exactly what you bought thinking it might work. Working on a project like this there are so many variables to over come, i love it, its like putting a puzzel together, may not be worth the time and effort you spent but when you are finished it works, and you are proud of your accomplishment.1 point
-
Try to figure out what year the engine is, I saw a wiring harness with pigtails on eBay it is for a 90-95 warrior they also had the pig tail CDI that goes with it . So I’m thinking your engine is somewhere in that range1 point
-
I've done that before. It's what I normally recommend.. Swap every brass bit and the slide needle from the oem to the aftermarket and they aftermarket often runs good. There are only a couple of reasons for biffing the oem, badly worn slide or throttle spindle, or seized idle mixture screw(which is I think the most common problem). And the slides have to be pretty worn to be a problem. I suppose you have checked the throttle cable has free play Bobby ? As Gw says, look through the carb and make sure the throttle plate is closed right off. And check the choke is going right off. The choke plungers can be different designs in after market. Some have a needle and some are flat ended.1 point
-
You might check to make sure the throttle plate is going all the way back and not binding open slightly. Other than that good reasearch i have never tried using OEM parts in a chinese carb, really didnt think they would work.1 point
-
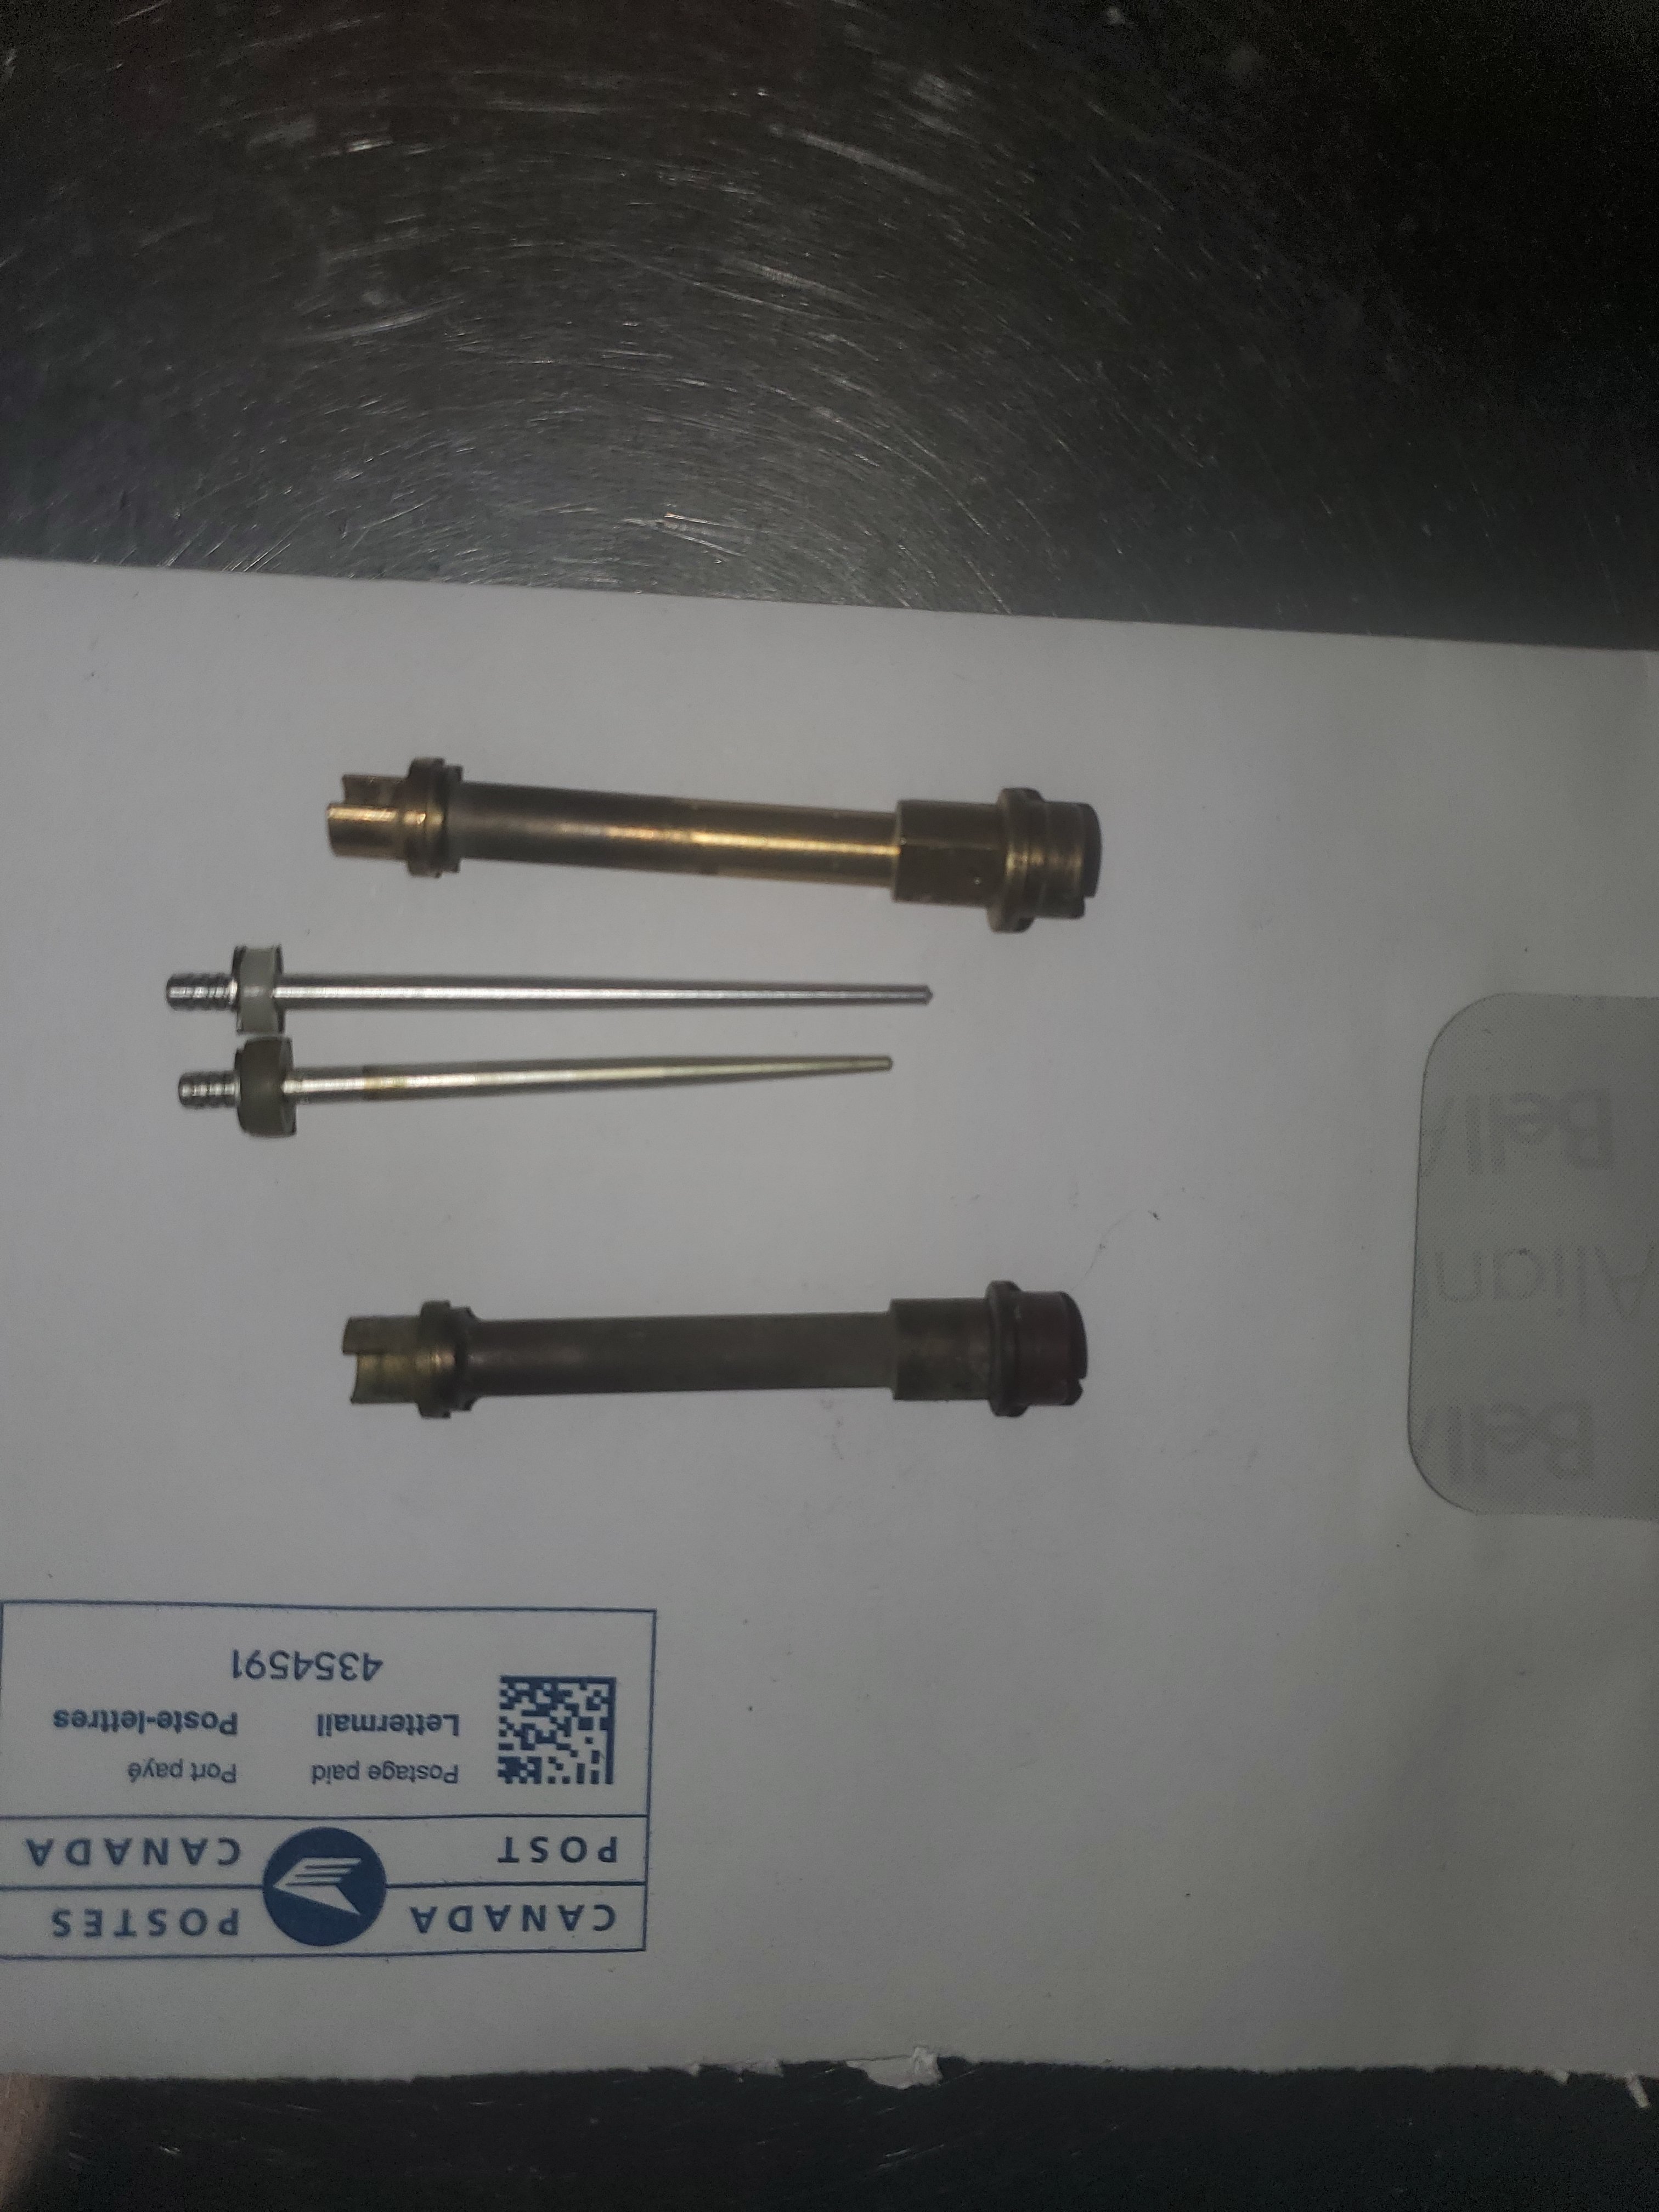
Ok, back to this pig. So I pulled the clean chinese carb back apart, but this time I pulled the factory one apart as well. I compared jet sizes and such, and I stumbled upon something very interesting. The needle sizes are very different, and tapered different. See my picture below. The chinese parts are up top, and the factory parts are below. The emulsion tubes and main jets appear the same, but the needles are vastly different lengths, and taper. I have since installed the emulsion tube, main jet, and needle from the factory carb into the chinese carb, and ran the bike. At first it was still a little lean at idle, but now I have gotten my mixture screw adjustability back. I can now idle, accelerate, and rev at high rpms with no backfiring through the carb. Big step forward. It looks like the long needle was not allowing hardly any fuel through. One issue I have now, is with the idle screw backed all the way out, the bike idles too fast. A little more digging required, but it looks like this junk carb may end up working for me.
1 point
-
I just rebuilt a 96 Kodiak carb for a customer which is almost identical. Did you remove the plastic center block the slide glides on? There is an O-ring in there that gets deteriorated and won't allow the venturi pull the correct amount of fuel up from the jets. The All Balls Racing kit I used came with that O-ring. Also did you adjust the linkage arm so when the buttery starts to open it's lifting the slide at the same time?1 point
-
The idle fuel jet has to have the right size air jet to go with it, and they both have to be suitable for the mixture adjusting screw, which can have different diameter and taper needles, and, the main and it's air jet have to be matched and suit the slide, slide needle and discharge/emulsion tube, and both those different fuel ranges, idle and main, both have to be suitable/matched for one other. The low speed air and fuel jets have to suit the air and fuel main jets. And whole carbs, even when everything is set up and mixes well with no flat spots or wasted fuel, needs to matched to the type of engine it's fitted to. Road bike carbs are set up different to work bikes or scramblers. Even twin cam cam engines are different set up to the same engine with a single cam, not because of the cam specifically, but because of the different power band they've used the twin cam or single cam to achieve. It is best to stick with what the manufacturer has gone to so much trouble sorting out for us. Oh yeah. I don't think the ignition timing will be out either.. I was just saying it does make the plugs burn whiter.1 point
-
I very rarely find one of these out of time, those engines are very resiliant and the valves rarely need adjusting, but this one is older and more than likely been rode hard and put up wet many times. Wrong plug will definately do it, i usually just put in the factory recommended plug. Then there is the carb most of the after market carbs that i have seen have 25 jets, which may be right since the aftermarket ones are slightly different, but the OEM one is 22.5 and the kits i have bought also have the 22.5, but it may not be correct in the aftermarket carb. I think i would keep working on the OEM carb, see if you can get it to factory specs. Aftermarket carbs seem to run lean right out of the box even with the 25 jet, so that might be some of your problem. I have noticed the same spitting and sputtering and not smoothe acceleration with them, that is why i have been working to get all of mine back on OEM carbs.1 point
-
Being too advanced with the ignition timing, or having too hotter plug will beoth make the porclain white, but the spitting backfiring out the inlet does sound like lean. Try your hand across the inlet. Oh, and check the air jets are still in the back of the carb. There should be two brass jets you can see right where the air-cleaner fits on.1 point
-
That sounds like a good plan definately the best way. I dont like using easyouts either and i think the smallest one would still be too big.1 point
-
I have actually destroyed a carb in the past using an easy out. The flutes pull the extractor into the soft brass, actually making it bigger and more stuck. I then split the carb from the force of the easy out. I was talking to a friend with a milling machine, and he thinks we can get very centered up, and drill out the screw until only the threads remain, and then pick them out. This is likely what I will end up trying. Thanks guys for the thoughts. I am going to be disappointed if I end up with the same symptoms. Is there anything electrical that can manifest itself as a lean condition? Or am I only chasing fuel/air?1 point
-
Yeah Gw's right about using the easy-out. If you drill it out too much the easy-out will spread the screw if it's tight and make things worse. Drill it a bit and then try the easy-out. Then if it doesn't turn drill it further. As long as you get the hole real well centered you can drill them fairly thin. I prefer to use an old fashioned egg-beater drill because it's slow and delicate drilling. Heat on the aluminium does help as well.. I've found the most effective part of it though is tapping the outside of that aluminium tube, and if you have thin lube down the hole, the tapping helps it work down the threads even if you don't spread the metal to enlarge the hole. Lube and tap it then drill it, then use an easy-out, or drive a small steel jewelers screwdriver into the hole.. The screwdriver won't spread the hole as much as the easy-out.. if you choose the right size drill and screwdriver.1 point
-
The Big Bears I've worked on have a really small stock pilot jet. I think it was like a 16 or 18 or something. I switched it out for a 22.5 and it started and ran perfect every time. I would bet your needle position isn't helping things. Usually 2 or 3 spots down from the top will give you a better idea what's going on when you blip the throttle. As for the stock carb... another way to get the mixture screw out without drilling is to take a dremel with a cutting wheel and just cut off the empty part of tube that Mech is referring to. Measure how deep the screw is set with a small flathead and mark it on the outside of the tube. Then just cut flush with the head of the screw. If there's room you can now turn the dremel sideways and cut a small slot in the head of the screw just deep enough that a flathead will fit in. you can now attempt to screw it out or use a small impact to break it loose. If its really stuck a little heat from a torch can help as well.1 point
-
I would try everything possible to get it out, before drilling, that is a tiny screw and would be easy to get into the threads and then the carburetor is ruined. I would soak it completely in a combo mixture of carb cleaner and penetrating oil, and use heat if there is no head left on the screw at all and it down in the hole, then you have to drill a small hole and use the smallest ease out and it still may be too big, i dont like using easeouts but are sometimes necessary.1 point
-
You are correct, the needed itself is lifted to the highest position, which means the clip is at the lowest of the 5 slots. My practice when cleaning carbs is to ensure every hole is able to flow carb cleaner in, and out another hole. I then blow compressed air through as well. The pilot jet has no markings. The hole is tiny, and only 1 bristle of my small wire brush fits through it, which is how I cleaned it. The main is 125, which I believe is correct. Great point about choking the carb intake, I'll give that a shot when I put this back together enough to try it. Likely go at it again Sunday. I need to man up and go after that mixture screw in the stock mikuni carb. That is where my best hope lies.1 point
-
You've got the slide needle "lifted to the top slot" ? I hope you mean you have the needle lifted, which would be with the clip in the lowest groove on the needle. You want the needle raised, not lowered.. Have you completely stripped and checked the carb right over, checked every jet and O ring is in there, and that they seem to be about the right sizes/in the right proportions between the fuel jet and it's corresponding air jet, that the float level is right, and that plenty of fuel is getting in through the float needle ? It will be either not getting enough fuel, or getting too much air.. If you put your hand across the back of the carb and only let a bit of air in between your fingers, will it rev up then ? The genuine carbs nearly always run better than any after=market one. I'd try fixing the old one. I've got the idle mixture screws out before by drilling them. First though, most of the screws are in a sort of aluminium tube, and it's often just a thin walled tube in part. Often at the front side of the screw's tube there is a thin walled bit. If you gently tap that bit, as much as is possible, with a punch and tiny hammer, before you drill the screw out, you can spread the metal and expand the hole slightly. Because the screw is only fat where the threads are, you can expand most of the metal that's around the threads. If you look at a mixture screw you'll see the threads only go down a certain way before the needle starts, and the spring is. That's the part that's seized and we can tap the tube around quite a bit of that. When/if you do drill, don't drill so deep that the drill hits the spring. Drill it first with a very tiny drill and stop if it's not exactly in the center. If it's off center, drill that shallow drilling out with a slightly larger drill so that you can then go back to the smaller drill again and drill at an angle with it to correct the centering. Once the tiny drill is getting across to the center position you enlarge the holes and then go back to the tiny one again. Keep doing that. By putting the tiny drill down a slightly larger hole you can realign things. Once you have a hole going down to the right depth and in the center then you drill it out to a size that will just leave a thin wall of threads and then use an easy-out or a screwdriver driven gently in to wind the weakened screw out. The screws are soft and drill easy. Once the center is out of them they loose their grip in the hole. Oh.. It normally only effects them at revs, but a blocked exhaust won't let it suck air in, and will give a lot of back pressure and so make it spit out the carb. There's a difference though between spitting back out the carb, and backfiring back out the carb. Spitting is back pressure, and backfiring is mainly caused by lean mixture.1 point
-
T for top and F for firing.1 point


This leaderboard is set to New York/GMT-04:00

-
Topics
-
-
Gallery


