PolarisRich
-
Posts
211 -
Joined
-
Last visited
Content Type
Profiles
Forum
Gallery
ATV Magazine
Events Calendar
Downloads
Store
Community Map
Everything posted by PolarisRich
-
-

The Official Good morning thread!
PolarisRich replied to BuckBilly's topic in General Talk - Anything Goes!
Morning QC Nice day for a ride! -
The Official Good morning thread!
PolarisRich replied to BuckBilly's topic in General Talk - Anything Goes!
Morning Ox -
The Official Good morning thread!
PolarisRich replied to BuckBilly's topic in General Talk - Anything Goes!
Morning All -
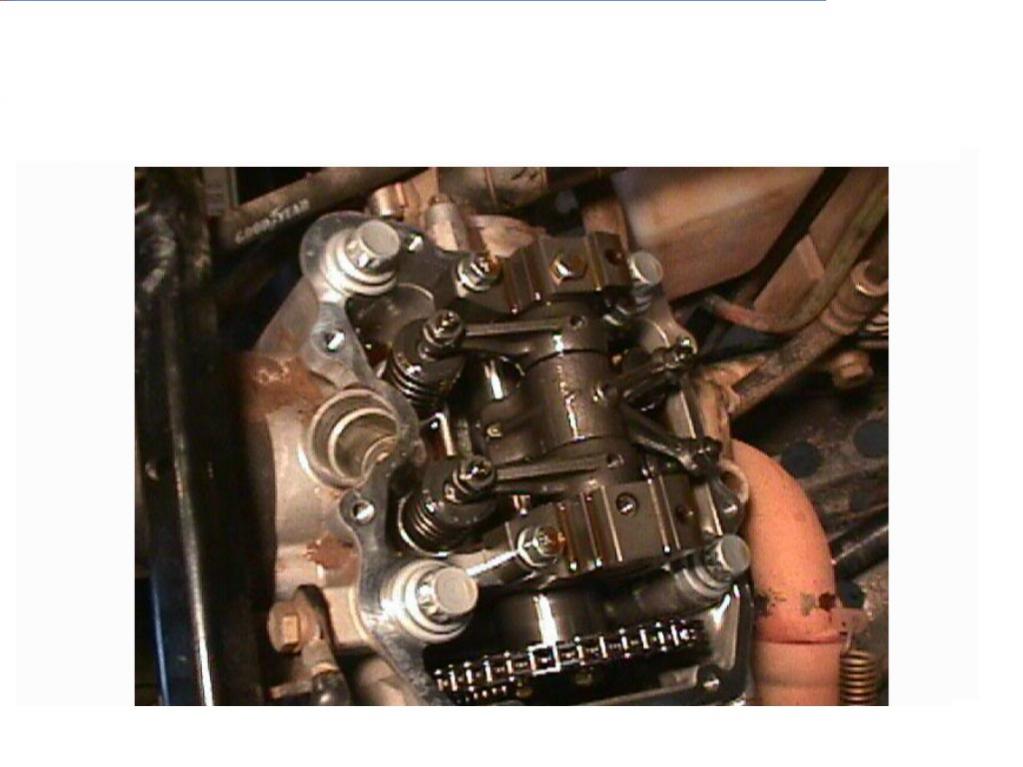
Heres my findings during the valve adjusting process. The two exhaust valves were just less than .004" and the intake valves were tight with no gap causing pressure on the valve it's self. Everything is now adjusted to .006". So I took the bike out for a little run today and I noticed a few things. First the "Pros" The first thing was how easy the bike started, next was how the idle had smoothed out. The idle dosn't fluxuate as much anymore. Throttle responce is a tad better too. Now the only "Con" if you can call it a "Con". There is now a valve train noise that was not there before I did the adjustment. I guess the slight ticking sound is normal, also good for the Cam and the general performance of the engine. Only a "Con" because of the noise.
- 21 replies
-
- 2
-

-

-
- adjustment
- atv
- (and 1 more)
-
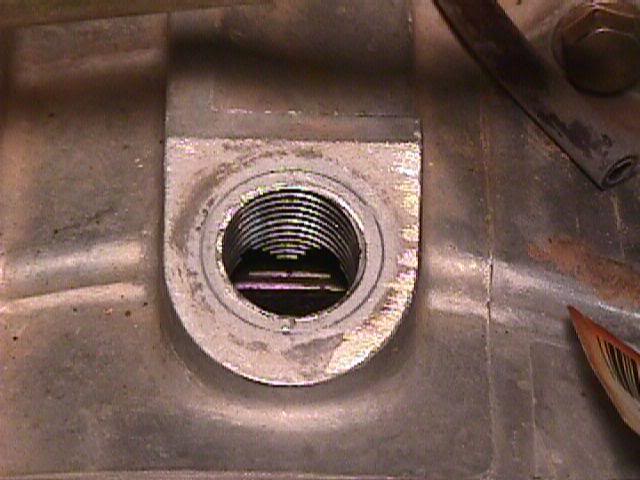
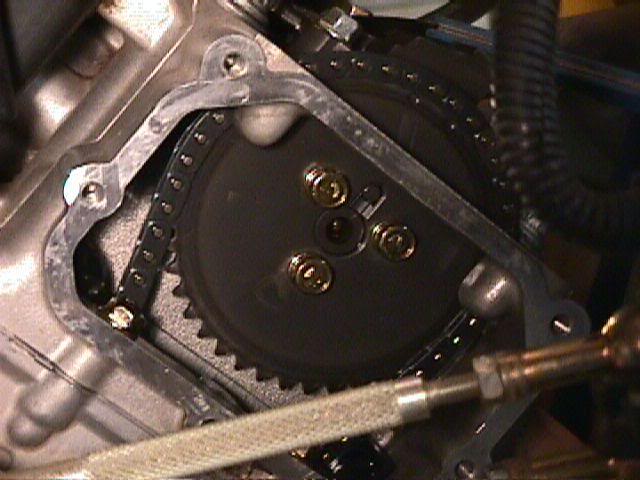
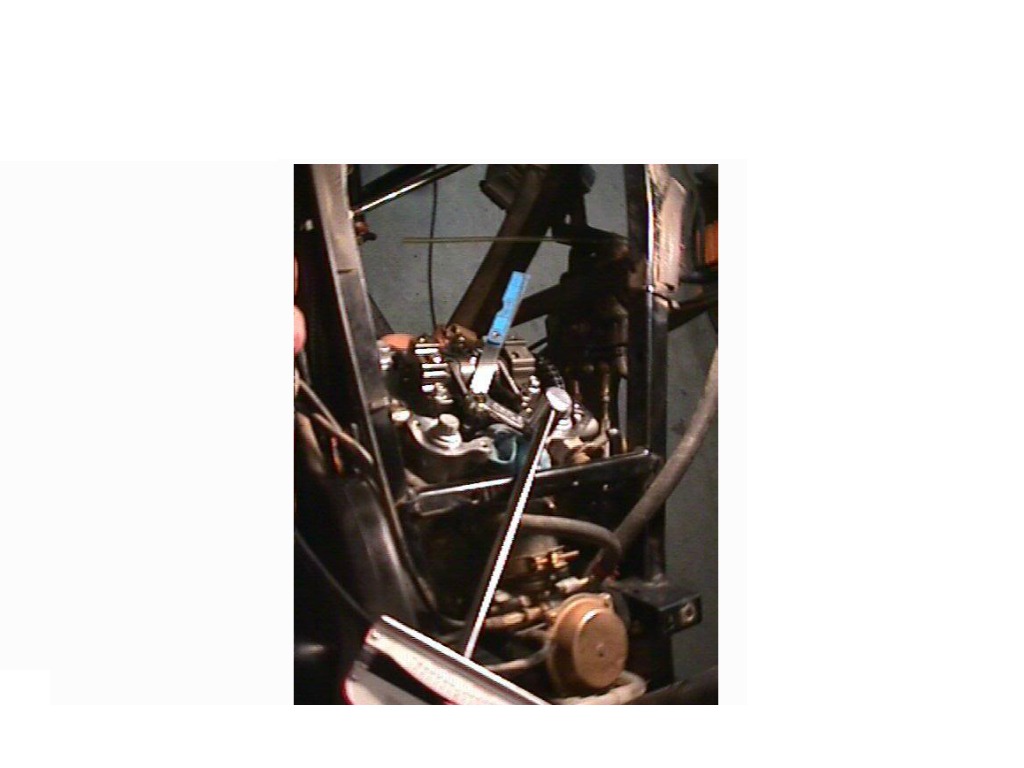
I've never done this before but after reading a few thread I decided to check my valves for the first time and to my surprise it was much easier than I thought. My bike is a 2005 Sp 500 HO. I first pulled the seat and the right side panel off, and that's it! It wasn't too bad to get at. Next I pulled the spark plug out and removed both the head cover ( 8-8mm bolts) [ATTACH]1021[/ATTACH] then the side cam cover (5-8mm bolts). [ATTACH]1023[/ATTACH] Also remove the plug in the recoil cover (14mm bolt) to see the timming marks. [ATTACH]1022[/ATTACH] Next I turned the engine over with the pull cord untill it was at TDC of the compression stroke. The best was to tell that your at TDC of the compression stroke is to rotate the engine until the timing marks are parallel to rocker cover gasket surface. The cam sprocket locating pin will be facing upward directly in line with the crankshaft to camshaft center line. Now fine adjust by looking into the timing hole in the recoil cover and line up the upside down "T" on the flywheel into the center of the hole. [ATTACH]1023[/ATTACH] Now using a feeler gauge, slide the .006" (.15mm)blade between the top of the valve and the bottom of the adjuster and adjust accordingly [ATTACH]1024[/ATTACH] [ATTACH]1025[/ATTACH] To adjust, Loosen the locknut (10mm) and check clearance with a feeler guage. Clearance should be .006" (.15mm) for both, intake and exhaust valves. Turn the adjuster with a stubby flat blade screwdriver untill the proper clearance is achieved then tighten the locknut (5.8-7.2 ft. lbs) while holding the adjuster in place with the screwdriver. Re-check the clearance with the feeler guage one last time and re-assemble the covers (72 in.lbs) and plugs. The only thing that i noticed was that I had to clean and silicone the side cam cover other than that I found the whole process rather simple. I'd give it a 4 out of 10 on the skill level scale. I hope this helps! Thanks Rich

- 21 replies
-
- 1
-
-
- adjustment
- atv
- (and 1 more)
-
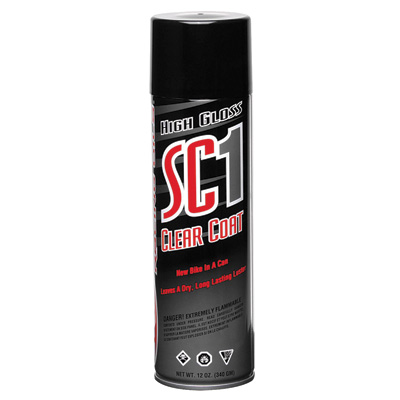
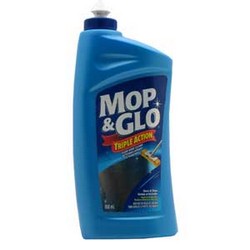
I've used a few products with some good results. The first product is Maxima SC1 Clear Coat. [ATTACH]1019[/ATTACH] This stuff works great, easy to use and smell good too. Clean your bike and spray it on. Leave it sit over night and your plastics will look like new. The other stuff that I tried that gave me some decent results was Mop & Glo. [ATTACH]1020[/ATTACH] Just apply with sponge brush slowly so not to make air bubbles and let dry over night. Both products act like a clear coat and hide all the little surface scratches
-
What do you think of my Raptor Body Wrap?
PolarisRich replied to RuKind007's topic in General Talk - Anything Goes!
Looks great, Nice job installing but I bet it was a bit of a PITA I also bet the old cougers just love it! -
The Official Good morning thread!
PolarisRich replied to BuckBilly's topic in General Talk - Anything Goes!
Good morning QC, wet and rainy today in Southern Ontario -
The Official Good morning thread!
PolarisRich replied to BuckBilly's topic in General Talk - Anything Goes!
Top of the morning y'all. -
Mossy Oak Graphic 3M Vinyl Mod Before After
-
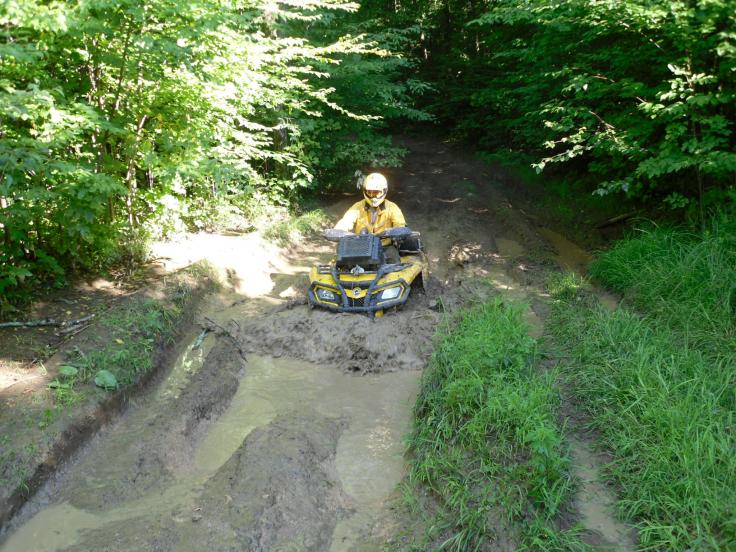
What! No pictures of anyone stuck? Looks like you guys had a blast, I can't wait to get out riding again.
-
Happy Trails...
-
The Official Good morning thread!
PolarisRich replied to BuckBilly's topic in General Talk - Anything Goes!
Gooooood Morning everyone! -
Welcome to QUADCRAZY Scrammy! Nice to see another Polaris Fan here. Great site and a lot of knowledgeable people too!
-
The Official Good morning thread!
PolarisRich replied to BuckBilly's topic in General Talk - Anything Goes!
I don't know about "good", but it sure is a hangover morning! -
The Official Good morning thread!
PolarisRich replied to BuckBilly's topic in General Talk - Anything Goes!
Top of the morning to ya all! -
Wow now thats a cool battery 8 Cell EVO 2 Dimensions: 112MM (L) x 60MM (W) x 103MM (H) Positive Terminal Location: Left Weight: 825 grams (1.81 lb) Voltage (Charged): 13.6V Amperage: 15 Pbeq A/H Cold Cranking Amps: 275 CCA Operating Environment: -18°C (0°F) to 60°C (140°F) Typical Applications: 1000cc and under multi-cylinder motorcycles and 450cc singles. 8 Cell EVO2 (100-011) - $159.99 I been doing some research and I haven't been able to find too many reviews on using this battery on ATV's and Winching.
-
I have regular lead acid YUASA in it right now and I want to upgrade to a Maintenance Free AGM somewhere in the 220 CCA or more with a longer Amp Hour.
-
Hey guys I have to replace my battery on my Sportsman soon and I was wondering if there is a better battery for winching other than the stock OEM battery. I was also looking at getting a battery charger that will keep the battery charged while the bike is in storage. What do you guys use?
-
"Runva Winch" Anyone ever heard of them?
PolarisRich replied to PolarisRich's topic in General ATV Discussion
I got my winch in the other day and it's all installed. Nice and clean looking install and the winch sounds nice, now I just need to get out riding so i can try it out. I think the hardest ting about the install was having to cut the front cover of the bike to let the fairlead stick out. -
"Runva Winch" Anyone ever heard of them?
PolarisRich replied to PolarisRich's topic in General ATV Discussion
Sorry! I forgot to mention that I only payed $159 and the shipping was free. -
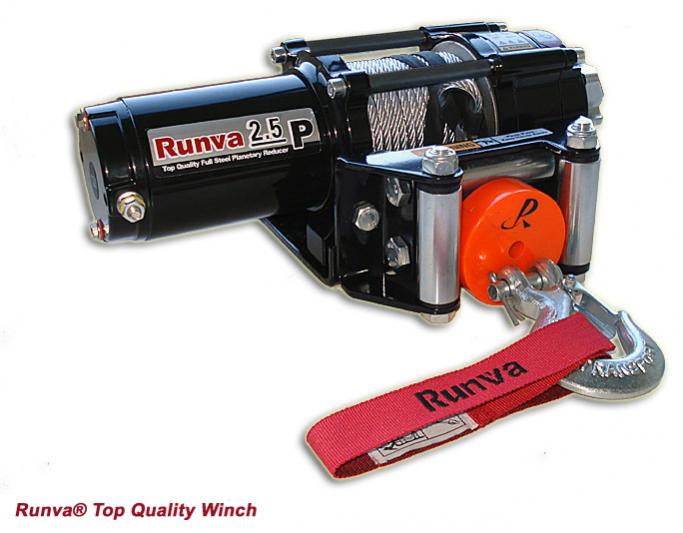
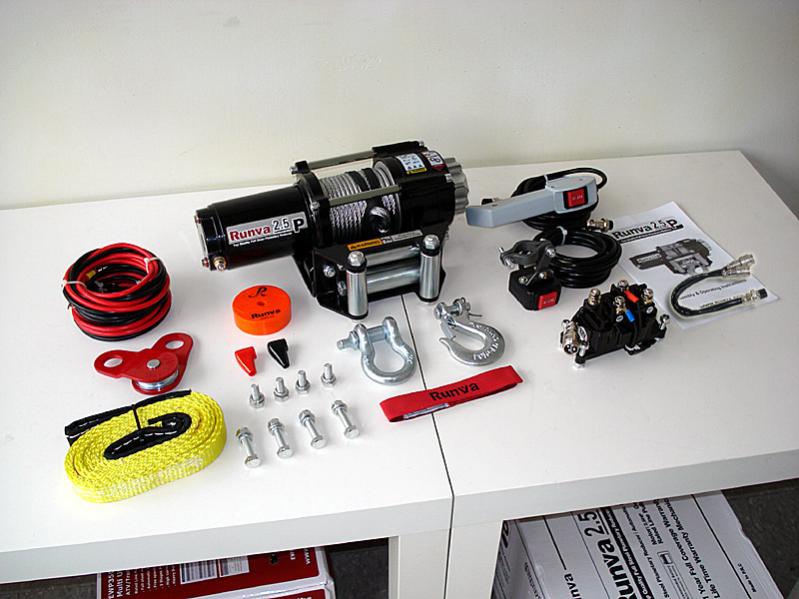
I know this is a little after the fact, but I just ordered a "Runva Winch 2.5P 2500 lb ATV Winch Super Deluxe Package" and I was wondering if anyone has ever used one! I know Runva has been big in the Jeep mudding circuit for a while now. They now seem to be aiming there sights at the ATV and UTV worlds. This is my first winch and winch install. I know it's not a hard job, but any info or tricks would be greatly appreciated. I'll be installing it on a 2005 Polaris Sportsman 500. I just bought a original Pure Polaris Mounting Plate and Fairlead bracket, the only problem is that it did not come with any bolts. So lets hear your opinions!!!!! [ATTACH]956[/ATTACH] [ATTACH]957[/ATTACH]
-
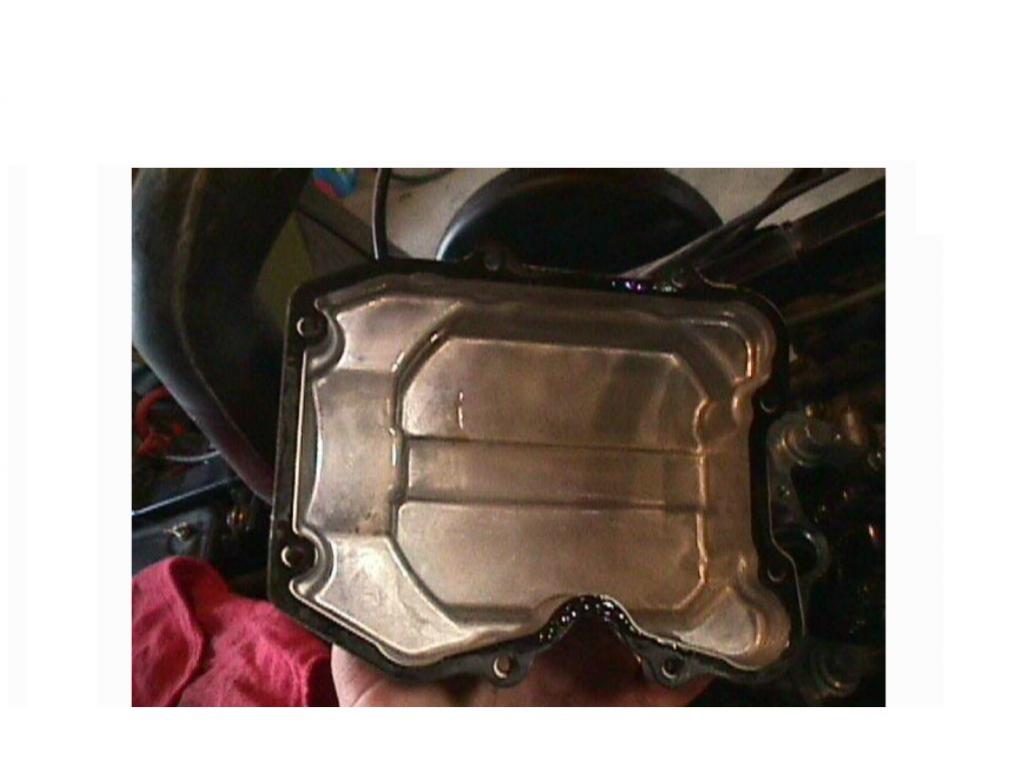
So i found the problem. The bottom left hand bolt the one thats about 3" long was wrong. Who ever replaced the clutch must have lost the bolt in question and replaced it with a different (Wrong Size) bolt. Instead of using a metric fine thread bolt the dumb as* use a standard 1/4 thread bolt that was too short. They cross threaded the bolt so bad that it never tightened down on the cover, thus causing the leak. I drilled and tapped the hole and replaced the bolt so all should be good now. I was able to save and clean the gasket that was on the cover and I used the blue gasket silicone to seal it. I'm going to wait till tomorrow to refill the bike with oil. Thanks
-
Hey guys, A friend dropped off his late 80's Big Bear 350 for me to give it a once over. You know, oils's, brakes and grease. I thought I was done with the bike when I noticed a pool of oil under the bike. It looked like it was coming from the clutch cover. It looks like someone has worked in the clutch before because of all of the sloppy blue silicone around the cover. Now my questions since i dont have a manual are.. 1) Can I just remove the cover and not have to worry about pieces of the drivetrain falling out? 2) Is there a gasket, do I need a gasket or can i just clean and re-silicone? 3) I noticed a clutch adjuster on the cover, do I need to do anything to it before I remove the cover or or just leave it alone? I've not worked on too many Yamaha's before so any help would be appreciated! Thanks Rich