-
Posts
3,925 -
Joined
-
Last visited
-
Days Won
208
Content Type
Profiles
Forum
Gallery
ATV Magazine
Events Calendar
Downloads
Store
Community Map
Everything posted by Frank Angerano
-
Polaris 500 sportsman give it gas stalls
Frank Angerano replied to Flipper Tiffany Roper Jones's topic in Polaris ATV Forum
It happens. We all (is flippers) get that occasional machine that does this to us. Best part is when it’s figured out and running good it’s worth the work. So walk away and do some research and between you and Quadcrazy there will be a logical answer. -

Polaris 500 sportsman give it gas stalls
Frank Angerano replied to Flipper Tiffany Roper Jones's topic in Polaris ATV Forum
No im lost with this. I will keep looking into it. Just got back from a long weekend. I will talk to a buddy of mine who specializes in Polaris. -

Yamaha Warrior clutch/carb/exhaust issues
Frank Angerano replied to JacobSlabach's topic in Yamaha ATV Forum
What's up @JacobSlabach welcome back. Use a little gasoline to get pine tar off. Wipe the plastics down good with the gas as well then hit them with a good armorall coating. -

Polaris 500 sportsman give it gas stalls
Frank Angerano replied to Flipper Tiffany Roper Jones's topic in Polaris ATV Forum
I hear you but that’s the function of a regulator I’m sure you know that already but maybe it’s defective? Was it an oem or aftermarket? -
The reserve inlet is part of the gas petcock. If you were to remove it there is a long and short screen. The longer is for the on setting and short for reserve setting obviously. So my guess is the screen in the reserve pick up screen could be blocked, or the small port on the petcock behind the valve is clogged. You would see two screws where the on off is shown. They come off and the valve cover comes off and you can inspect. But he careful because once you open that up they are hard to get back together without leaking again due to the old gasket coming off and going back on. Ive always drained the tank and pulled the gas line off. Put a new long hose like theee feet and clear on the petcock and put it on the reserve and blow into it and see how freely it flows. Same with the on setting and see if there is a difference. If there is an obvious difference then take that long hose and hang it up higher then the tank and spray carburetor cleaner in the hose until it fills up. The pressure in the hose will keep pushing the dirt into the tank and freeing it up. Then it’s just a matter of putting a little gas in the tank and flushing it.
-

Polaris 500 sportsman give it gas stalls
Frank Angerano replied to Flipper Tiffany Roper Jones's topic in Polaris ATV Forum
If it’s over charging then the regulator/rectifier is no good. -

1996 Kawasaki Mojave KSF250 No Spark
Frank Angerano replied to Chris2018's topic in Kawasaki ATV Forum
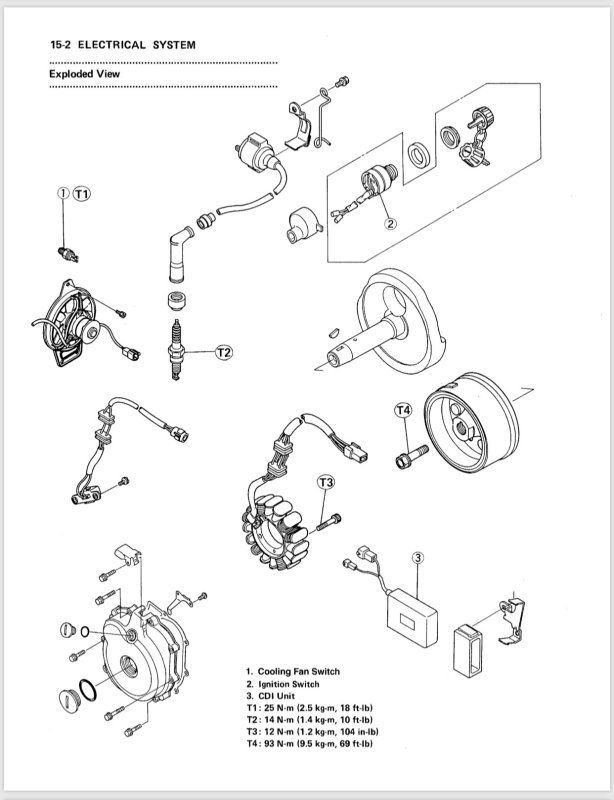
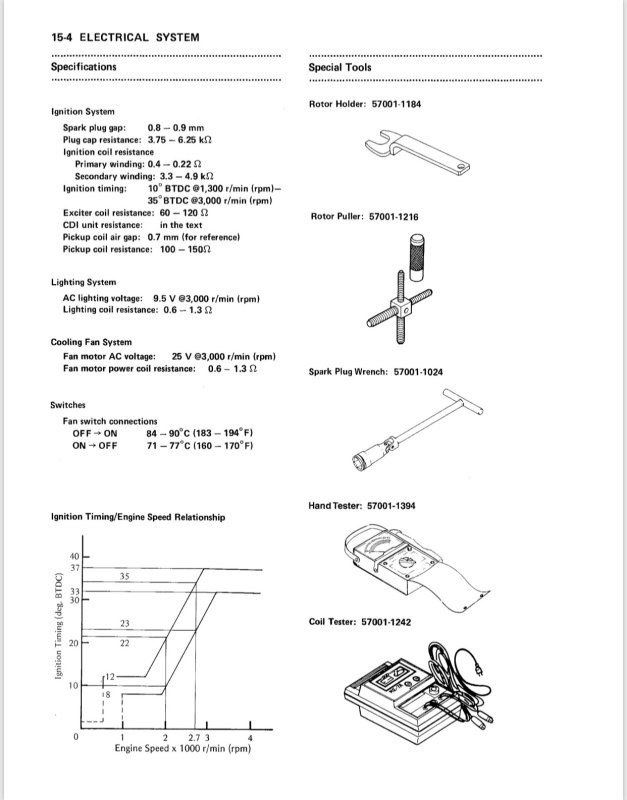
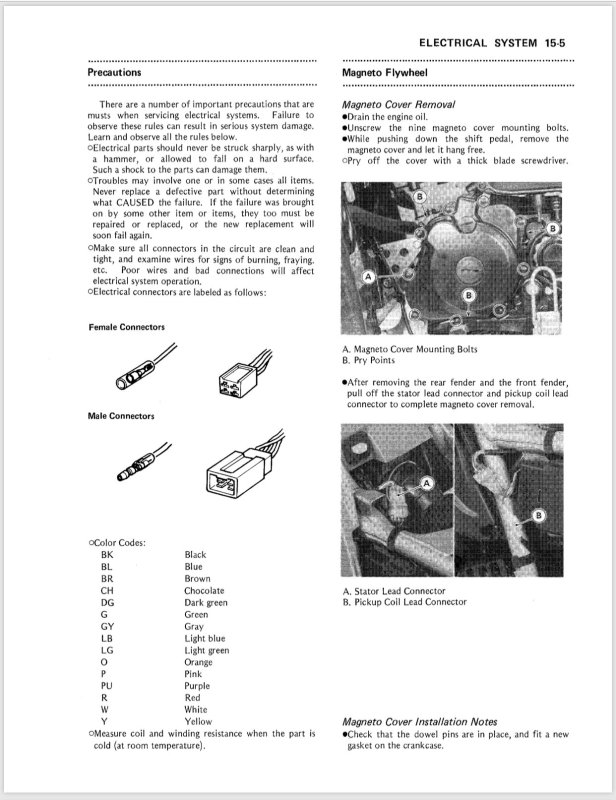
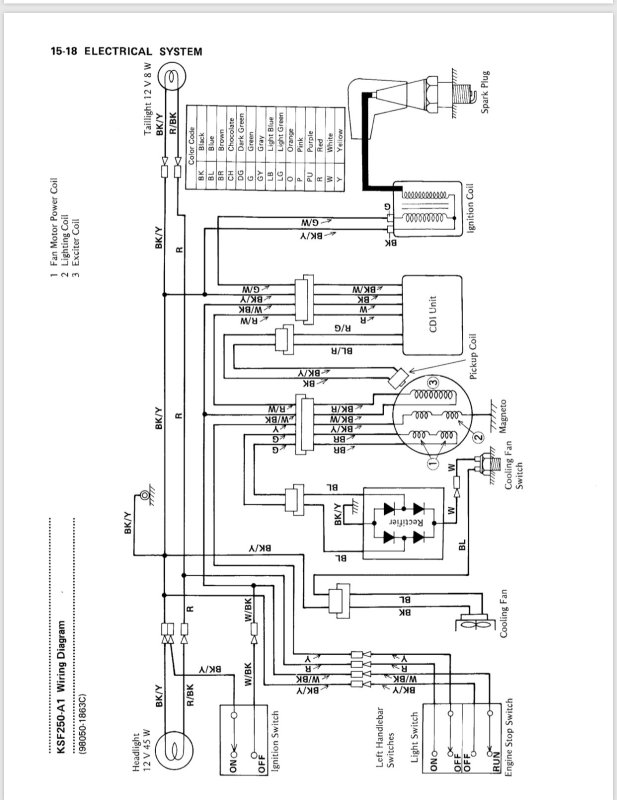
Once you rule out all the other parts which you can test that would qualify the cdi as pretty much your culprit. In addition to all of that testing we spoke about the additional items would be an ohms/continuity test on the kill switch, wiring is all in tact and inspected for damage or a worn out piece of wire insulation that is allowing the copper conductor to touch the frame and the ignition switch is properly working. Lastly it could be as simple as a corroded plug. But some dielectric grease and open all plugs and connectors one at a time and clean and add the geese. It’s an older bike and corrosion happens after a while. It sounds like a lot but this is all about two hours worth of work that will rule out all other parts. Then we can try one more thing with the cdi that will sound outlandish but it’s worth a crack. Let me know! -

1996 Kawasaki Mojave KSF250 No Spark
Frank Angerano replied to Chris2018's topic in Kawasaki ATV Forum
Ok for so the cdi you really can’t test. All other components you can. The stator test is pretty easy and I’m sure you did it the right way but can you explain the tests you did and how you did it ? As far as the secondary coil goes that too. My money would be on the cdi but a stator is a usual suspect also. -

1996 Kawasaki Mojave KSF250 No Spark
Frank Angerano replied to Chris2018's topic in Kawasaki ATV Forum
Here is what you should need. The wiring diagram covers from 1987 to 2002. Like I said I’m tearing into my own Mojave so any questions you have ask away. Click on each pic to see it clearly. Let us know if you need a hand with troubleshooting. Good luck. -

1996 Kawasaki Mojave KSF250 No Spark
Frank Angerano replied to Chris2018's topic in Kawasaki ATV Forum
Lol I hear ya. They say money talks, all mine ever says is GOOD BYE! Let me see if I can dig anything up for you. -
That’s great. Let us know how it turns out as well as some progress photos of the bike as you bring it back to life.
-
That’s some good stuff right there @Russell Senior Welcome to Quadcrazy.
-
Agreed. I would rather a used oem then a Chinese one. So it’s a 1998 ? https://rover.ebay.com/rover/0/0/0?mpre=https%3A%2F%2Fwww.ebay.com%2Fulk%2Fitm%2F183662188337 I think your regulator will work for a few different bikes. Take a look on eBay
-
I like it! Def worth the effort Bc honestly there is a person out there with the same bike that would pay $200 just for the plastics and racks. So you will get your money back if the engine is beyond repair.
-
That’s good. Able to find another one ?
-
That’s great a 93???? Sounds fun post some pics. This is one of my more intact machines that I picked up but I will take them either way! Hate waiting on parts!!!
-
That is correct you should get the same reading or close to the same. Should have 5 wires, three on one plug (phases) and two on the other plug (positive and negative) tester should have a ohm setting with the diode symbol. Take the red test lead put it on the black (negative) wire, take the second test lead and go from each of the three phases and the readings should be the same. Then do the same thing except switch the black test lead to the red (positive) wire and go to the phases again. They all should be close. Any open/zero reading is a bad diode.
-

Polaris 500 sportsman give it gas stalls
Frank Angerano replied to Flipper Tiffany Roper Jones's topic in Polaris ATV Forum
Holy crap a second failure!!!! Ok time to take a breather and really look into this to see what’s happening. That is a serious failure. Without disturbing too much try to open the head up see what’s loose or does not look right. It’s almost as if the engine is kicking backward ? -

Metal shavings in crankcase of Baja Storm 125
Frank Angerano replied to Adrian Ciotinga's topic in General ATV Discussion
Ok so if there is no obvious bolts or keyways holding that sprocket on and it’s pressed on the cam then your going to have to unbolt the cam from the head so the cam and sprocket come off as one. Just mark where the cam journals (parts that hold the cam) down so they go right back on in the same exact spot. -
Got the carb broken down and rebuilt. It all seemed in tact and usable. The jets were a little scared up from what appears to be marks from using the wrong screwdrivers on them. I filed the scuff marks down and polished as best possible. If there are any performance issues I will swap them out with direct replacements. Engine is finally clean and ready to come off of the frame. I ordered a bunch of parts that are in route. Oem Kawasaki green paint for the frame and a few other goodies for the engine and sole cosmetic stuff. Overall it looks like I will be into this thing for about $700 to $750 bucks If I don’t need anything more, that’s including the quad itself and not my labor of course. So not bad so far but that’s all speculation for now until this thing fires up and runs. But honestly I absolutely love tearing these older machines apart that have been sitting around and bringing them back to life! Little by little and more to come stay tuned!
-

2000 Yamaha 400 Big Bear, dies off idle
Frank Angerano replied to MarkinAR's topic in Yamaha ATV Forum
Prob so but nothing that a little sealant can’t fix. Its gone and that’s a wrap but I give you a lot of credit for seeing it through. Nice work ! -

Metal shavings in crankcase of Baja Storm 125
Frank Angerano replied to Adrian Ciotinga's topic in General ATV Discussion
Once that tensioner comes off you should be able to take the chain off. Look on the sprocket there should be bolts to take it off. If not then you have to unbolt the cam from the head. -

2000 Yamaha 400 Big Bear, dies off idle
Frank Angerano replied to MarkinAR's topic in Yamaha ATV Forum
Wow that’s great news brother. Takes time but worth the effort! Enjoy the hard work and ride safe. -

Metal shavings in crankcase of Baja Storm 125
Frank Angerano replied to Adrian Ciotinga's topic in General ATV Discussion
So the valves would most likely stay attached to the head on your average atv. I honestly don’t think it’s piston and rings but more so your valve seals but either way you should change the valve seals based on what you have to take apart to change the piston and rings. So do this first. Get the piston to top dead center. Take pics of where the cam sprocket and the marks are on the top end so you can put it back the same way. Remove the carburetor, exhaust and valve cover. Unbolt the sprocket from the cam Remove the top head of the engine .Remove the timing chain tensioner that’s in the side of the cylinder and the bolts holding the cylinder to the engine block. Slide the cylinder up off of the piston. -

Lost trails night ride glow riders.
Frank Angerano posted an event in ATV Poker Runs and Riding Events
Going to attend with a few friends. I think it would be a cool ride with all the lights and glow sticks etc. I will be out there for the first half of the day to tear it up and get re acquainted with the trails and break off for dinner and then right back into the night ride. Anyone in the northeast vicinity that has the date open should try to attend. It would be nice to meet a few more Quadcrazy members. @06kfx440 let’s go brother !


