Gwbarm
-
Posts
3,177 -
Joined
-
Last visited
-
Days Won
185
Content Type
Profiles
Forum
Gallery
ATV Magazine
Events Calendar
Downloads
Store
Community Map
Everything posted by Gwbarm
-
Looked good no pitting, cleaned up inside lip with wire brush you can see in photo 6 no rust just a lot of remnants of stop leak hard brittle stuff.
-
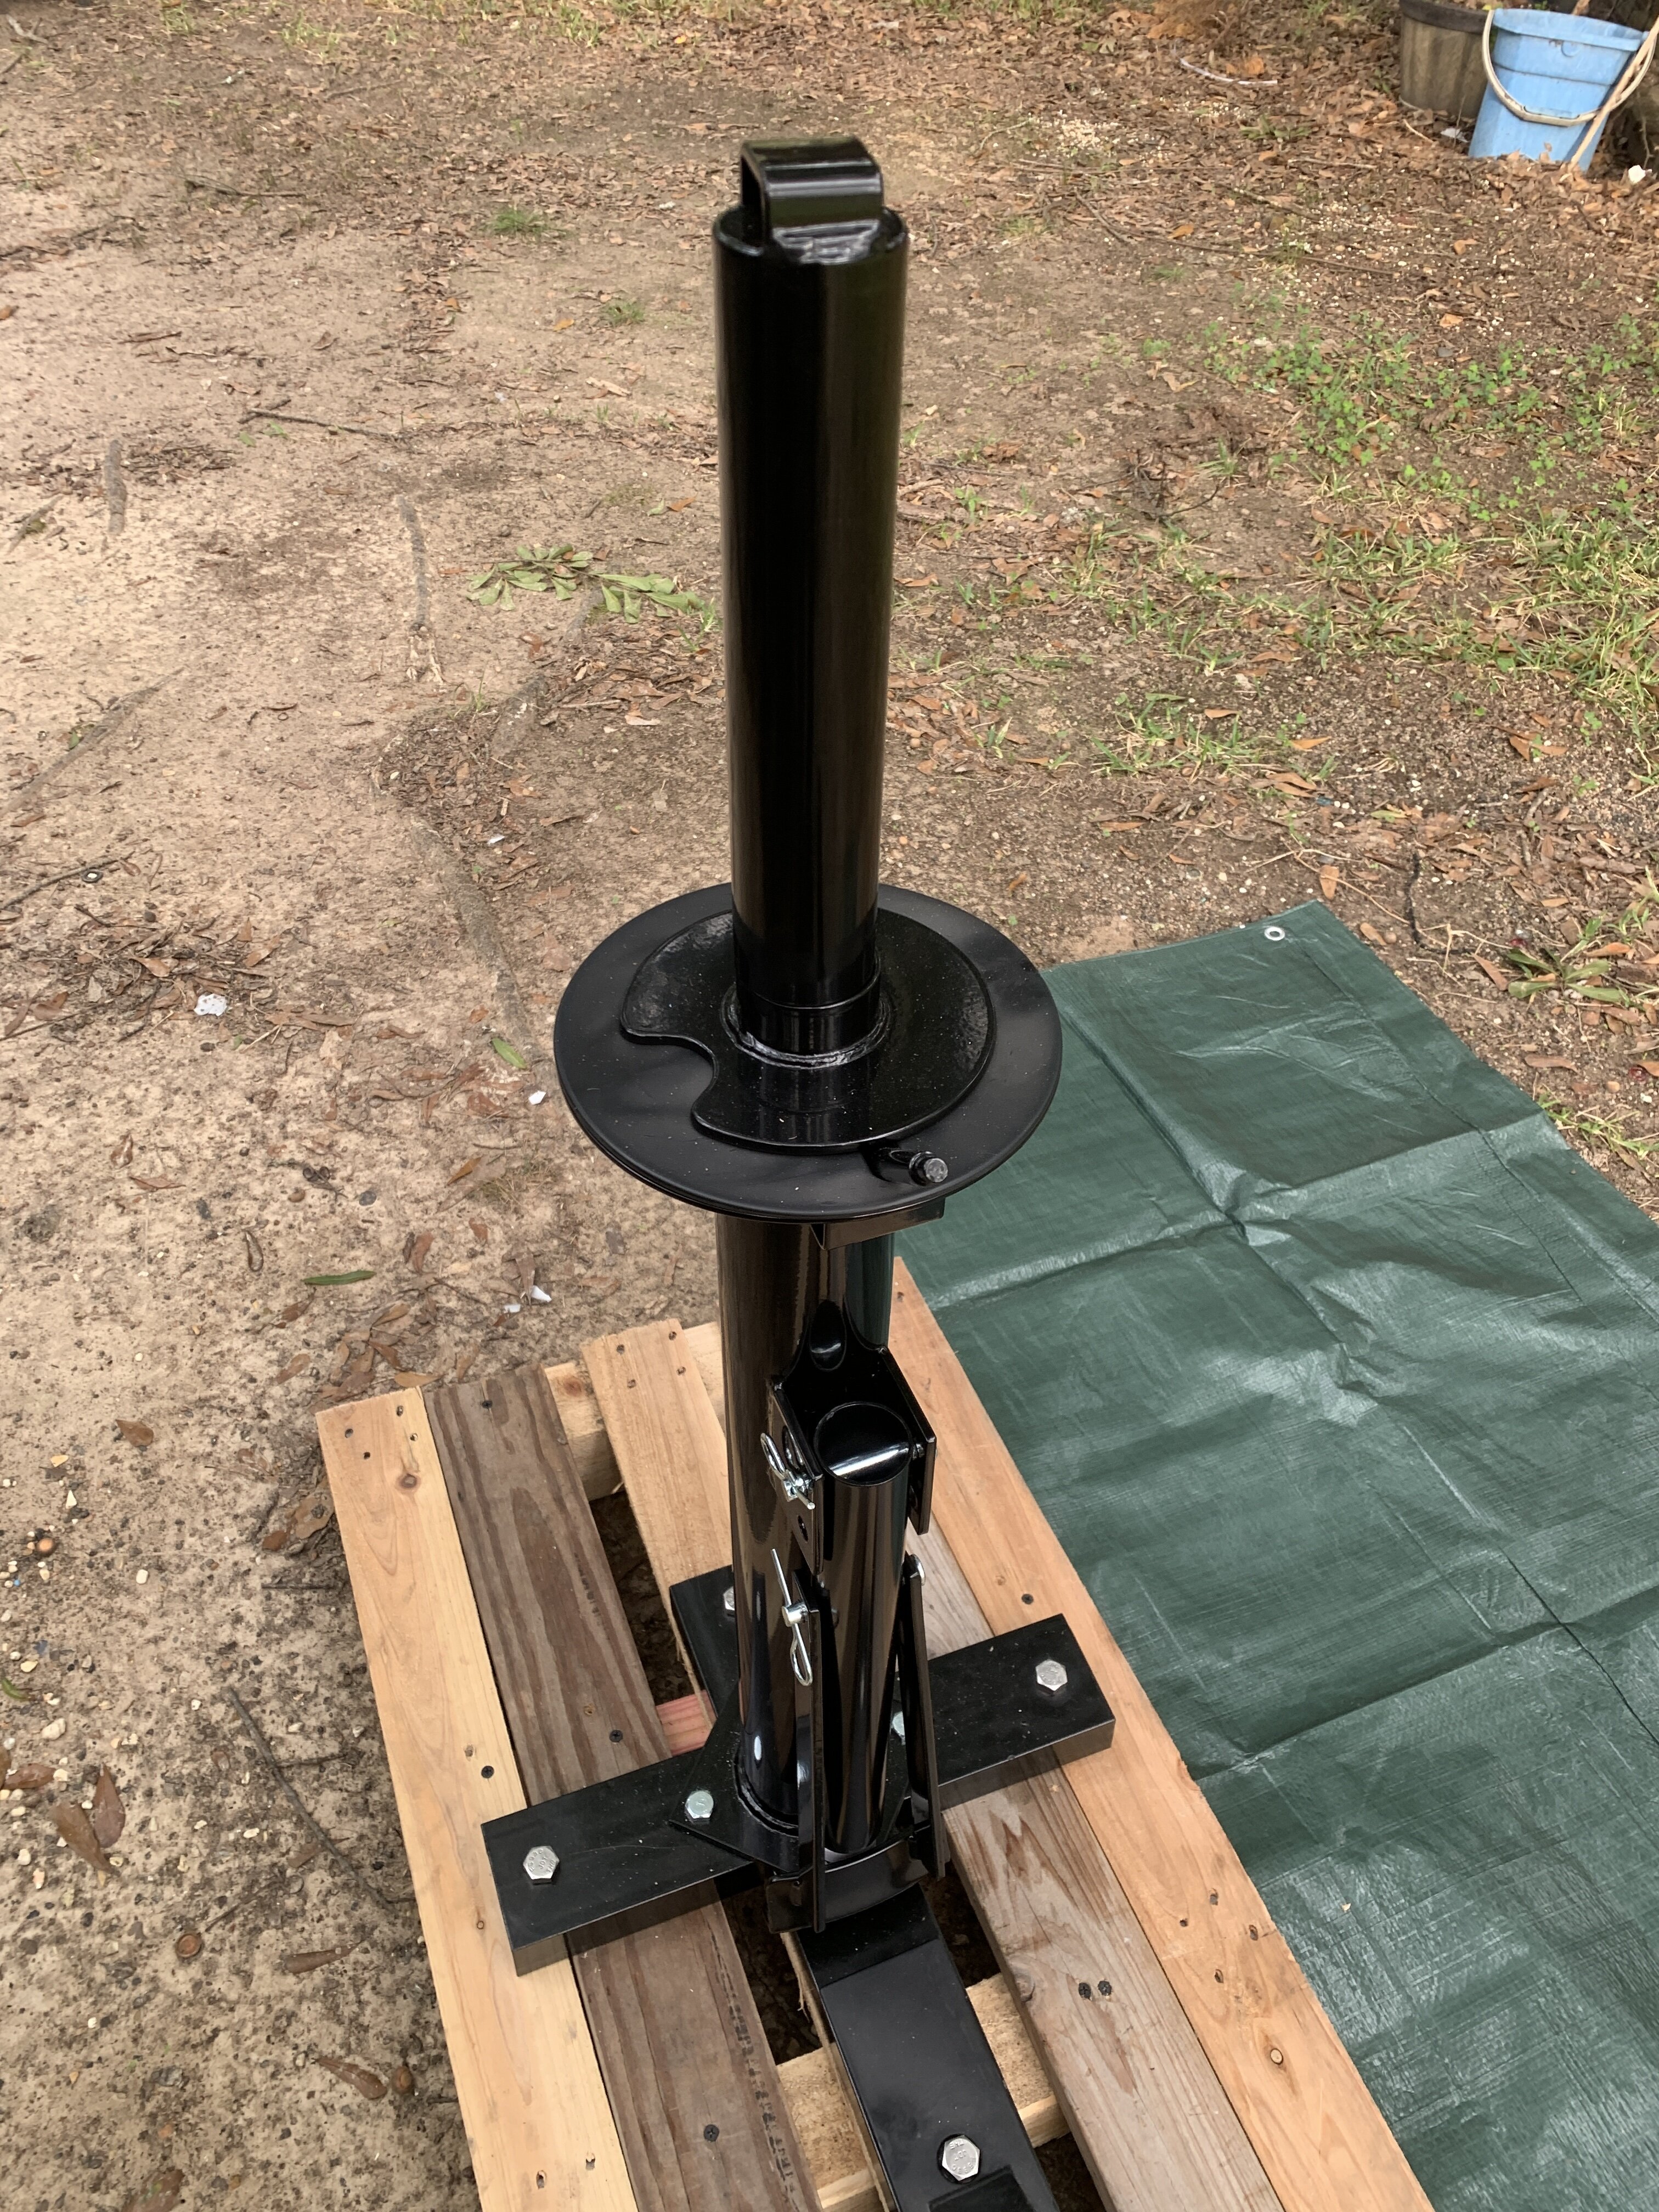
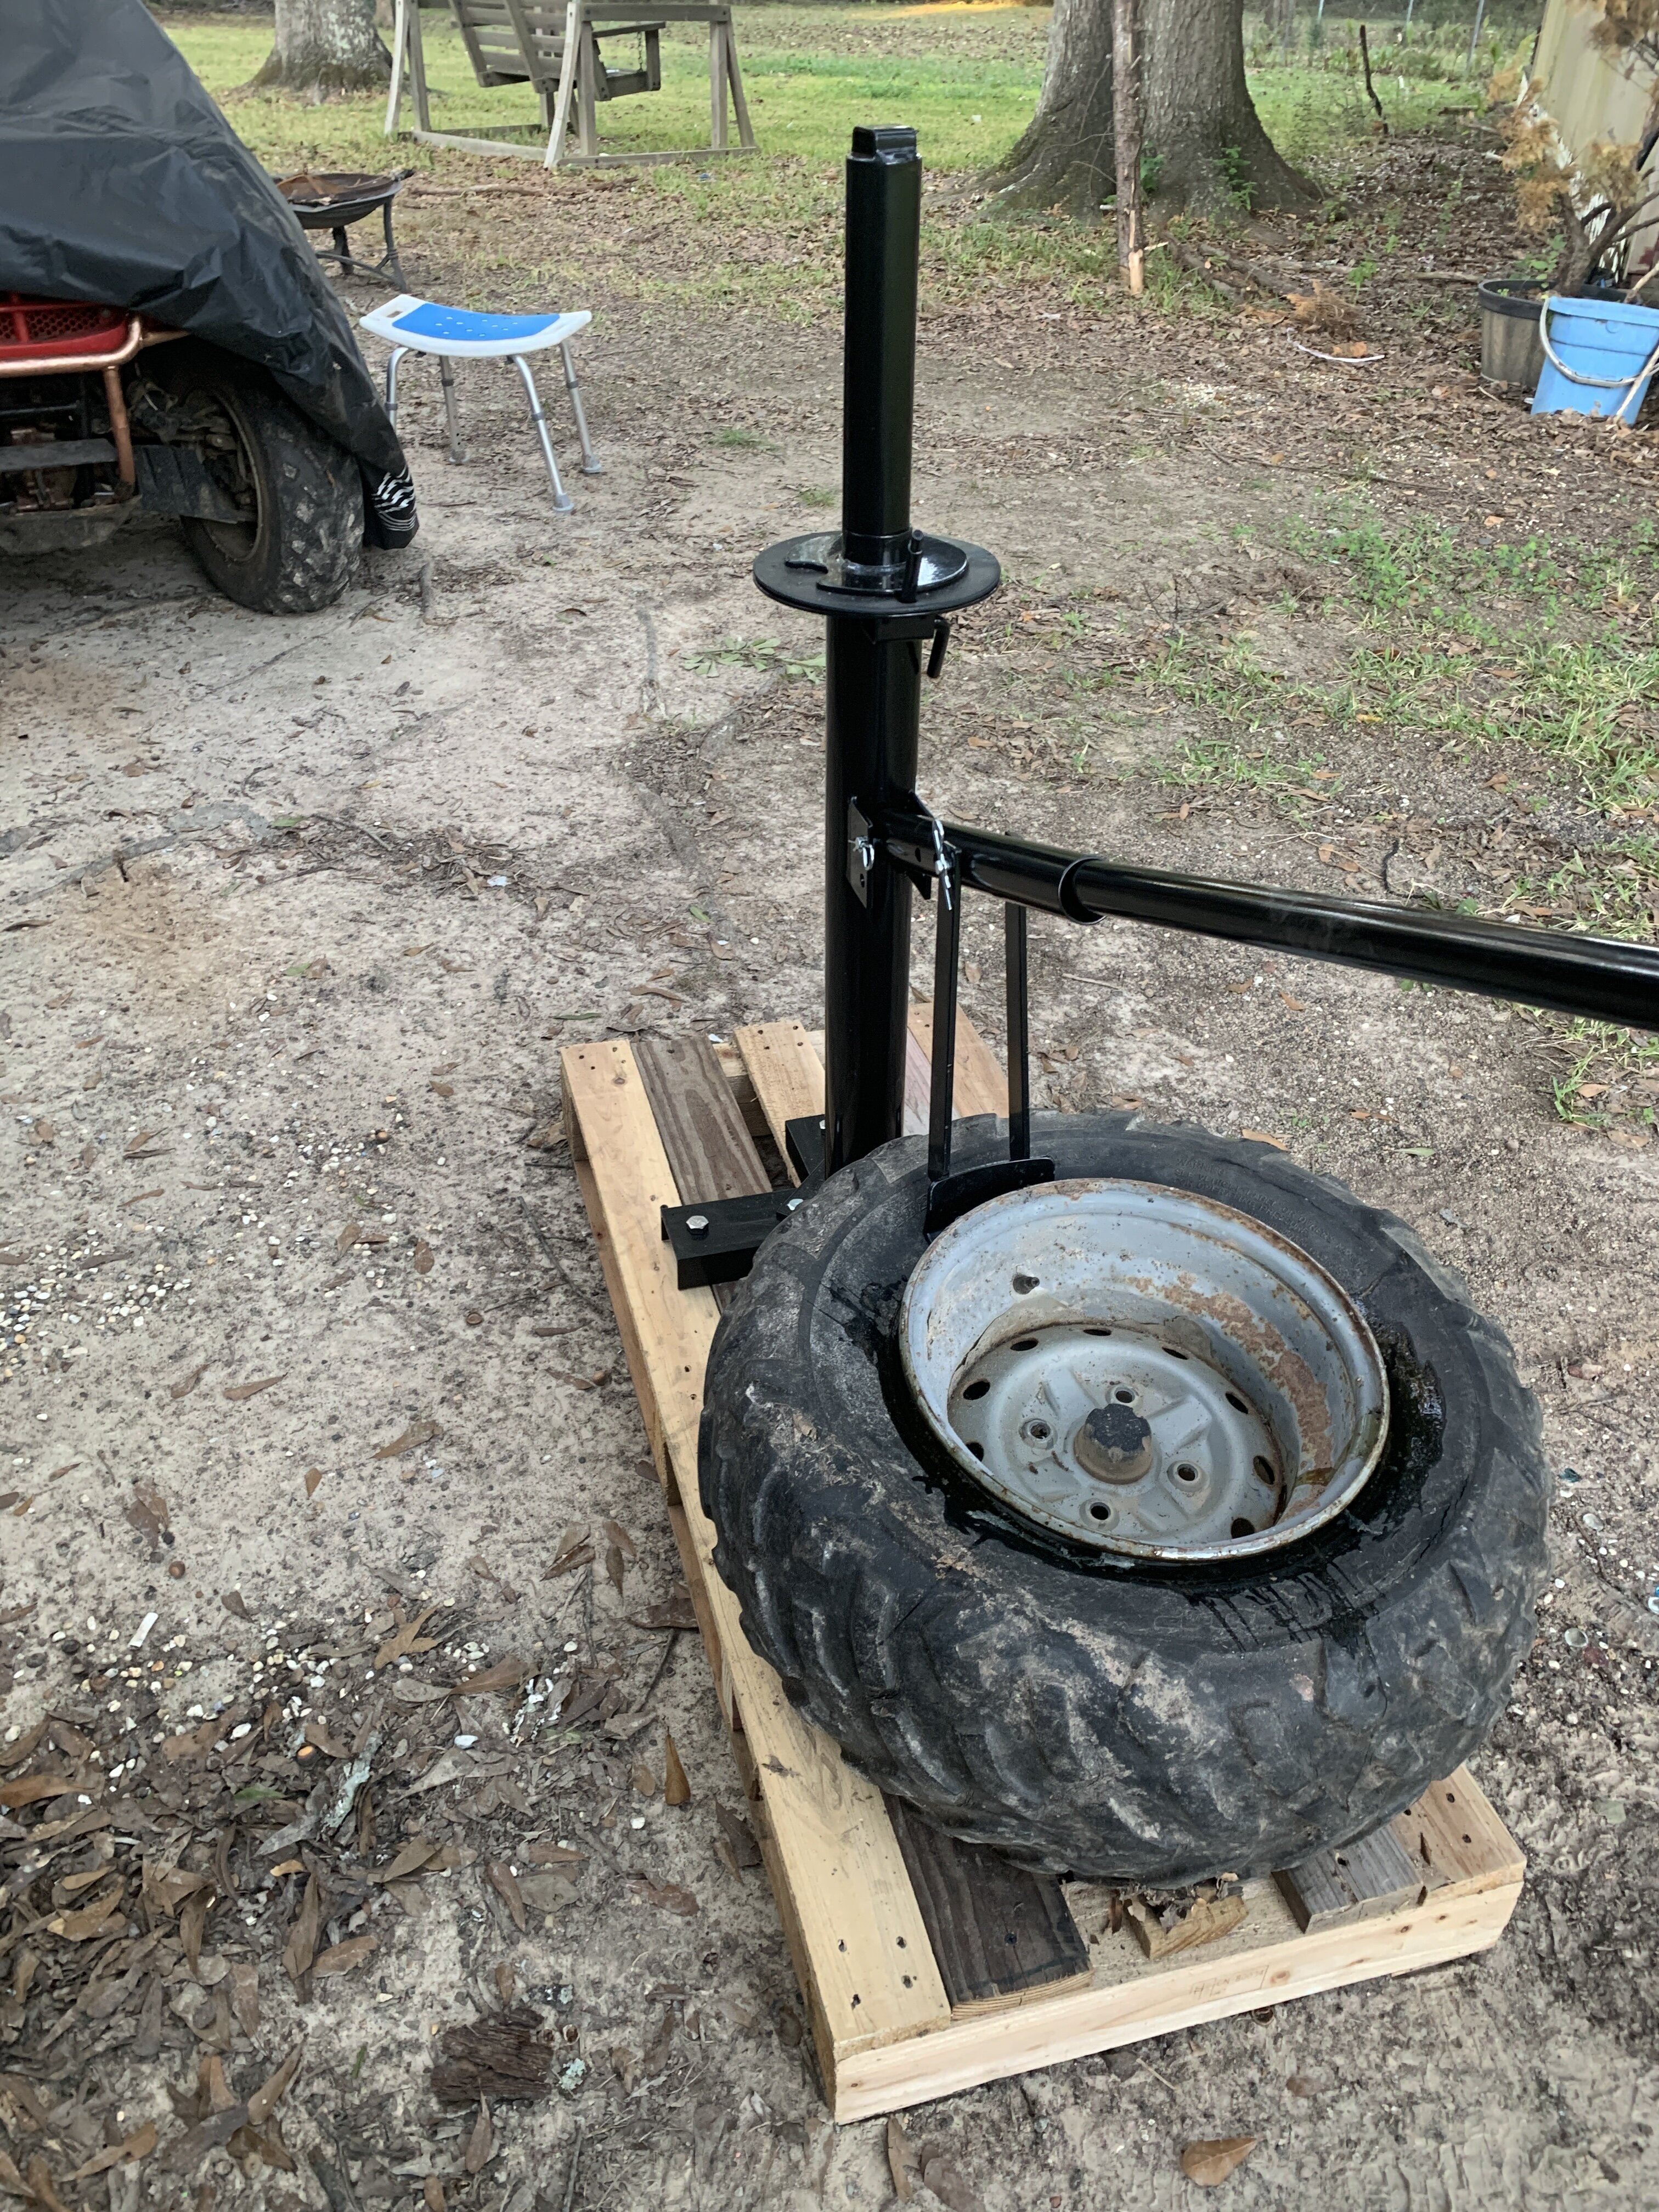
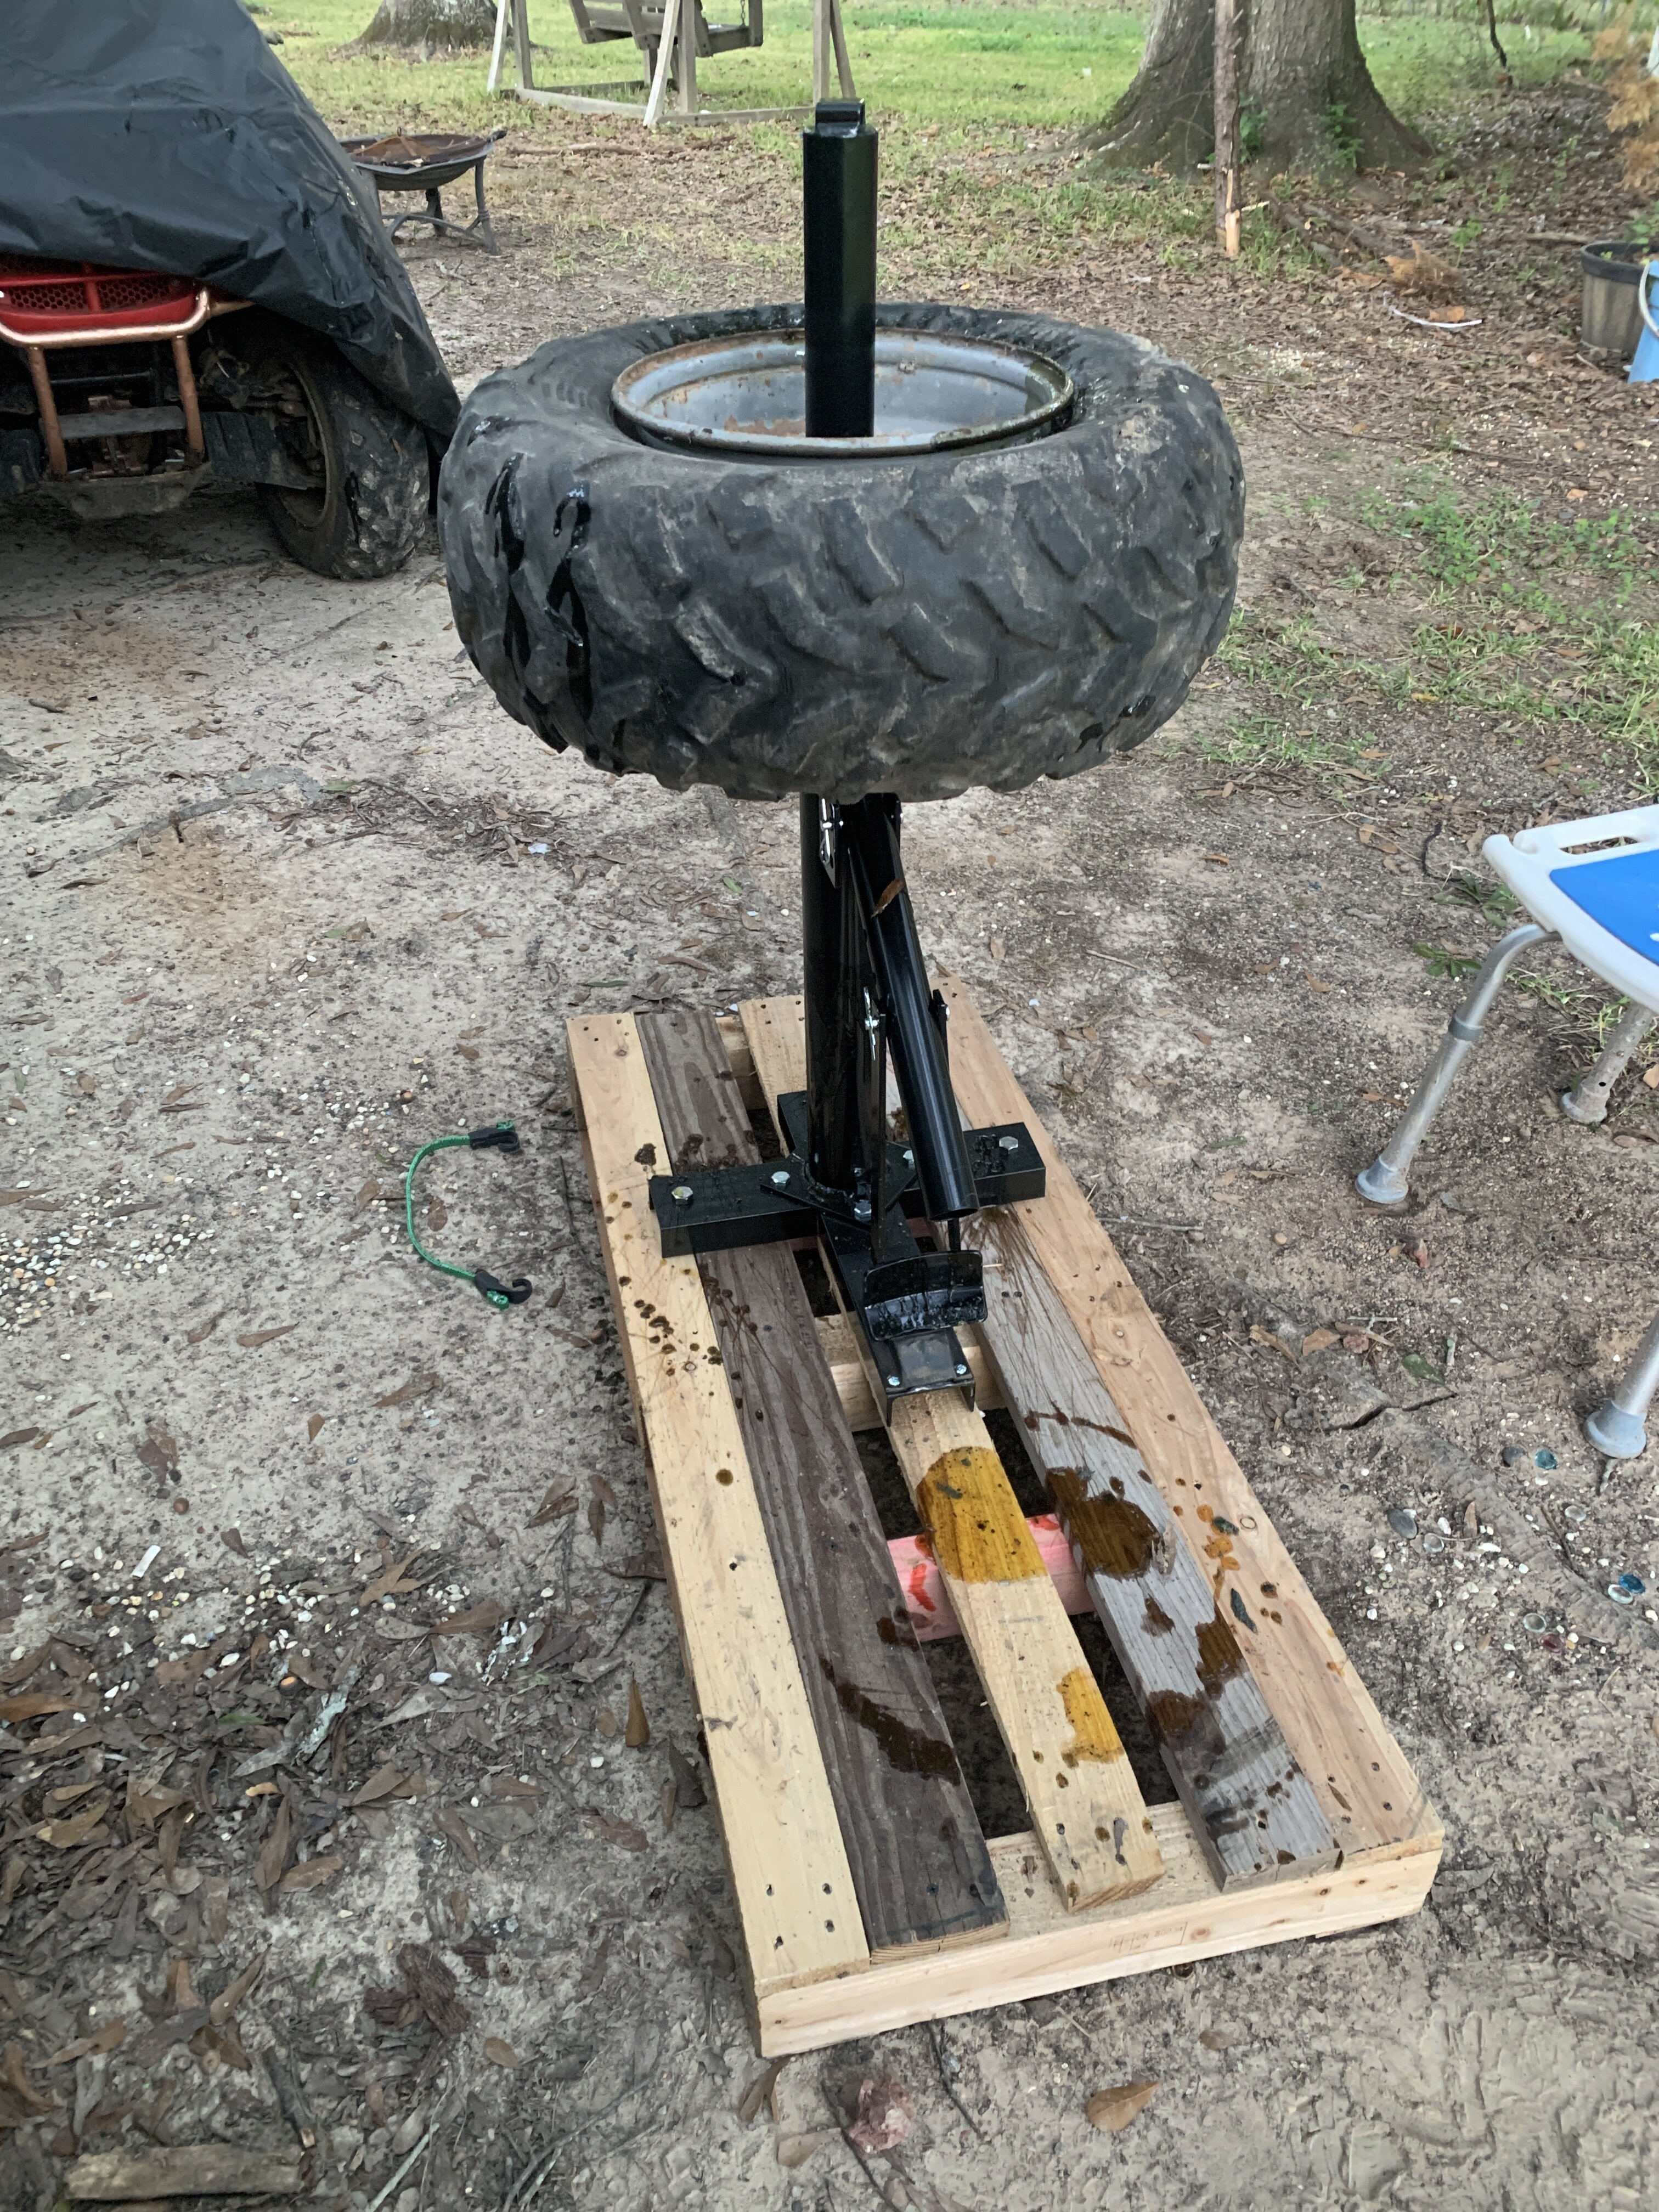
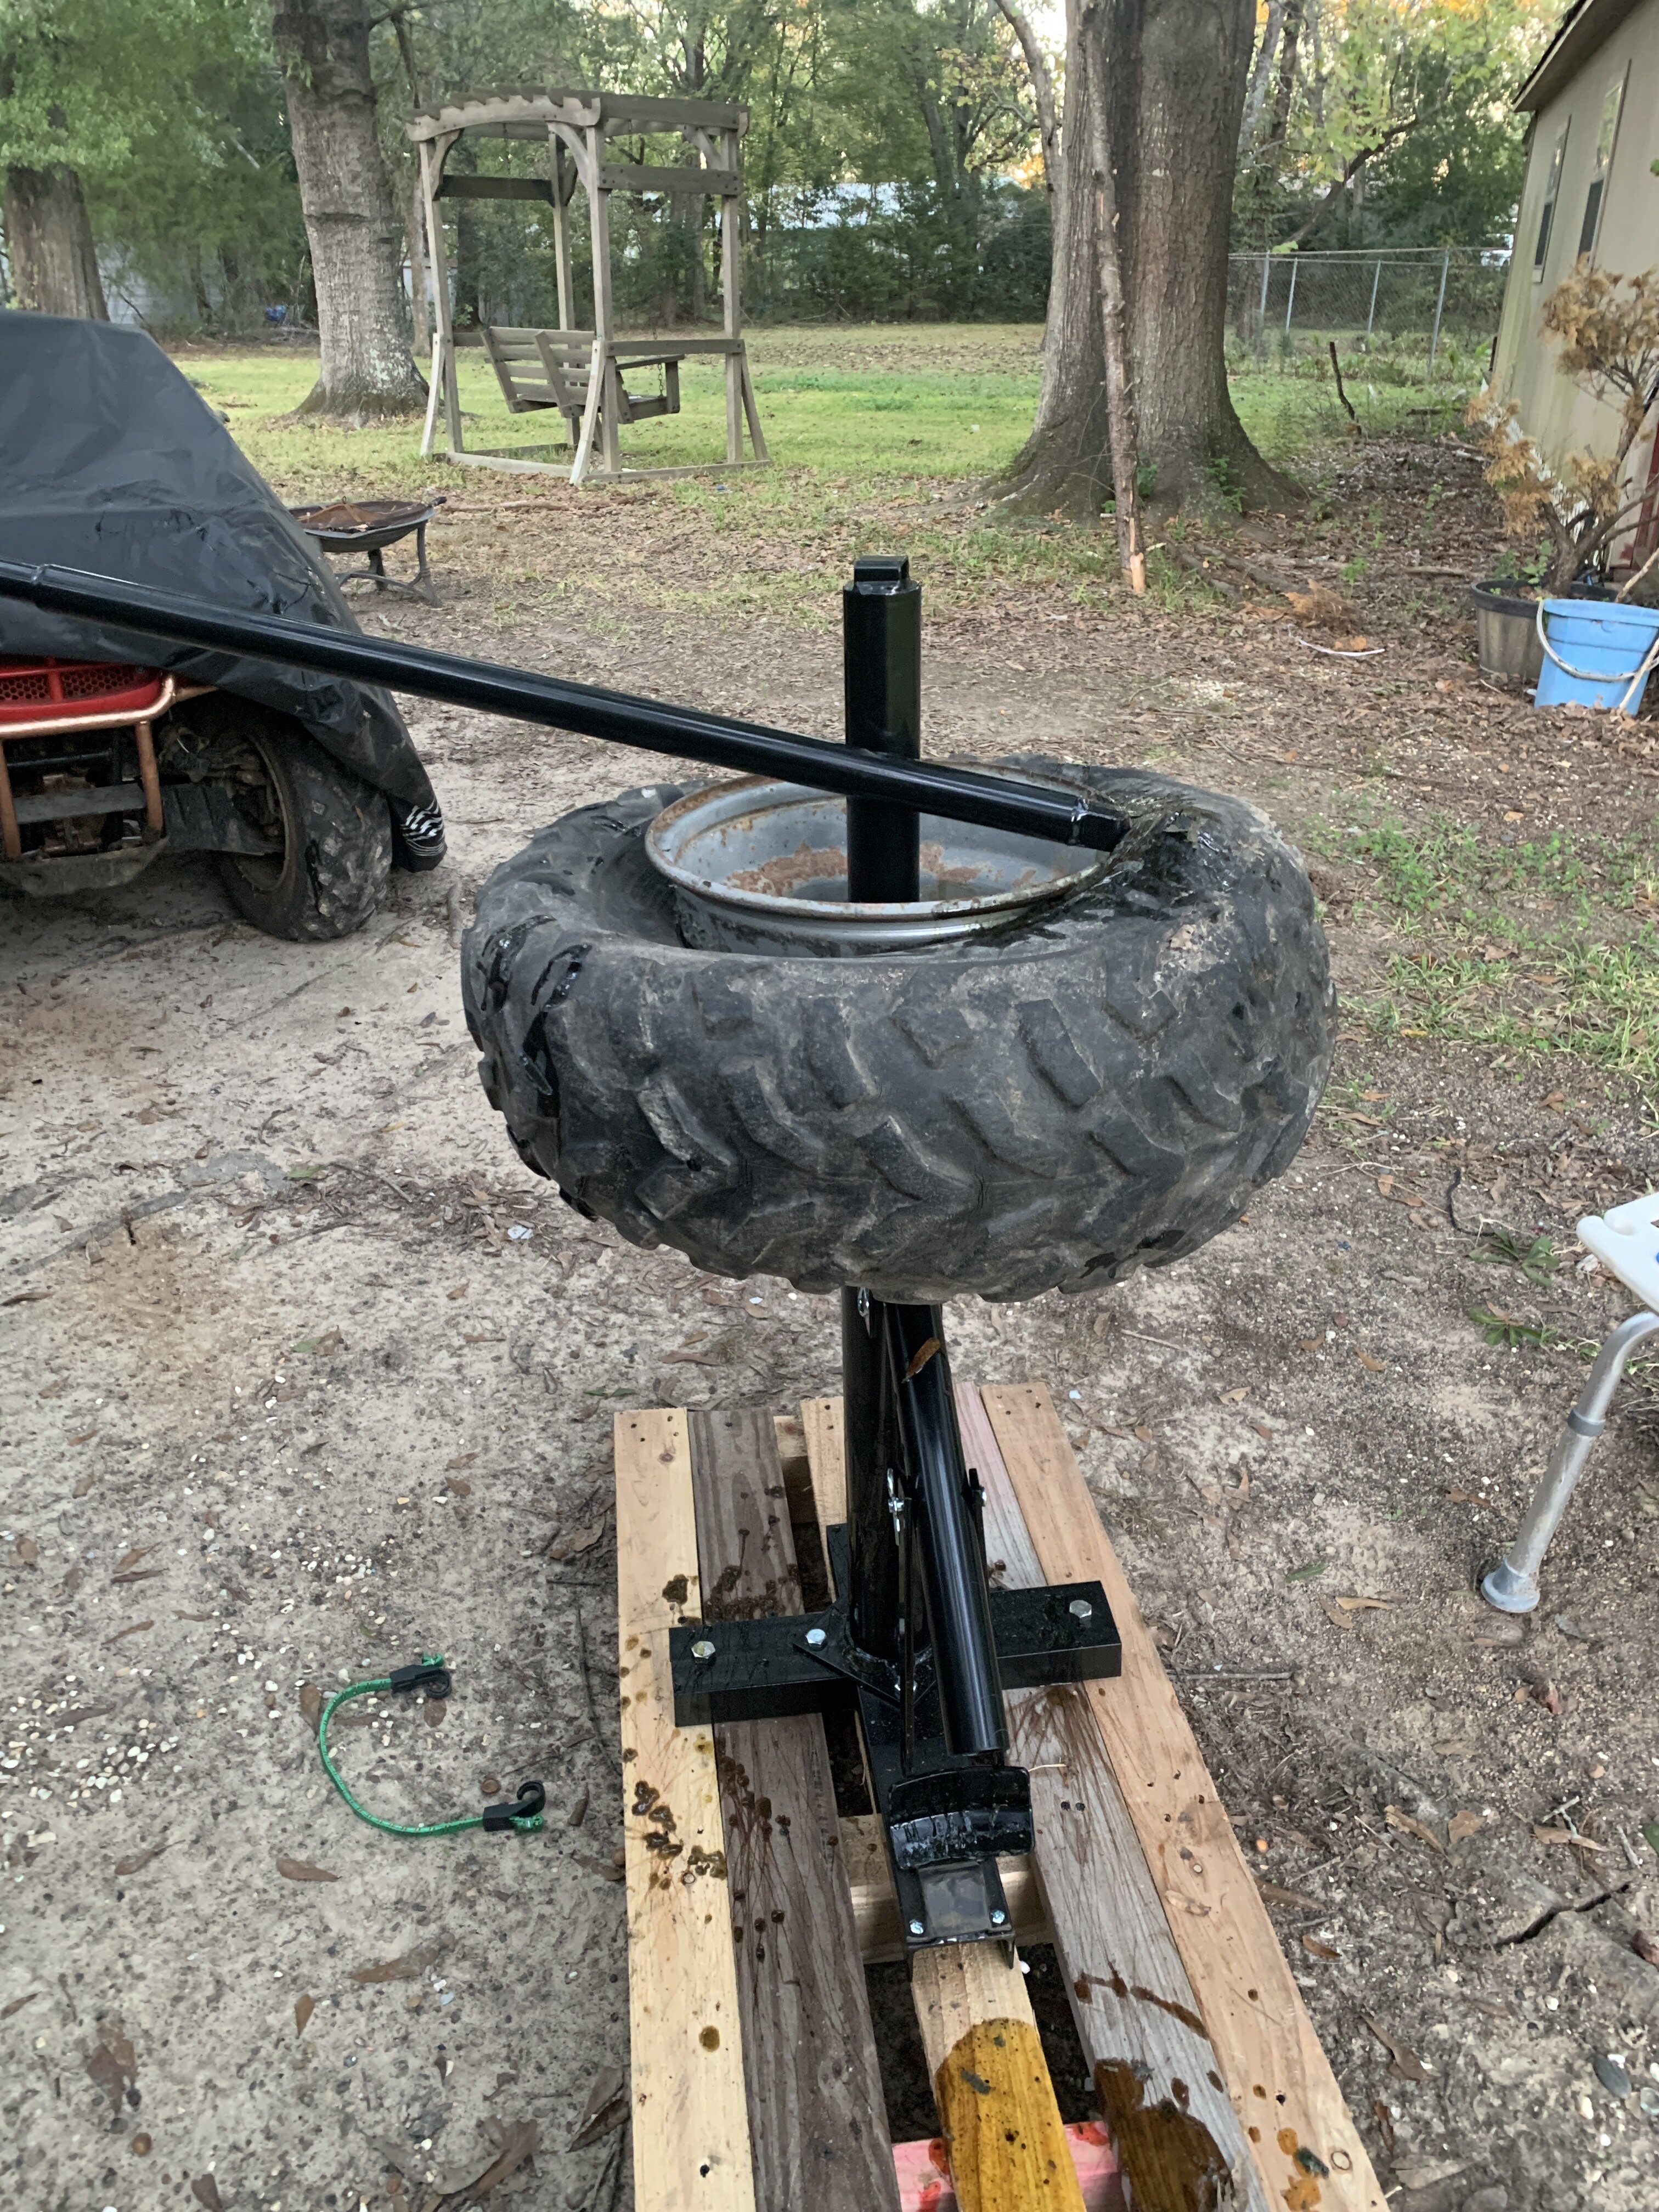
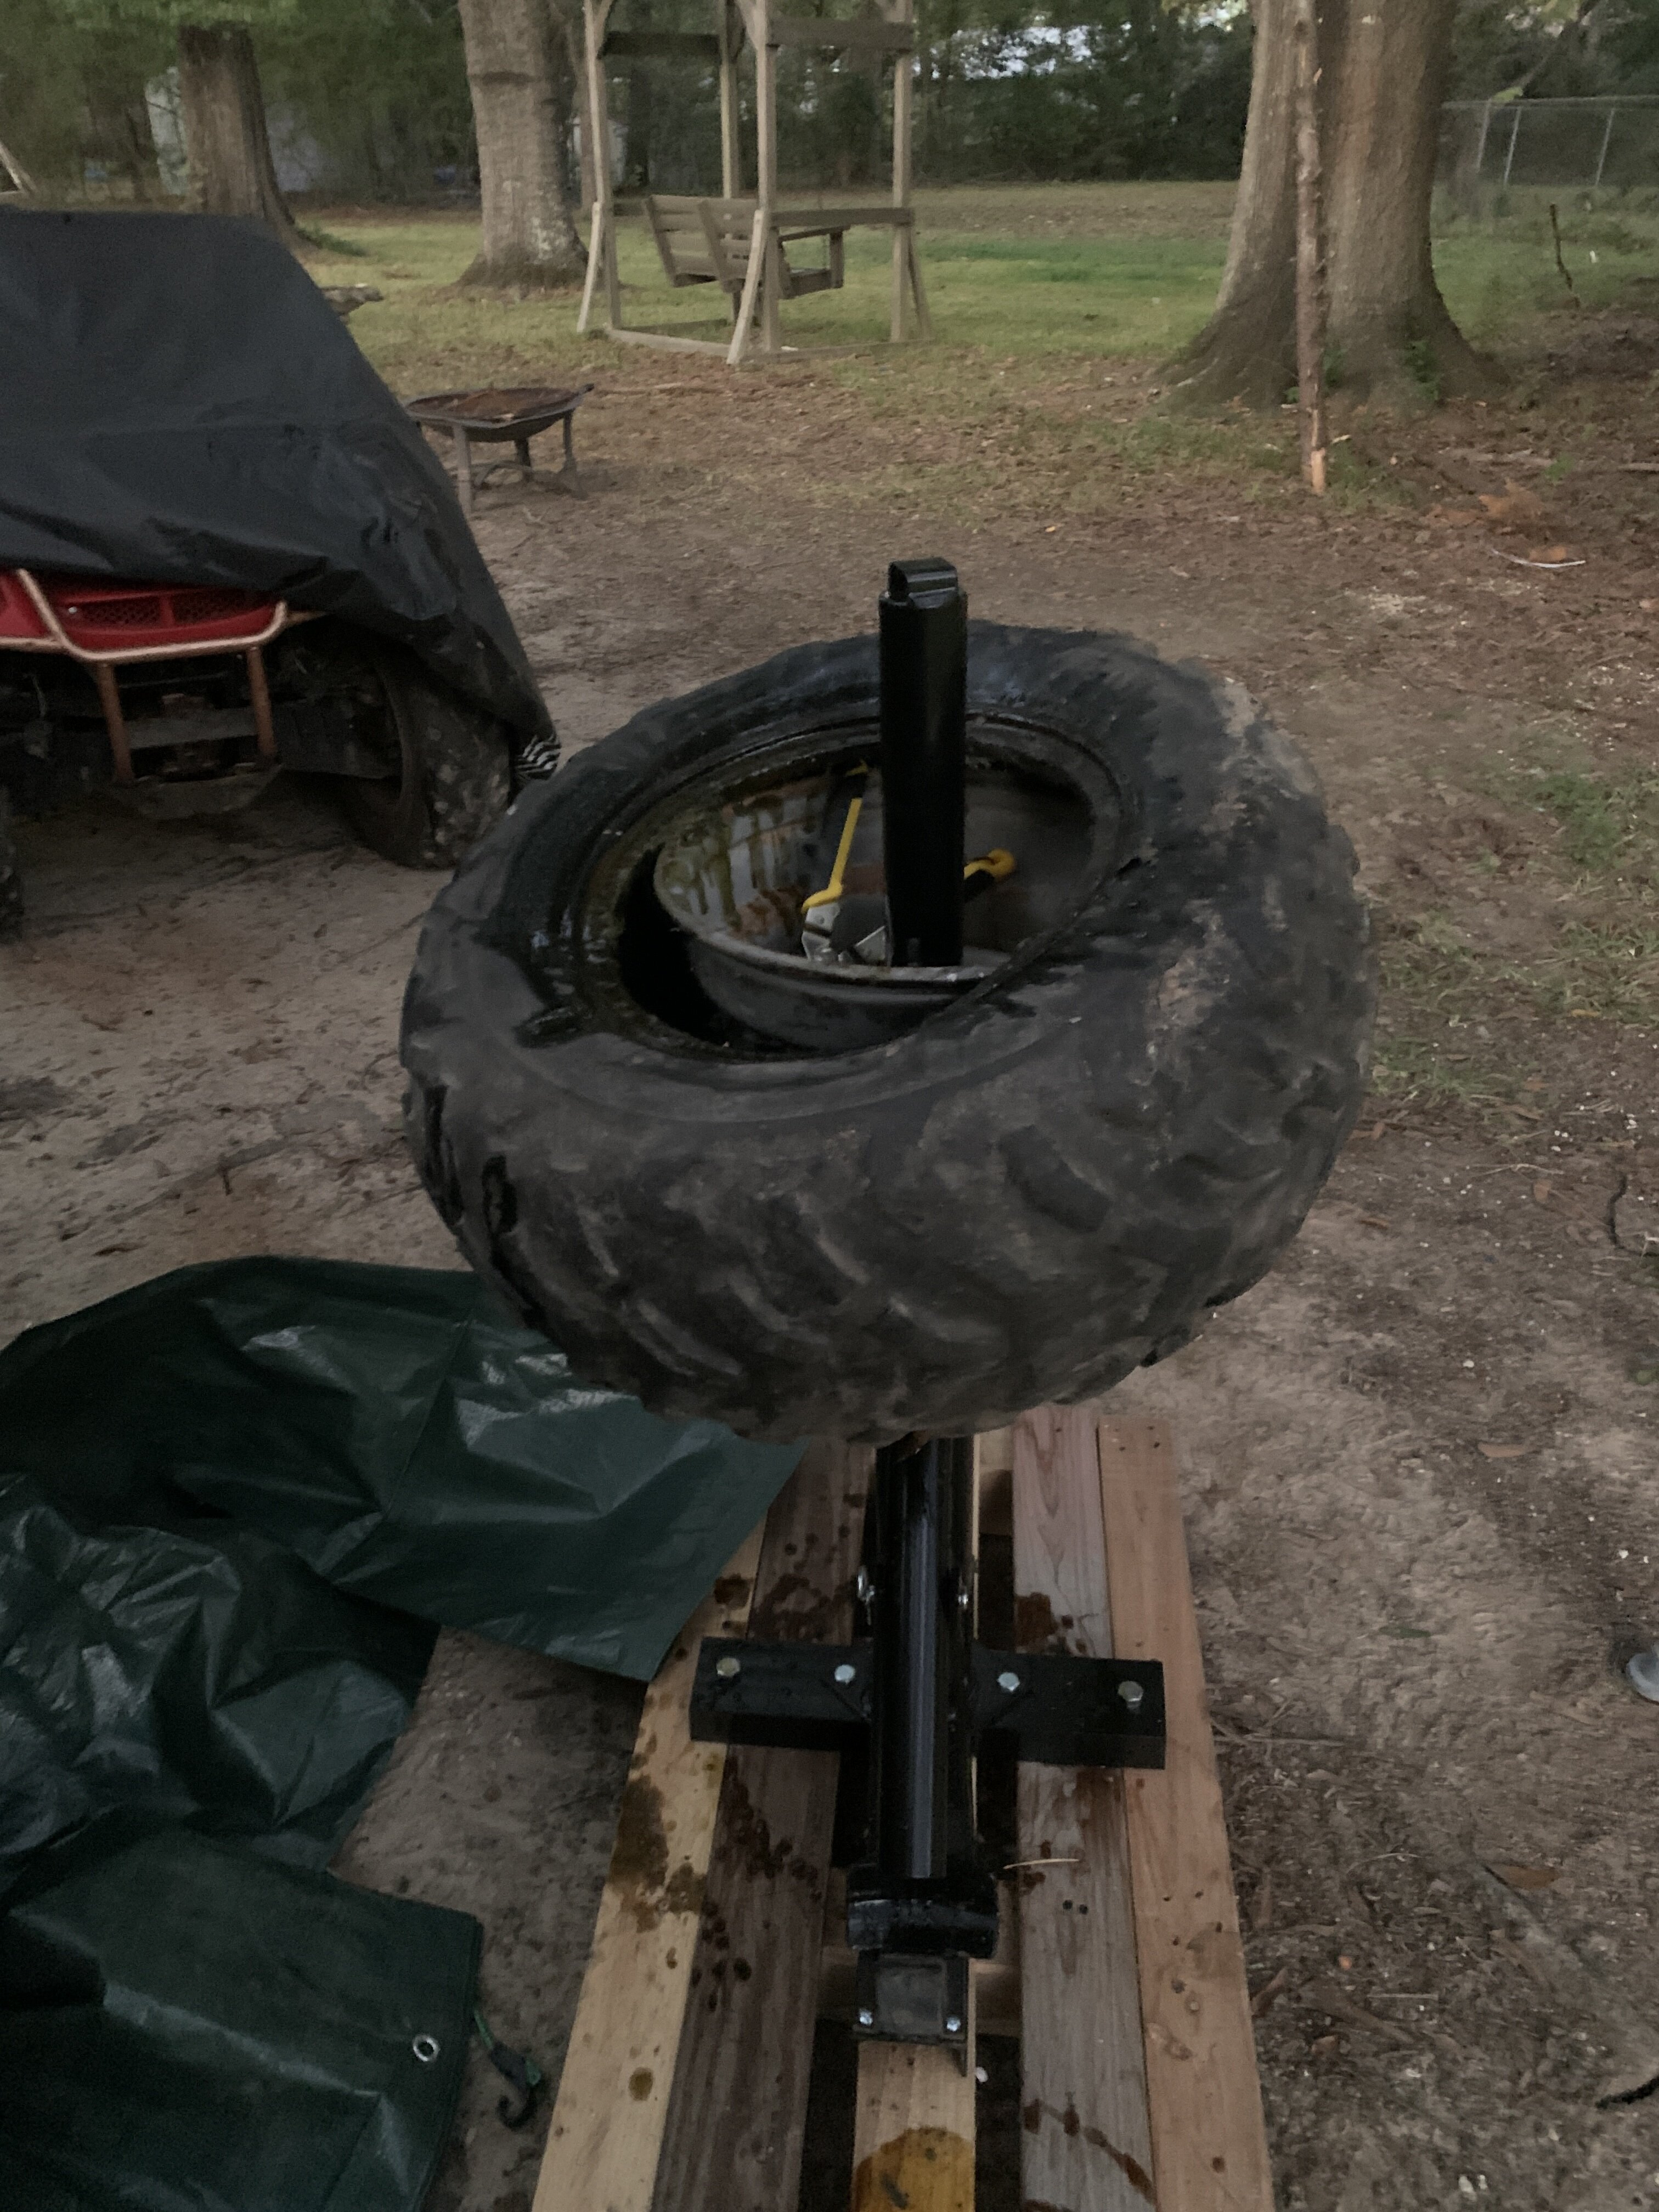
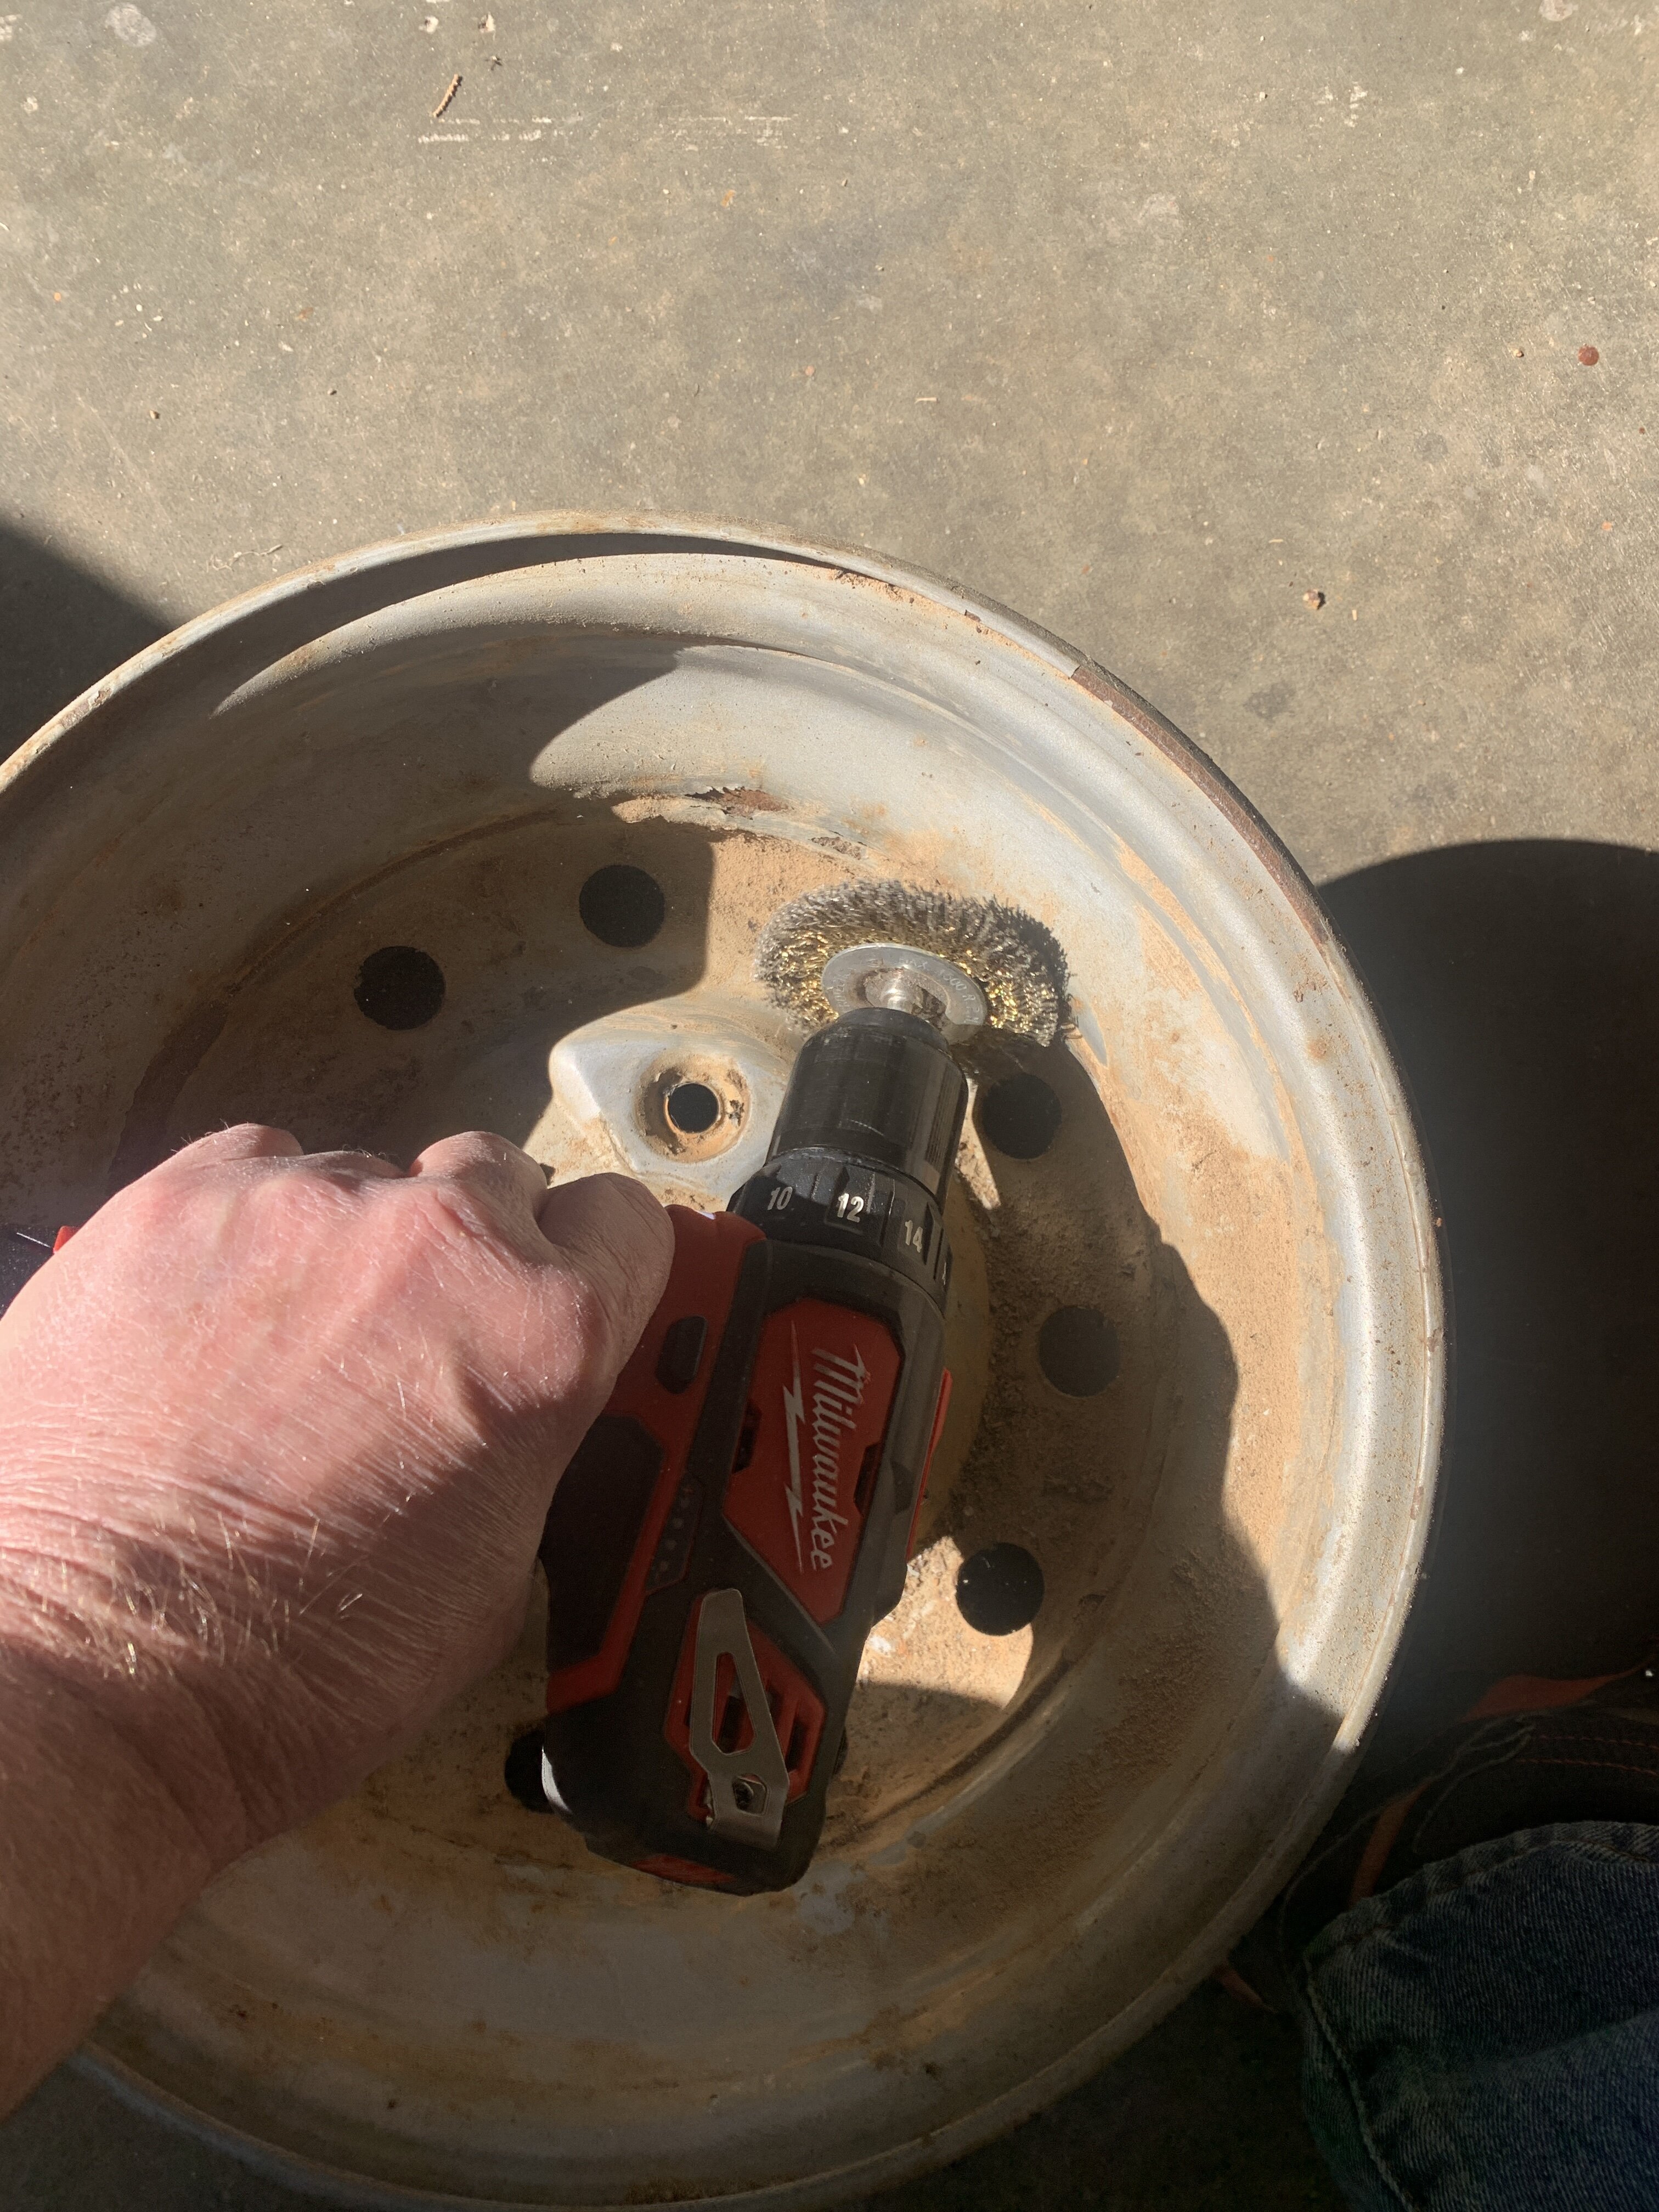
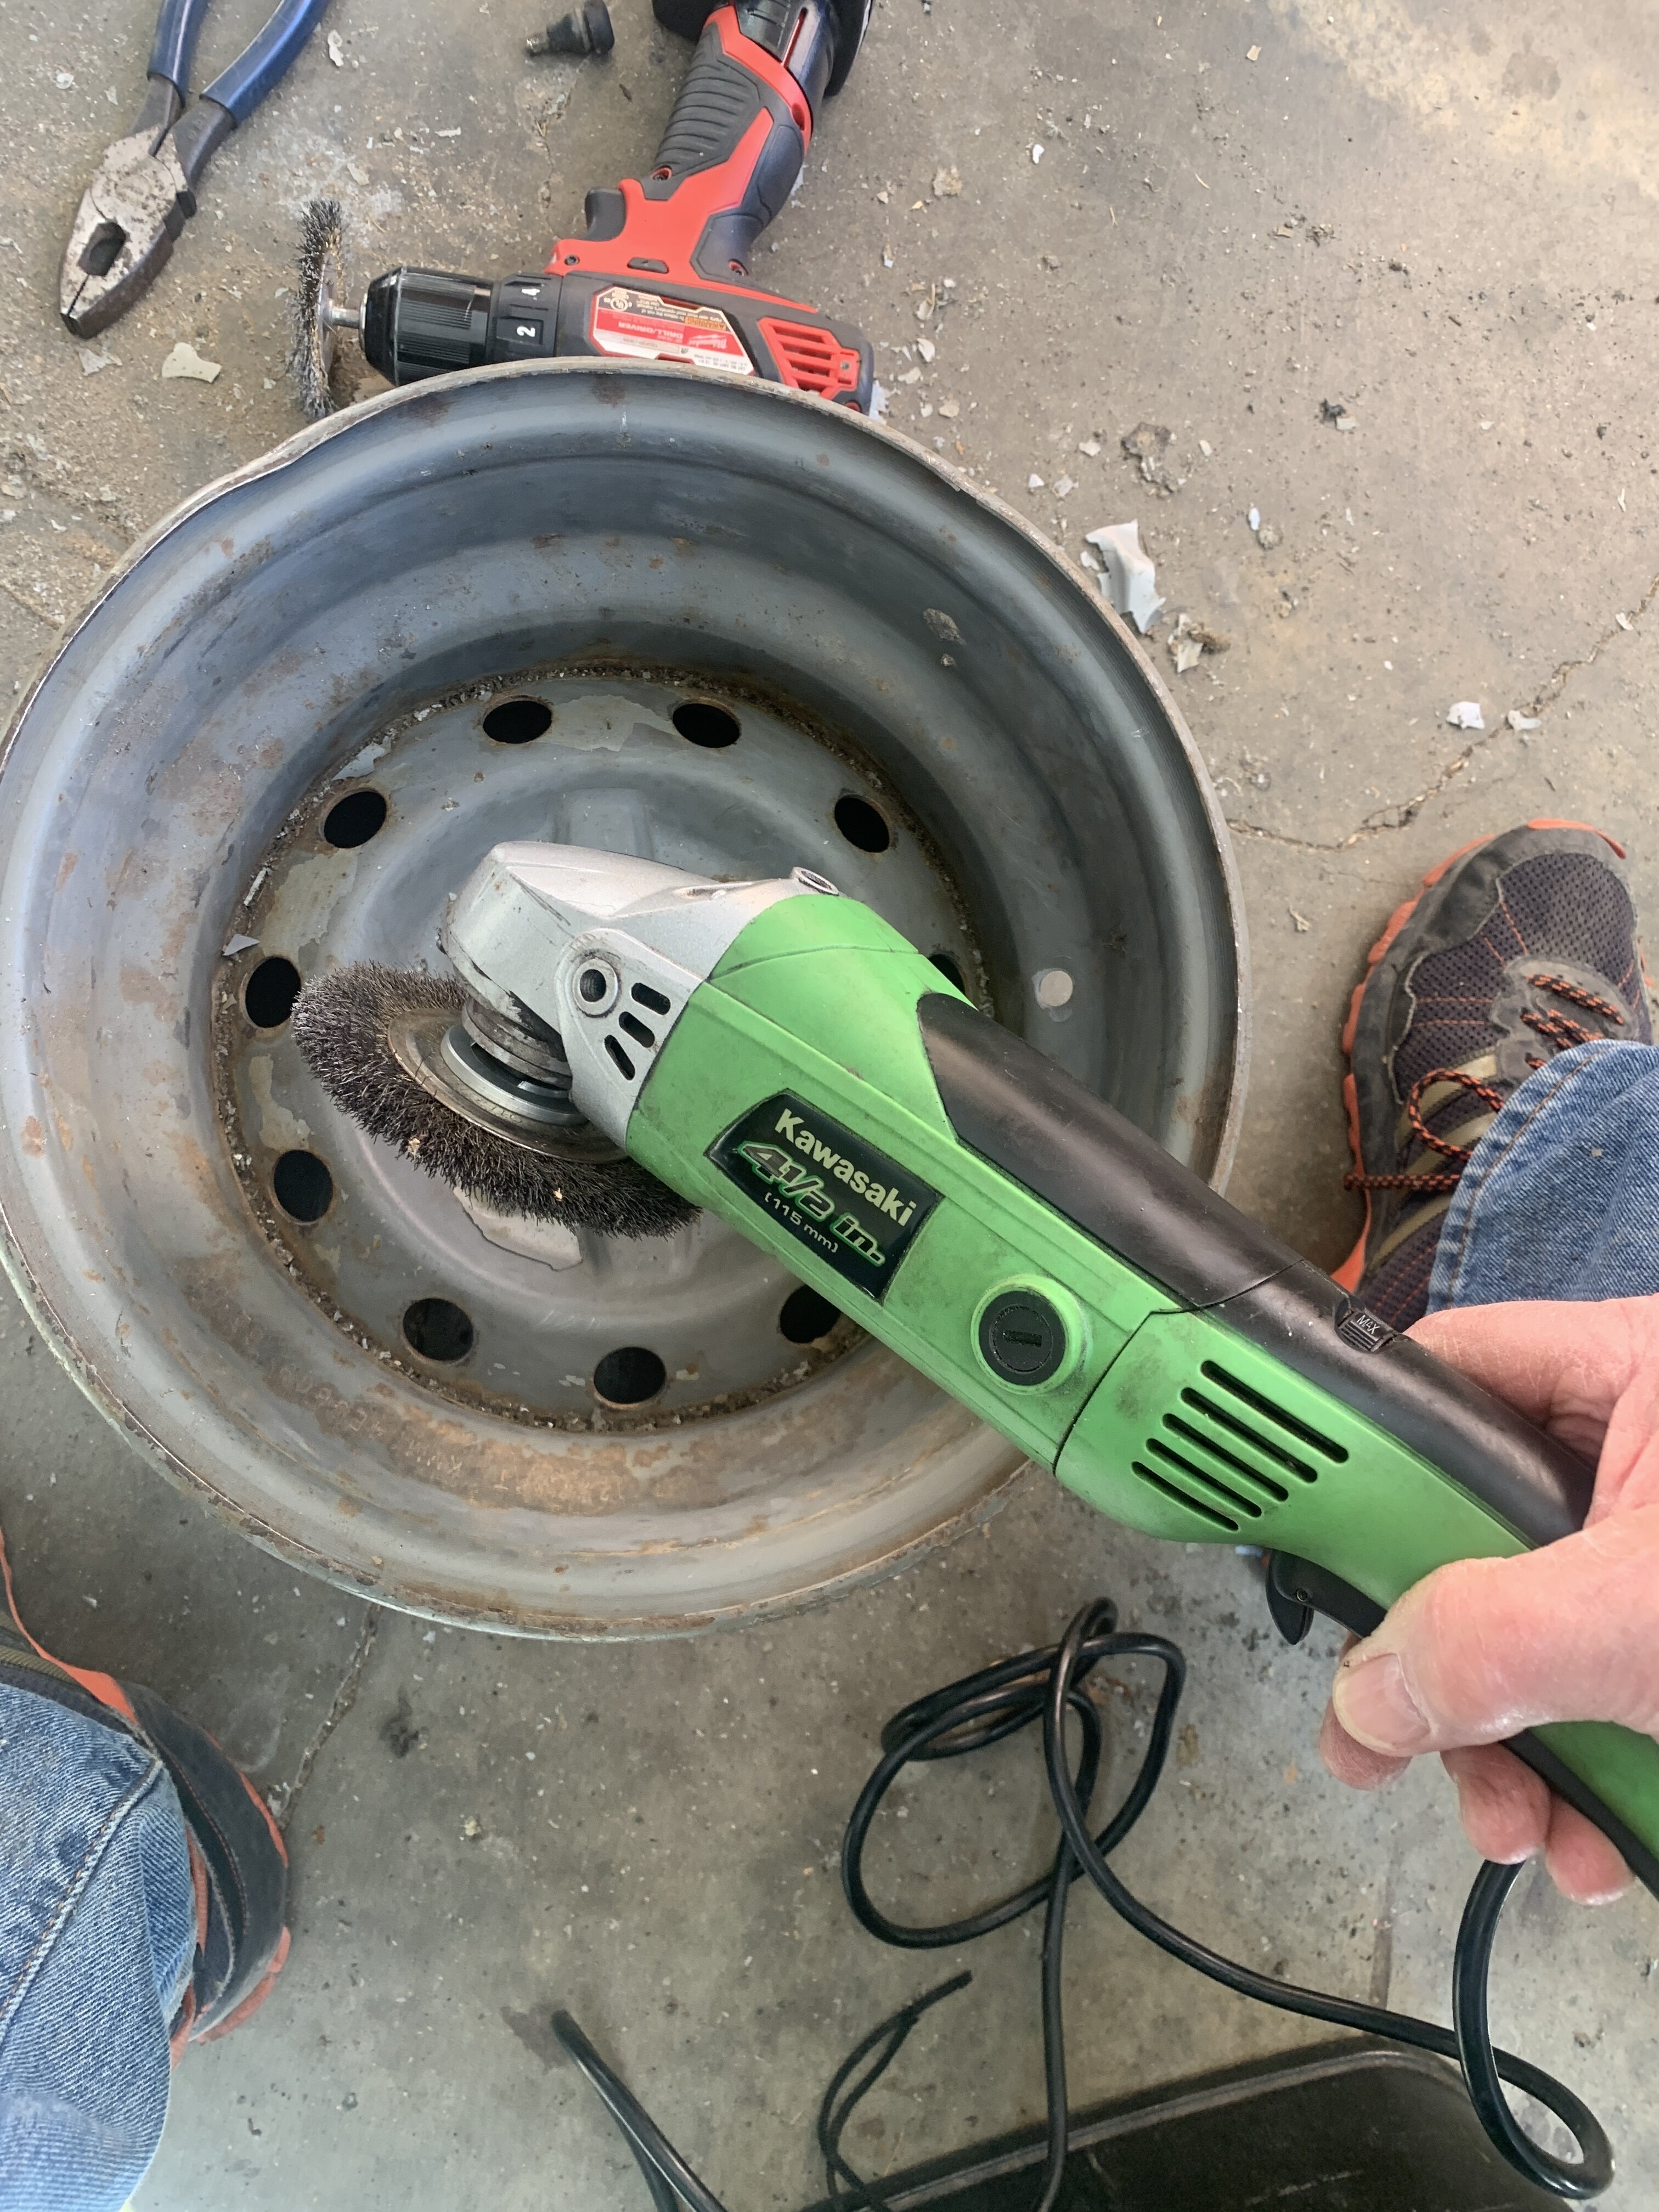
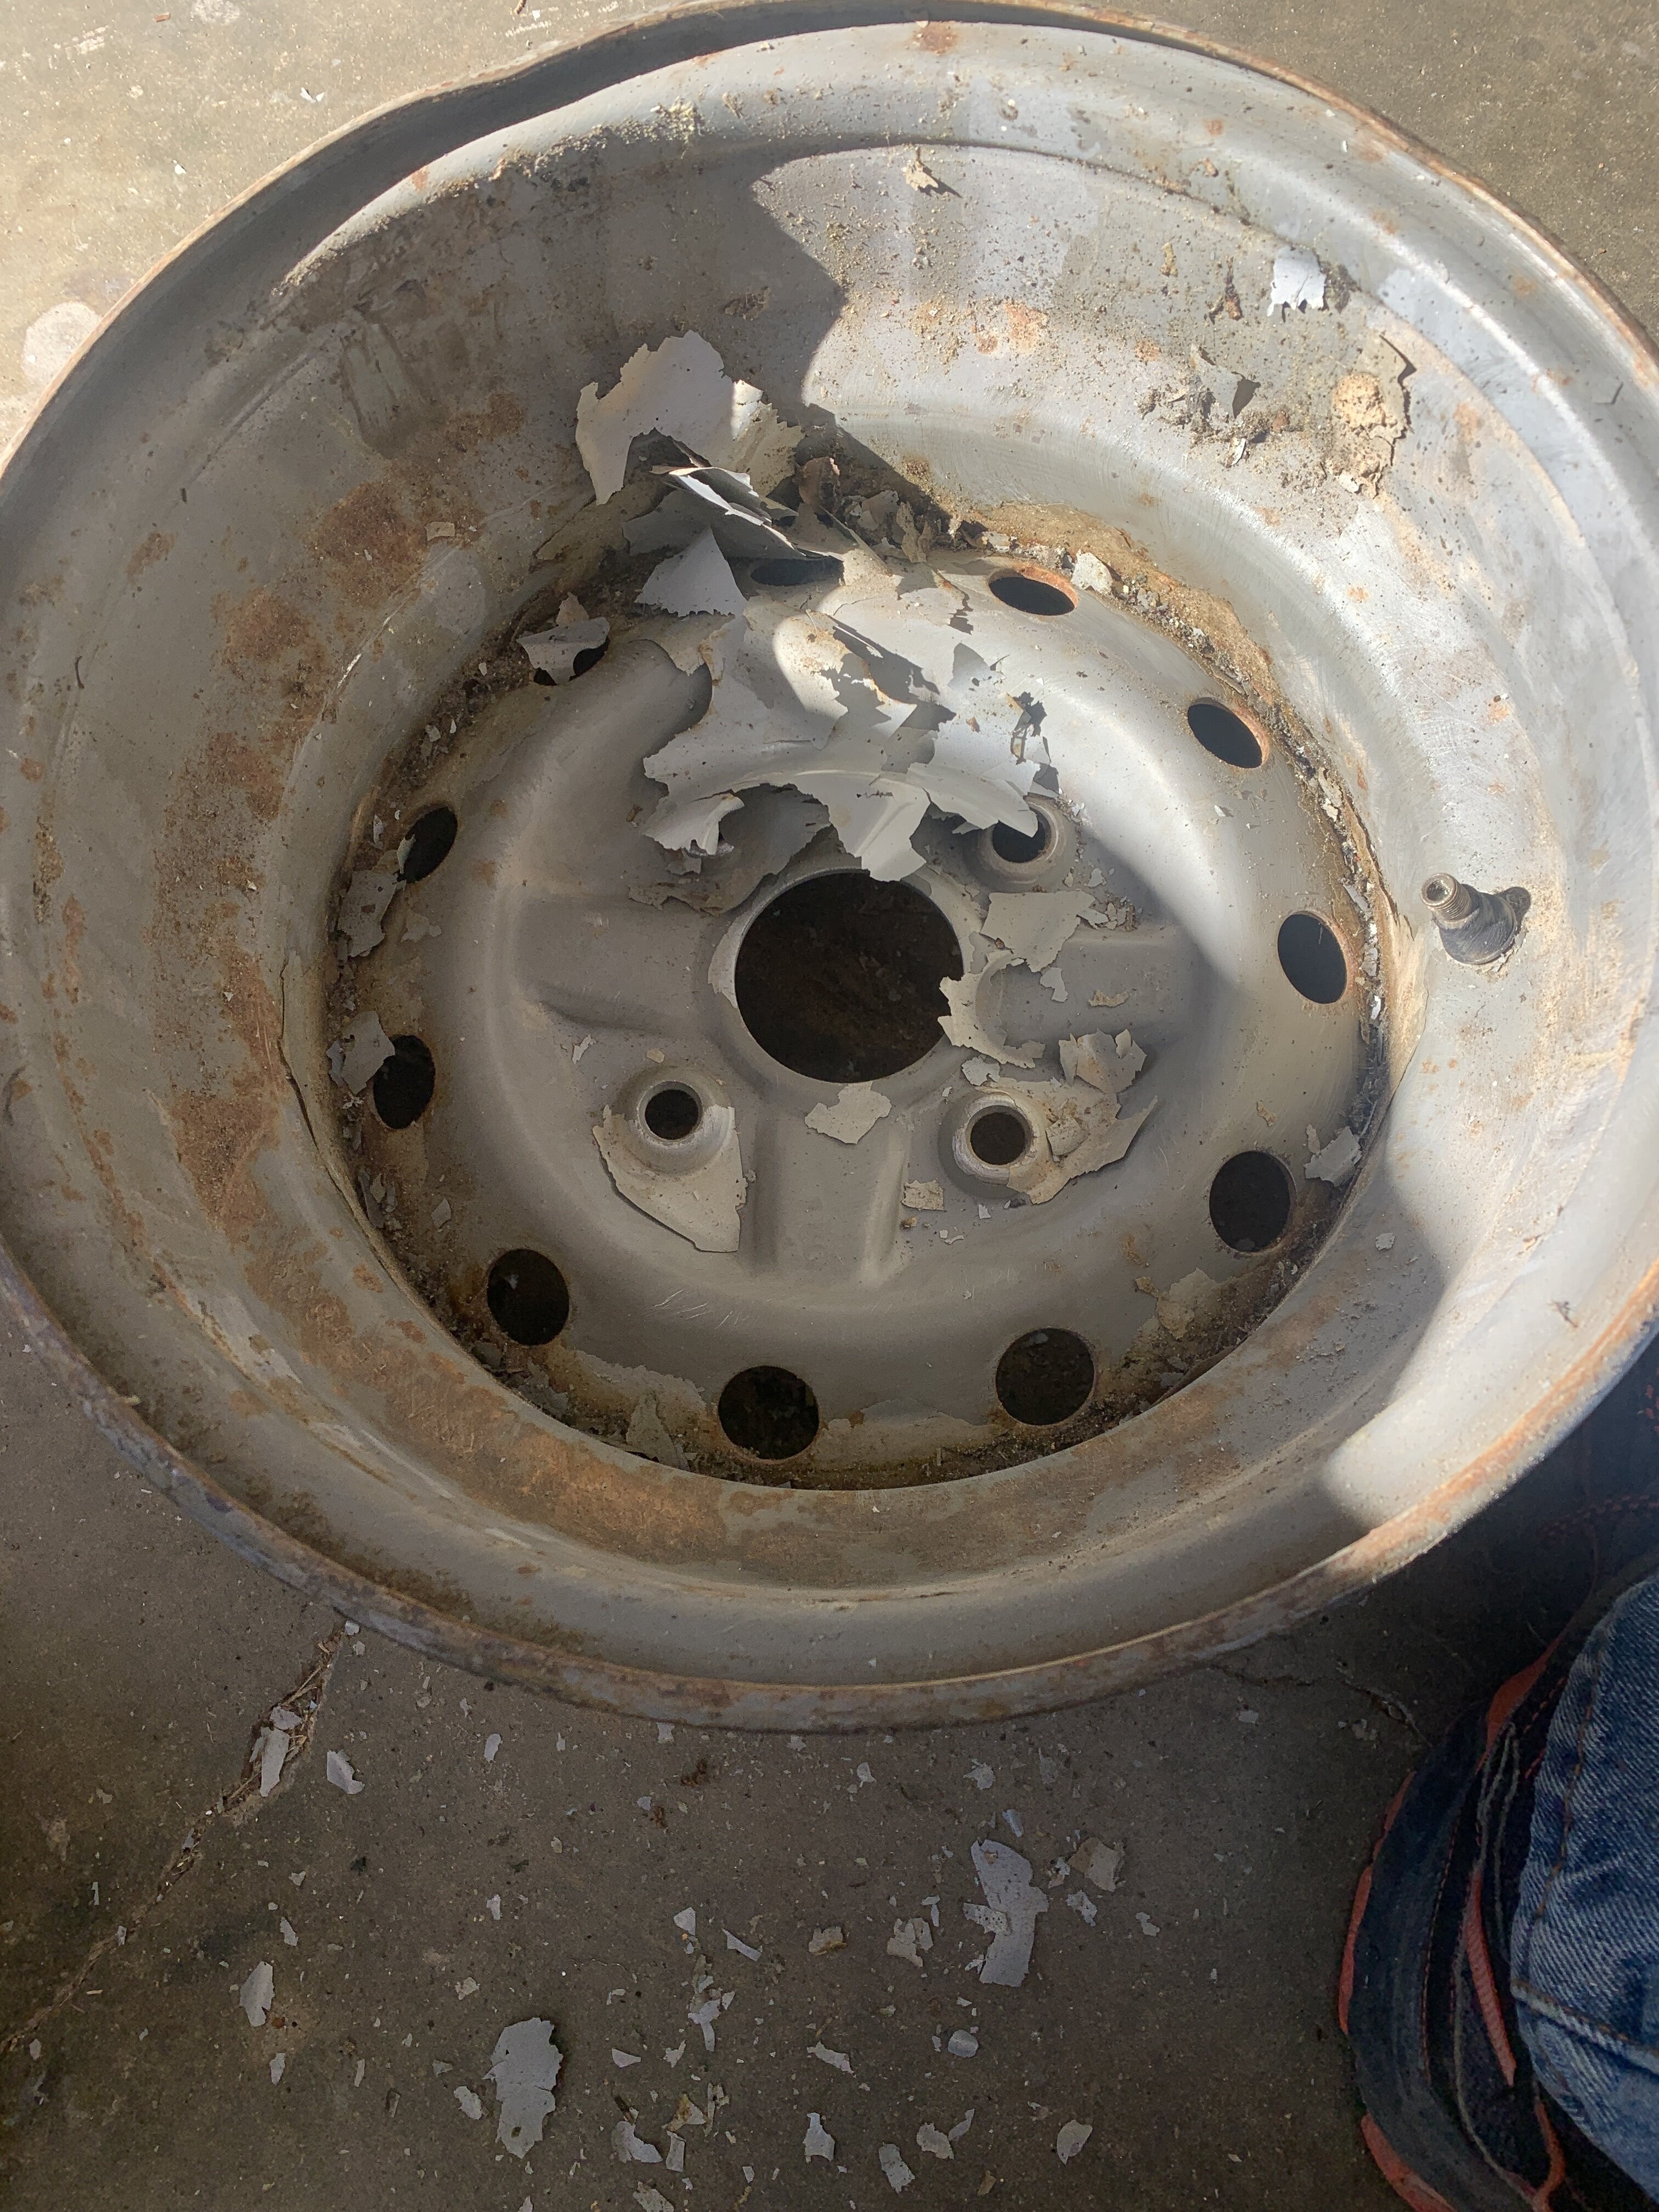
I have had my new tires for a while, chronic procrastinator, decided it was time to get them mounted up. Against my better judgement i decided to mount them myself. I got one of these Harbour Freight manual tire mounting machines, mounted it to a half pallet to make it more portable. Very impressed with the quality and amount of tools that came in the kit for a low price point. The bead breaker worked very well, i wasnt sure it would be able to do it, i think these tires are original to the bike its a 2004, but with enough lube, mothers concentrated car wash straight, it finally broke the bead. Tire fit very well on the machine and it tightened down good. The extra long pry bar that came with the kit worked well to get the outer rim of tire off. Half way there, half way there no issues, then it got serious. I pulled and i tugged had 3 prybars working this thing and it wouldnt budge no matter what i tried it would not come off, until i got the grinder out and cut it off. Im sure most of you see what the problem was. I didnt notice it until i was too far in to change direction. On this particular rim the tire goes on and off from the back side of the rim, not the front like what i was used to. The back side is the low side. Plus to add to the problem tires were old and not very strechy, i have a greater respect for how well these ATV tires are made with well reinforced sidewalls, even with the grinder it took me a minute or two to cut through it, of couse i was being very careful not to nick the rim. Anyway the HF machine worked well and the tire is off, hopefully the next one wont be this bad. Lot of hard work for an old man, glad i can still do it. Now for the fun part , cleaning up the old rim, years of stop leak and slime caked on the inside, that stuff dries hard, the little Milwaukee is good for getting into tight spaces, but wasnt quite up to the task. Needed a few more RPMs. Old rattlecan paint just flaked right off. Now time to decide on a new color, tired of the boring gray. More to come!

-
There are many things it could be, clutch, shift linkage, carb issues, but from your description it sound like maybe a flywheel problem, the only reason i say that is because the Eiger was known for the magnets coming unglued from the flywheel and binding, they seem to stay in place but can move around causing intermittant firing problems and can move to a point where it is binding the engine, and eventually destroy the stator, like you stated felt like the brake was on, the only problem is to know for sure you have to get to it and inspect them. Even if thats not the issue i would go ahead and replace the flywheel while in there because it will happen eventually. You can also check the shift linkage when running and make sure it shifts through all the gears if not then there is a tiny spring on the clutch side that can come loose and then it wont shift.
-
Question: 2000 Yamaha blaster rear brakes
Gwbarm replied to Rick Shropshire's topic in General ATV Discussion
Nice work, good you went ahead and replaced it. Good to see it haas a spin on oil filter, changing the oil filter on my yamaha is a nightmare. -
Started on brakes on the 2004 Eiger, this is the one that wouldnt roll when i got it, found out that someone pulled the side case, when you do that on an Eiger all the gears on that side fall out, so you have to spend a minute figuring out where everything goes back, this guy figured wrong and put the main drive gear in backwards and tried to hammer the case cover back in place, case was cracked and i could see the claw hammer indentations on the case, ended up having to replace the case cover. After pulling the wheel i could see that someone had been in there recently a new castle nut rusty but may not be to bad in there. Digging a little deeper i could see it had a new drum also. Also new shoes, after looking closer i could see it was never used after new brakes were installed, he spent some money here, OEM shoes and drum, cost more than i paid for the whole rig. All i could find wrong was one of the brake cables was missing the hand brake on right side. Some cleaning later and good to go. I suspect the front is going to be OK as well because they are working, i will check them out. Even though this one was easy glad i checked it out.
-
That one bolt that just won't let go
Gwbarm replied to Ant-Knee's topic in General Talk - Anything Goes!
Thats a great idea never tried that. -
Got on the front brakes yesterday! Interesting find! Crappy mess as i expected! Completely down to metal! The left side was worse, inside shoe was completely gone! Remnants of shoe inside piston. Never seen one this bad , i just ground it back down with the grinder reinstalled and working perfectly, see the remnants of the shoe i dug out of the piston laying on the tire in the background. Had to reinstall it with a c clamp my caliper tool was to large to fit in the tiny caliper.I have new calipers ordered for both sides, but its working good now i suspect the bad one will start leaking. Caliperss are so cheap 25 for set of 2 new caliper is cheaper than piston and seals. I have one more of these Eigers to do, i have the front brakes working with no issues but never pulled the caliper to check it out, rears not working at all, while its fresh on my mind i think i will do it also, plus thats the one i need to mount the new tires on. That will be an interesting venture, i usually take it and have them mounted but the cost has gotten so expensive i decided to do it myself. I bought one of those Harbour Freight portable tire changers cheaper than the cost of getting them mounted, very interested to see how that goes, but that will be another thread.
-
A lot of newer brake systems are calling for DOT 4 this is older so i used DOT3 but the new master cylinder might want DOT4 it didnt say, maybe i should get a magnifying glass and read the fine print. I think i will , let you know.
-
No they are not, quite different from a car, you either push the petal or pull the right hand lever and they make contact and stop, you adjust them with a wing nut attached to a cable just above rear axle, very easy to adjust, now that i have it all lubed up with antiseize, they were rusted solid when i first started taking things apart.
-
The Official Good morning thread!
Gwbarm replied to BuckBilly's topic in General Talk - Anything Goes!
Not on my Bucket list. -
Got the rear all finished up Looking much better. The hubs are pretty worn but they will be OK for now will probably replace them next round, see how long these aftermatket shoes last. Now on to the front. I think they are going to be worse than the back. Got the master cylinder installed. Always use anti seize on the resorvoir screws. Find the bleeder valve Next replace front pads, that will have to be another day.
-
Question: 2000 Yamaha blaster rear brakes
Gwbarm replied to Rick Shropshire's topic in General ATV Discussion
I think if you oil up the thing a-abob and make sure the what-cha-ma-call-it moves you will be good to go. -
1995 Polaris magnum 425 will not run with airbox hooked up
Gwbarm replied to Kurt Reiser's topic in Polaris ATV Forum
Sounds like the rubber may be breaking down after 20+ years. -
Its made by Plasticote, not a brand i generally buy, but it is one of the best i have used for painting metal with pitting and imperfections, does a good job of hiding those, of course i really didnt need it for this, i used it because once sprayed on its there very hard to get off maybe keep the rust down to a minimum. Plus i didnt have to run to the store to get something, that kind of throughs a pebble in your pond, and it takes a minute to get back to where you are. Wife came out while i was working on this, 3 quads sitting around and 2 riding lawnmowers, she said you need therapy, my response was yes maybe, but will that help me get these parts cleaned up, i dont think so.
-
I only used that primer because its what i had in black, i started with engine enamel but it was green so dnt use it. The primer holds up well and sticks to anything.
-
I decided it was time to do the brakes on the Eiger, i got it a couple of years ago and worked out all the bugs got it running good and ignored the brakes. None on it ,front or rear. Decided to attack the front first no pressure on the master cylinder and screws were stripped out on the reservoir, took the banjo bolt loose and pure water ran out, glad i didnt wast time on drilling the screws out, pads were shot also. Pulled a couple out of my box o parts. One was for right hand so wouldnt work, the other looked fine until i opened the reservoir and full of white powder. Cleaned it out anyway and tried it, only would build up a minimal amount of pressure. So no go on that one. So ordered new master cylinder and pads, so now i have to hurry up and wait. On to the back they are drum brakes so i knew this would be fun, 20 year old machines that have been mudded and abused for that length of time nothing comes off easily. The engage shaft was froze solid from corrosion. Getting that out is easy but you have to get to it first. The center nut was supposed to be 30mm but it wasnt it was 27 the only size not in my large set, go figure, The previous owner decided it was a good idea to JB Weld the cover on making it near impossible to get off, had to chiesel it off. The mounting plate was a different story, nut was tight tight tight took my biggest impact two or 3 times hammering on it to get it loose after soaking all night in PB Blaster. Got it moving along the splined shaft easily but wouldnt come off, when it got to end of its run it would just stop, ended up using 2 24 inch pry bars one on each side, past the point of being gentle and it finally came off. Got to the drum and it came off easily a little suprised at that, it was full of mud and rust, i knew it was going to be bad because there was a snorkle on it when i got it, never buy one with a snorkle, they are highly abused to the machines limit, but i got it cheap . Finally got in there and no shoes left and a complete mess. Lots of mess to clean up. Got it looking a little better. Lots of cleanup later! Waiting for new parts.
-
Question: 2000 Yamaha blaster rear brakes
Gwbarm replied to Rick Shropshire's topic in General ATV Discussion
Yeah! Anything with Yamahas name on it is expensive, i noticed that when i was restoring mine, but if you want to play you have to pay. -
Question: 2000 Yamaha blaster rear brakes
Gwbarm replied to Rick Shropshire's topic in General ATV Discussion
I took a closer look at your photos, not really familiar with that system, but the caliper should move may just need to soak it good with PB Blaster and let it sit overnight, it should only be spring loaded, no brake fluid to cause corrosion and gunk in there . Nothing appears to be broken, its a fairly simple set up not sure why its not working. I would say just replace the pads it might take more strength to move it, out of the machine, than can be applied, or either something is broken internally. Maybe for piece of mind you should just replace it, but i would try putting it back on the machine and trying it first. -
Recommendations for must-have tools for maintenance and repairs.
Gwbarm replied to DexKing's topic in General ATV Discussion
You will never have enough tools, but the ones you only need once in your lifetimes list gets long. For most tasks you just need a regular socket set metric and a volt meter definately feeler guage, JIS screwdrivers, phillip will mess up the screw head taking it out. If you go to do the brakes the rear axle nut is large, not usually in a standard socket set. I would recommend only buying these specialty tools as you find a need for them.- 20 replies
-
- 3
-

-
- maintenance
- repairs
- (and 2 more)
-
Question: 2000 Yamaha blaster rear brakes
Gwbarm replied to Rick Shropshire's topic in General ATV Discussion
Oh! You said you cleaned the caliper, if it has a caliper it is hydraulic, but you are right parking brakes are not hydraulic, does it have a drum rear brake that is usually where the parking brake is . It would have a cable that keeps the brake held against the drum when you push or pull on it.. I am working on brakes myself and the rear is a drum, what a nightmare, years of corrosion mud and rust. i will have to create a post for the adventures ia m having. If it has a mechanical piston ,that is new to me, but i dont work on UTVs much. -
Question: 2000 Yamaha blaster rear brakes
Gwbarm replied to Rick Shropshire's topic in General ATV Discussion
open the bleeder valve push one pad aganst piston and get a big c clamp if you dont have the brake caliper retractor tool https://www.amazon.com/BILITOOLS-Spreader-Separator-Caliper-Compression/dp/B0B8MN5C72/ref=sxin_17_pa_sp_search_thematic_sspa?content-id=amzn1.sym.9ce0d71e-7aca-4397-8822-32313a4aff8e%3Aamzn1.sym.9ce0d71e-7aca-4397-8822-32313a4aff8e&crid=2S2VIISKE7TQH&cv_ct_cx=brake%2Bcaliper%2Btool&keywords=brake%2Bcaliper%2Btool&pd_rd_i=B0B8MN5C72&pd_rd_r=e95aa5df-2b80-4f9a-9234-0cc5974947be&pd_rd_w=6p7vo&pd_rd_wg=zrmrC&pf_rd_p=9ce0d71e-7aca-4397-8822-32313a4aff8e&pf_rd_r=ZKHJSTDSDBSWXVR1K0ER&qid=1760458254&sbo=RZvfv%2F%2FHxDF%2BO5021pAnSA%3D%3D&sprefix=brake%2Bcaliper%2Btool%2Caps%2C155&sr=1-2-6024b2a3-78e4-4fed-8fed-e1613be3bcce-spons&sp_csd=d2lkZ2V0TmFtZT1zcF9zZWFyY2hfdGhlbWF0aWM&th=1 it will move, now after you move it if it is leaking i would replace the caliper rathar than trying to replace all the seals in the old one. -
Why Weize ATV Batteries Are a Top Choice
Gwbarm replied to quadcrazy's topic in New ATV Products, Reviews & Tests
Thanks for the update, my Weize in my Suzuki Eiger is 2 years old still going strong, the Mighty Max i got for the Big Bear is not doing so well. -
LOOKING FOR: Used OEM Carb, 1995 King Quad
Gwbarm replied to 95kingQuad's topic in For Sale or Wanted? Post it here.
It could be any of these for the 95 year depending on the sub model: 13200-19B84 CARBURETOR ASSY ~E.NO.102907Supersedes: 13200-19B80 (CARBURETOR ASSY) This part is currently unavailable. 13200-19B84 CARBURETOR ASSY E.NO.102908~Supersedes: 13200-19B81 (CARBURETOR ASSY) This part is currently unavailable. 13200-19B84 CARBURETOR ASSY MODEL PSupersedes: 13200-19B82 (CARBURETOR ASSY) This part is currently unavailable. 13200-19B93 CARBURETOR ASSY MODEL R/S; INCLUDES ITEM(S) 1 - 51Supersedes: 13200-19B90 (CARBURETOR AS* -
Suzuki king quad 300 idles great but Boggs when you apply throttle
Gwbarm replied to 97kingquad's topic in Suzuki ATV Forum
I see no markings on the carb what so ever that tells me it might be OEM except the box and i wouldnt trust that. -
Suzuki king quad 300 idles great but Boggs when you apply throttle
Gwbarm replied to 97kingquad's topic in Suzuki ATV Forum
They typicaly came with a Mikuni, cant remember the exact carb#. I would do an ebay search for used carb for 95 King Quad. Look at the photos closely to make sure it has Mikuni on the side or you will end up with another aftermarket.