
Frank Angerano
-
Posts
3,925 -
Joined
-
Last visited
-
Days Won
209
Content Type
Profiles
Forum
Gallery
ATV Magazine
Events Calendar
Downloads
Store
Community Map
Everything posted by Frank Angerano
-

King Quad 700 not getting fuel pressure
Frank Angerano replied to David Land's topic in General ATV Discussion
That bike is fuel injected yes ? If so you’ve replaced the pump ? And do you hear the pump come on when you turn the ignition ? I thought it was a vacuum set up. Can you pots a few pics ? -
King Quad 700 not getting fuel pressure
Frank Angerano replied to David Land's topic in General ATV Discussion
What year is the bike ? -
Have you checked YouTube? There are usually a lot of reviews from manufacturers and people who bought the machines.
-
Looking at buying a 2005 Suzuki ltz400 - Not sure
Frank Angerano replied to Brian Simmons's topic in Suzuki ATV Forum
Going through a puddle ? That’s odd because most of the electrical components are higher up into the frame. Something like that could be tricky to isolate. If water is getting inside of a plug, water going near the stator etc but that’s the only parts that are down low. The cdi could be gettin damp and causing that to happen but it could be anything! You would have to really look at the bike for any exposed wiring or open areas like around the kill switch etc. I would rate this on a scale of 1 to 10 a 7 as far as being risky. If the price is right then yes it would be worth the effort. But if your paying a lot of money walk away. That’s my take. -
King Quad 700 not getting fuel pressure
Frank Angerano replied to David Land's topic in General ATV Discussion
No worries. Just be sure you’ve checked everything else as well. Vacuum, all lines are tight, and anything else related to the fuel pump system etc. -
King Quad 700 not getting fuel pressure
Frank Angerano replied to David Land's topic in General ATV Discussion
It’s a pain in the as* but that’s the way it is. Sorry brother. Hopefully you will have better luck with with this one. -
Metal shavings in crankcase of Baja Storm 125
Frank Angerano replied to Adrian Ciotinga's topic in General ATV Discussion
This will give you a better understanding of how a cv carburetor works. -
2008 ranger crew 700 hard shifting
Frank Angerano replied to gpenberthy's topic in Polaris ATV Forum
If the throttle cable is damaged and lowering the throttle helped I would say yes this is an issue. Lower the idle as low as it can go without stalling and see how it shifts. Should idle at about 800 to 900 max rpm. -
King Quad 700 not getting fuel pressure
Frank Angerano replied to David Land's topic in General ATV Discussion
The fuel pumps have diaphragms that crack sometimes. We have also seen new pumps installed with problems. It’s weird but they do fail more so then the manufacturers like to admit. I would swap it out and see how it goes. -
Metal shavings in crankcase of Baja Storm 125
Frank Angerano replied to Adrian Ciotinga's topic in General ATV Discussion
Nope not a problem. The slide works on a vacuum. So have a clean preferably white towel or an old pillow case. I like to see what’s comes out and it’s easier to keep all the parts local. Take it apart and keep all the screws for each part separate on the area you working on. If you have a can of the air people use to clean off computer keyboards it helps. Something to clean the small holes out. If you need something I always recommend taking a strand of a piece of bicycle brake cable , it works great. -
Metal shavings in crankcase of Baja Storm 125
Frank Angerano replied to Adrian Ciotinga's topic in General ATV Discussion
Nice work ! That throttle cable will come off by grabbing that throttle control on the carb and turning it and pull the cable off as it slacks. Almost like you would a bike chain. Then once the cable is off of the main part line it up with that slot and slide it out. There should be a part that holds the throttle cable into the carburetor also. You can unscrew that as well to slack the cable. -
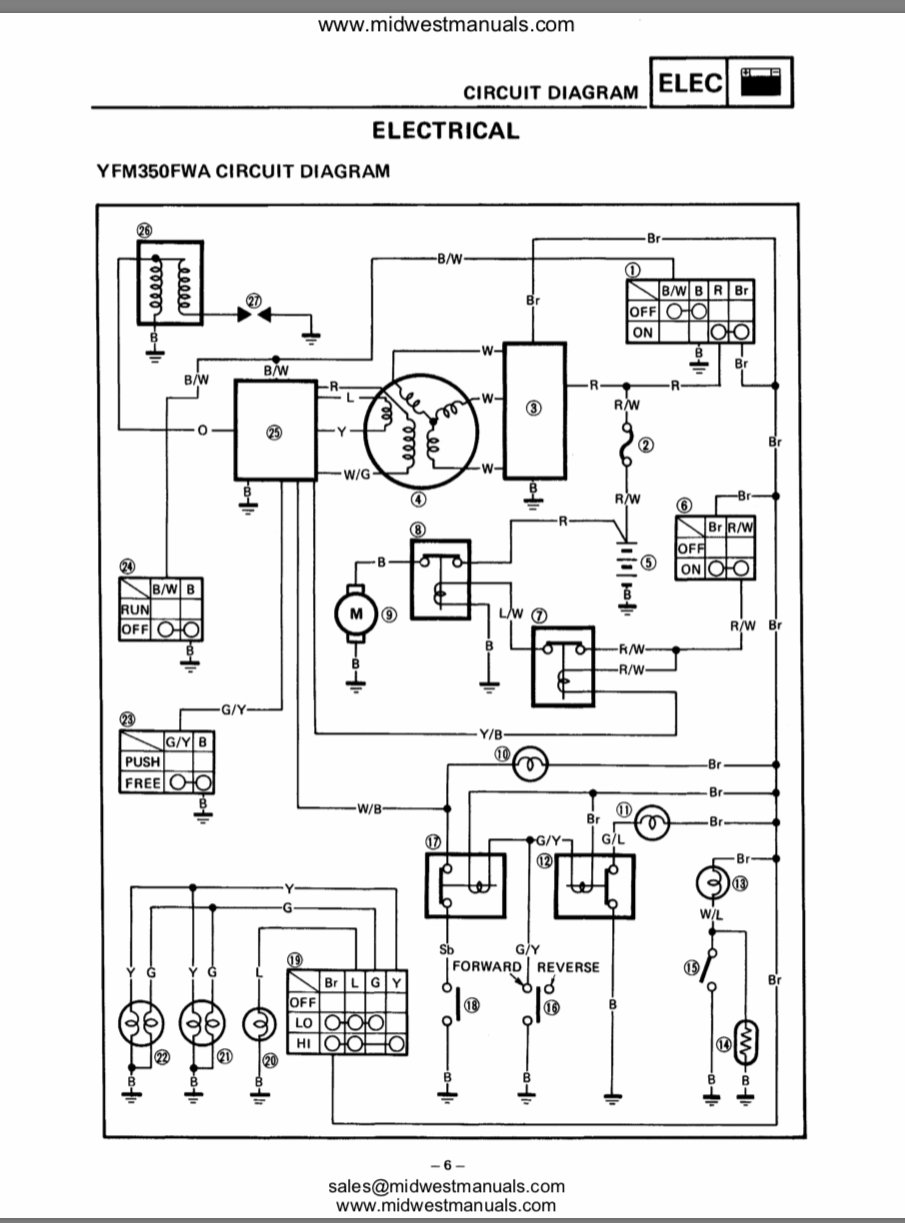
See if this matched up with your wiring on the bike. If so then the bear tracker wiring is the same. And so should the spec on the stator and pick up coil.

-
Nice work so far. Try to download the 89 bear tracker I’m pretty sure the wiring and specs are the same. What color are the three wires coming off the statue white ? I think that’s a good idea on waiting on a battery and tester. I have a feeling it’s going to be fine once that’s all together.
-
2000 KAWASAKI BAYOU 300 bogging down
Frank Angerano replied to mike costa's topic in Kawasaki ATV Forum
Well dam that’s definitely not a factory bend! The kit will come with new jets that should be the same but compare them and make sure the numbers match. If you plan on cleaning them use a piece of a bicycle brake cable. Take a strand off of the cable and use that to clean the small holes out. As far as the air/fuel screw it says 2-1/8 turns out. That sounds right. I would go with that and see how she runs. I can’t believe how that needle is bent. Good find! -
2000 KAWASAKI BAYOU 300 bogging down
Frank Angerano replied to mike costa's topic in Kawasaki ATV Forum
Fun fact, I’ve only used Quadcrazy via my iPhone! So no clue what you two are taking about lol 😂😂😂😂. Anyway it’s def a carb issue. A couple of things to look for. One is a crack in the float allowing it to fill up with fuel thus not allowing it to properly float/lift the needle to shut fuel off to the bowl causing an over flow condition as you seen. Two the float is set wrong and it’s a simple adjustment. Or the fill needle may have a rubber tip or o ring inside that’s compromised. The air fuel screw 100% needs to come out and have the as***** cleaned out of it good and blown out. (Count the turns it set at) After all is said and done you may have to adjust the air fuel screw with the bike running to get a final dial in. When you get to that point it’s easy enough to do. Get after it! #Texasinourthoughts -
I would throw a new battery in before you do anything. See what your charging at after that. Either way you need a battery so might as well go ahead with that. Check the spec on the stator output. It should be about 14 volts. But that’s an 89 I think you said so I can’t be 100% sure it’s supposed to be 14 volts. Maybe pull that stator cover and see how it looks.
-
2000 KAWASAKI BAYOU 300 bogging down
Frank Angerano replied to mike costa's topic in Kawasaki ATV Forum
I forgot one thing. You can put a tester on the battery while the bike is running to see what it’s charging at. This will help you out to determine if the stator is charging properly and if the regulator/rectifier is working. -
Yep I figured as much. The relay contacts arc when they make contact. That arcing eventually eats away at the contacts. That could be from poor voltage or an inconsistent voltage like a dirty contact on your start button.
-
2000 KAWASAKI BAYOU 300 bogging down
Frank Angerano replied to mike costa's topic in Kawasaki ATV Forum
Great research and work! But I have to disagree on the stator. If the bike is running and has good spark I don’t think its breaking down. In my experience the stator is either good or bad. There should definitely be a reading on the ohms setting giving you exact numbers from phase to phase. Why your not getting that is a little baffling. You should buy an in line spark tester and plug it in and watch your spark as you rev the bike to see if there is a loss or brake down in the spark. It’s about a $15 dollar tool that’s a big help. Back to the carburetor: I would definitely drill out that plug covering the fuel air screw and pull it out. Check it out and clean the port well with cleaner and air. Before you remove the screw tighten it to a snug position and count the turns so you know where to set it when you put it back. My guess is it’s around 1-3/4 turns out from a snug spot. The fact that the bike sat, the carburetor was gummed up and that air/fuel screw was never taken out and cleaned leaves a question mark on the carburetor. I would start with the less invasive stuff right now and do some testing first so your not dumping money into it. Narrow down the problem so you don’t question weather it’s a fuel or electrical problem. Fuel tank and valve (petcock) clean and delivering enough fuel, carburetor rebuilt and good to go! No cracks or problems on the boot connecting the carburetor to the engine etc. if all that’s done then I rule out fuel or carburetor problems and move on to possibly an ignition issue. Oem/aftermarket: Carburetors: Chinese carburetors look great but don’t perform well at all. If you have the oem carburetor and it’s not cracked or damaged then it’s a good cleaning and rebuild. But it has to be properly done. One missed port or blockage will cause a lot of throttle issues. Floats set wrong, fuel air screw not right etc. Cdi: oem always. Used from eBay at the very least. Same with regulators Stators: I’ve used aftermarket RM and Caltric. No issues to date. -
2000 KAWASAKI BAYOU 300 bogging down
Frank Angerano replied to mike costa's topic in Kawasaki ATV Forum
Just because a shop went through the carburetor dose not mean it’s going to be good ! We’ve all seen this. A guy who works in a bus depot as a mechanic can open an atv shop. Does that make him an atv mechanic? No! Sorry to be so blunt but that’s the way it is. Trust no one until you find the right guy and get to know him or her. My guess is the carburetor is not set right. It may have been cleaned and put back together right but If the air fuel screw is not set properly then it’s useless! I would get yourself set up right and locate the air fuel screw and turn it all the way back into a snug tight position. Then turn it out two full turns and start the bike. Then as the bike is running adjust the same screw turning it to where the engine revs higher, and that may be tight or looser until it reaches its best happy place and stop. And happy place means revs higher as you go, If it’s idling high after this then lower the idle screw. See what ya got after this. -
No it should not be a problem or interfere with the cooling system. It should just expose the valves.
-
Have you checked the boot connecting the carburetor to the engine for any cracks or leaks ? If you have good spark then I’m leaning toward a fuel problem. It’s sounds like you did the right job on the carburetor but covering the intake starving the engine for air allows it to rev then it appears it’s within the carburetor. Is that bike gravity fed from the gas tank or a fuel pump ? The only other item I can take a guess at is the gap between the flywheel and pick up coil. Take a look and see if that gap is within speck. Double check the pick up coil is tight and all is ok inside that cover.
-
Enjoying a few days off
Frank Angerano replied to mikeexplorer's topic in ATV Picture and Video Sharing
That’s a lot of miles! What’s your thoughts on the 450 as far as the top end smoke issue, just valve seals or are you going for the whole enchilada since its all going to be opened up? Or just wait to see what your mechanic recommends? Any good rides coming up ? -
Hey Tahj you can take a look atv the timing mark on the fly wheel and pull the plug to see where the piston is in relation to the TDC mark but other then that I think your stuck pulling cam sprocket cover in order to see and make sure everything lines up. You don’t want to spin the engine and have the valves and piston hitting each other so be careful with the cranking too much.
-
Ok so the starter relay is clicking. That’s a good thing. Starter is not turning. Bad thing. So the starter relay could be bad making a shitty contact within. That’s my guess, however put a tester on the wire at the starter and see if you get 12v at the starter when you press the start button. You can also jump the relay quickly to see if the engine cranks. If so then put a new relay in and it should be done.