
Frank Angerano
-
Posts
3,925 -
Joined
-
Last visited
-
Days Won
209
Content Type
Profiles
Forum
Gallery
ATV Magazine
Events Calendar
Downloads
Store
Community Map
Everything posted by Frank Angerano
-

How to identify size of machine as no stickers or books?
Frank Angerano replied to Westrom's topic in General ATV Discussion
Wow the bike looks like it’s in great shape I bet a good carb cleaning, fresh gas and plug like the boys say and she will fire right up. Keep us posted. -
1996 Yamaha warrior 350 ELECTRICS KIT
Frank Angerano replied to Chris Smith's topic in Yamaha ATV Forum
I agree with @Ajmboy. You can also find a used harness on eBay or other used atv parts vendors. I would rather take my chances on a used oem harness or a brand new oem one. The oem harness will fall right back into place and I’ve never heard one good thing about an aftermarket harness. -
Nice work!
-
01 bear tracker stutter/ bog, electrical ??
Frank Angerano replied to Thumpinhard25's topic in Yamaha ATV Forum
Any chance the fuel tank has junk in it ? Maybe remove the petcock (gastank valve) and check the screen and inside to check for junk and that it’s not starving the carburetor for fuel? Esp since you said when you start moving the bike around it gets cranky.- 16 replies
-
- 1
-

-
- bear tracker
- cdi
- (and 6 more)
-
I’ve never used a timing light on a quad. Once the marks are set the timing should be set and locked. Unless there is a slacked chain maybe but that’s about it. The tdc on the compression stroke and the “T” mark on the flywheel are all good then maybe take a look at the trigger/pulse coil. Maybe somethings going on there. I also used a spark tester on the bike to see how the spark fires during engine rotation. But possibly the trigger coil having an issue. Was the head taken off the bike ? What’s the history from the person you got is from. The “it just quit on him” doesn’t sound right. Maybe he took it apart? Does it look like the head was taken off? New gaskets or any fresh marks like was taken apart other then the chain tensioner ?
-
Hey JD, welcome to Quadcrazy. I’m sure you double checked your work and I’m sure it all looks right. But could it be possbale that your are 180 deg out on the timing ? The marks are funny and there are a few different marks on the flywheel. It’s super important to have the proper timing mark and not just a line on the flywheel. It should be a “T” on the flywheel as a TDC reference point. Have you looked at the piston and valves to check for damage ? Maybe a blown or jumped chain caused damage. Have you tried staring fluid and sure the carb is clean and delivering fuel ? Reason im asking is it’s pretty simple if what you say is accurate by having spark, fuel and compression there should be no issues as far as starting. (Other then timing) Now having said all that the next step would be the stator and pulse aka trigger coil to make sure it’s sending spark at the right time to the spark plug.
-
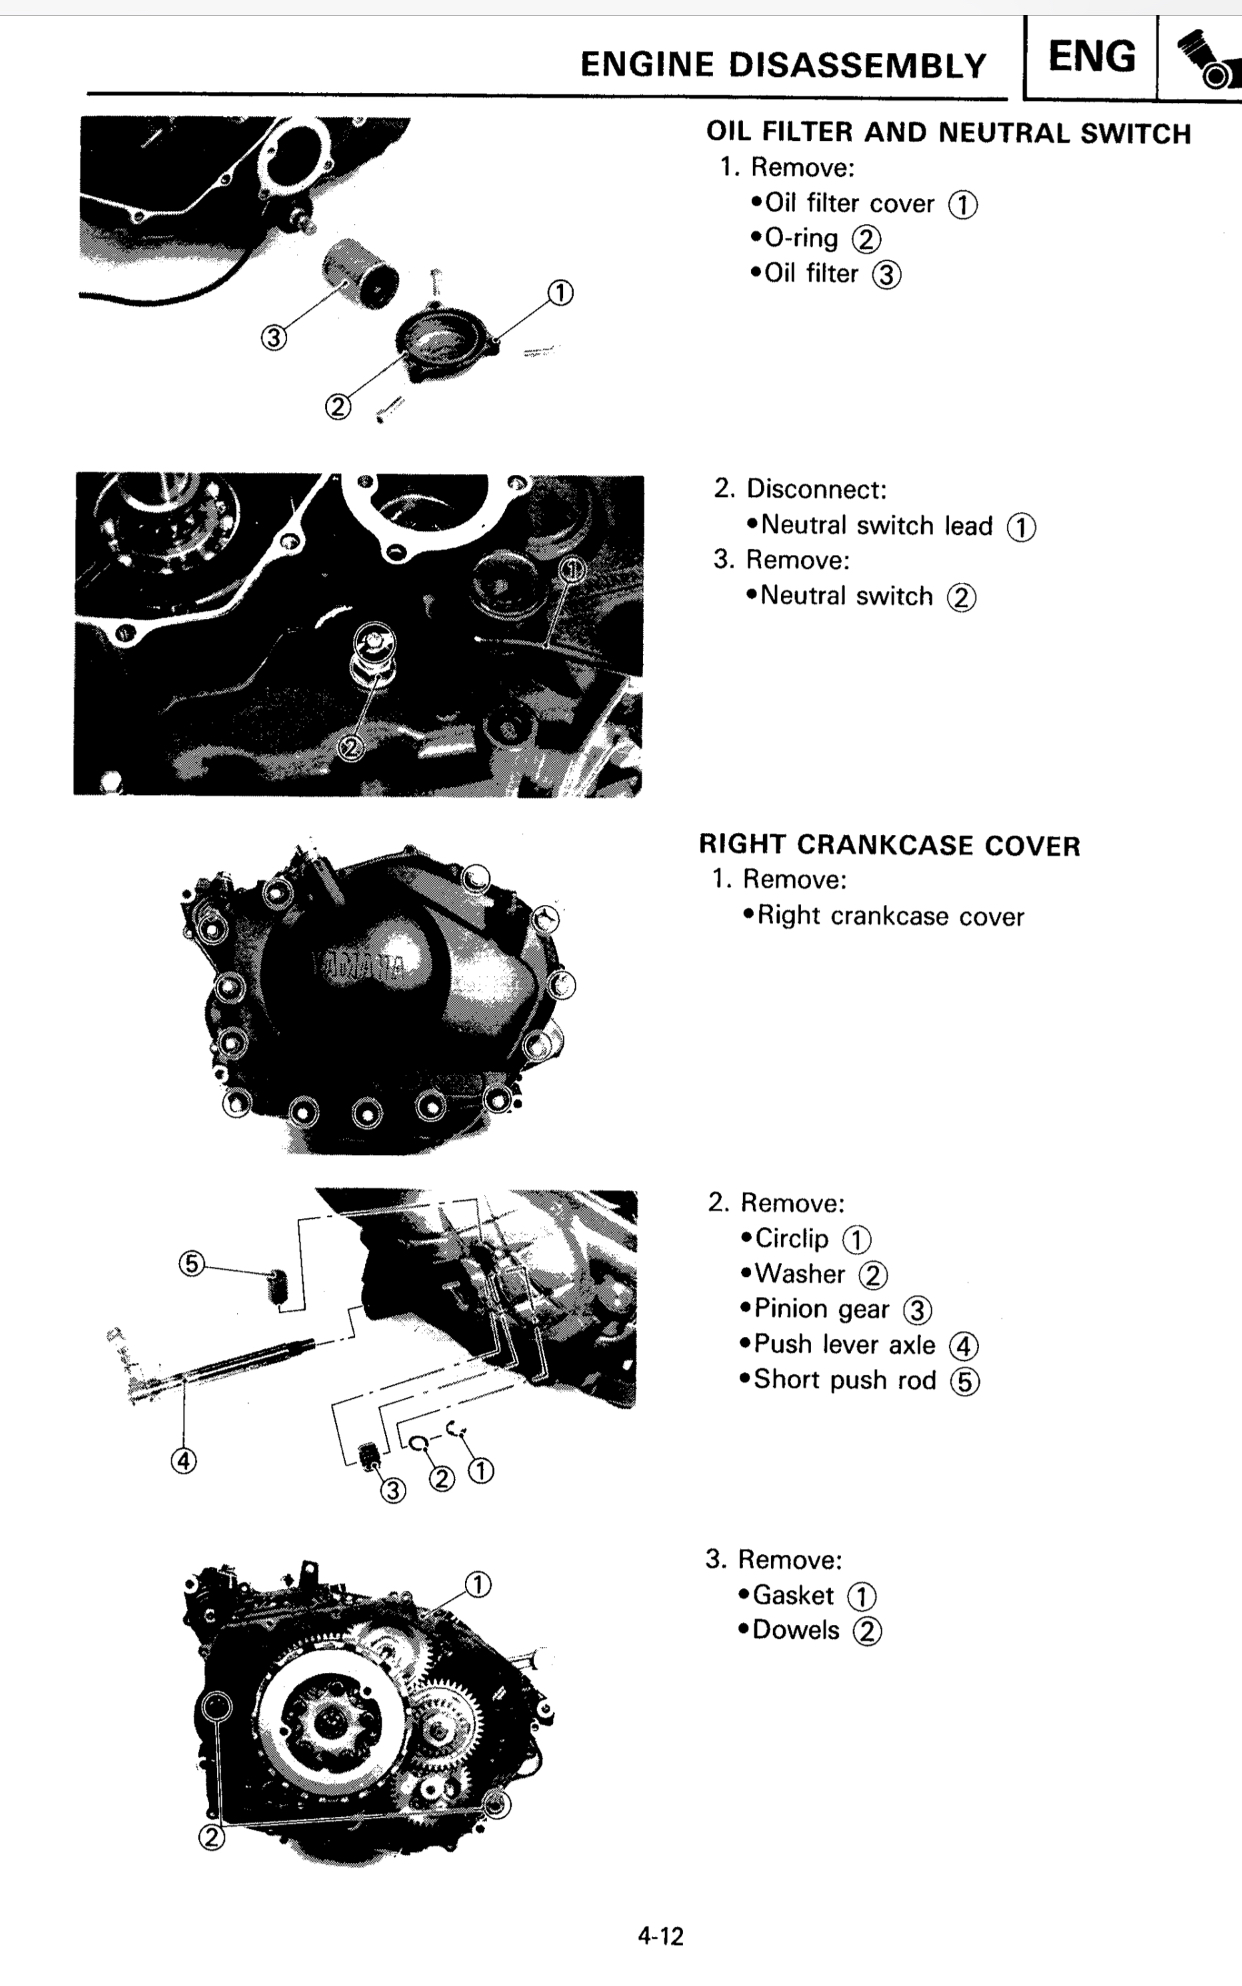
2000 Explorer 400 A00CG38CA Replacing head gasket
Frank Angerano replied to cleangfc's topic in Polaris ATV Forum
I would only recommend a gasket sealer on the base gasket only if the cylinder is off. The head gasket is designed with compression pockets that flatten out when the head is tightened down sealing any slight voids. I highly recommend tightening then head down with a torque 🔧 to the engine manuals specs. -
Can you post a picture of the carburetor?
-
#damgroundhog 12-16 here, maybe a little night ride later on with my boys. It is March right ? Be safe everyone. 😁
-
You are welcome and that’s great that you found some parts. That oiling system is going to be super important. Make sure that you have good flow. Also a ton of reassembly grease on all moving parts. That first start up will have a lot of friction.
-
Hey vertigo welcome to Quadcrazy, I picked up a bayou 400, same deal great price not so great head/cam. Journals were wiped out and the cam was burnt up. I contiplated a new cam and reworking the head etc but would up finding a used head assembly from a good motor on eBay for a good price. Glad I went this route. The bike runs like new and it’s all oem parts back on the bike. Good luck.
-
Welcome to Quadcrazy, I had one of the same type of bolts stuck. I used an impact driver. Got it on amazon. I put the link here to see. I hit it ever so lightly and the dam thing broke free. Good luck. I did have the engine hot prior to trying it. Once it broke free I let the bike cool and changed the filter. Good luck TEKTON 2905 3/8-Inch Drive Manual Hand Impact Driver Set, 7-Piece https://www.amazon.com/dp/B000NPPATS/ref=cm_sw_r_cp_api_u5DQAbJP361J6
-
I would check the timing marks that they are all aligned. Possible that the ignition system is not firing at the proper time. Maybe a pick up coil issue.
-
That thing looks absolutely nuts!
-
Could riders be into this? Perhaps a new trend?
Frank Angerano replied to motomaker's topic in General Talk - Anything Goes!
That I think was for a gps device like a garmin or something like that. -
Is it safe to lay an atv on its side? ATV Work
Frank Angerano replied to Soldier88's topic in General ATV Discussion
I agree with @Ajmboy it’s not really good to lay it on it’s side. Circumstances permitted ideally on all fours or up in the air. -
Sorry the cdi I meant***
-
Was the stator an oem ?
-
2003 Yamaha Warrior 350 No power to ignition switch
Frank Angerano replied to Smitty2662's topic in Yamaha ATV Forum
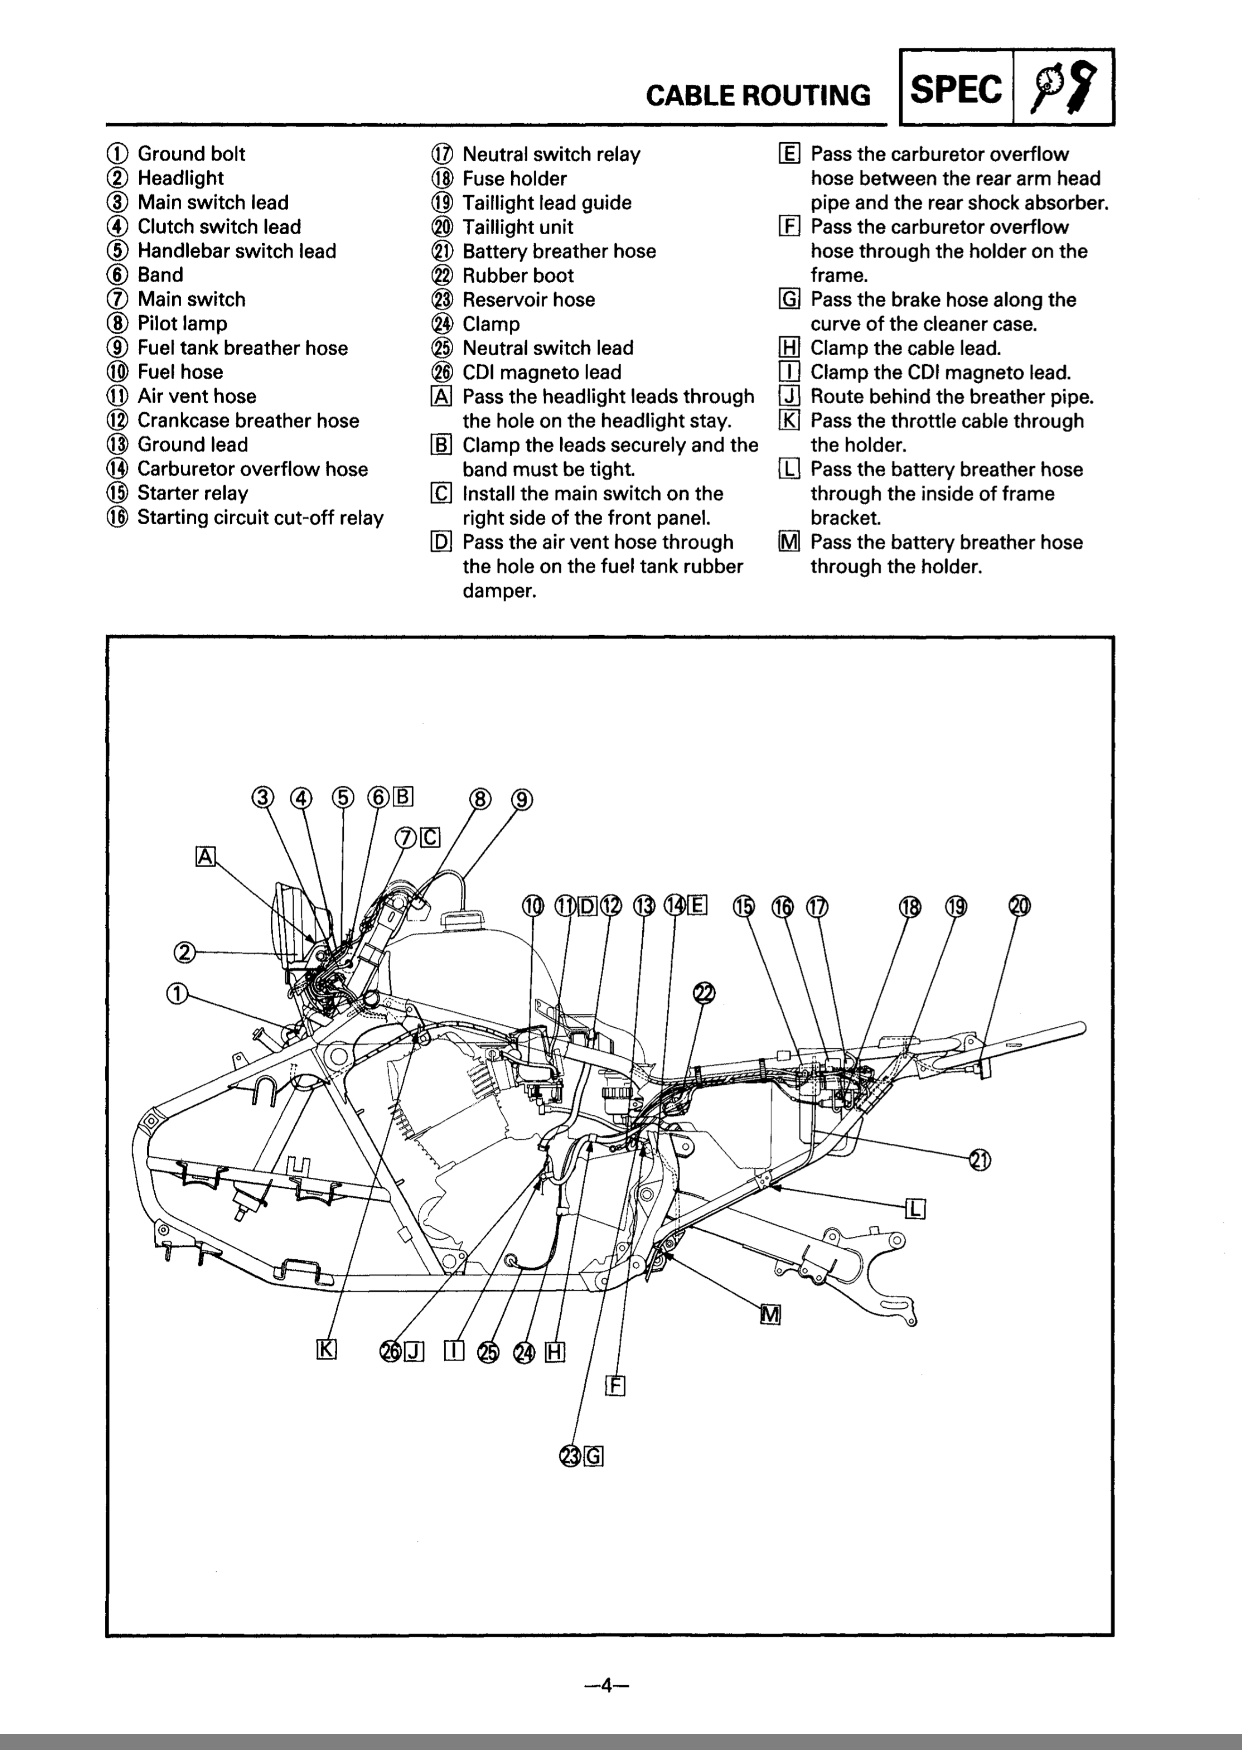
Should be on the bottom of the engine near the shifter, there is a sensor. And also a relay near the fuse block and start relay. Take a look. I attached a few pages form the manual of a warrior that should be similar. You can also find the manual to that bike on this site in the upper right tab and go to downloads.
-
These Bayous with No Spark.. What in the world.
Frank Angerano replied to Eric C's topic in Kawasaki ATV Forum
The rectifier if shorter aka burnt up may be causing a grounding of the electrical system and could knock out the ignition circuit. I would correct that and see what happens. And also go through the entire harness. Maybe it’s hit, damaged corroded at a connector and also the kill switch assembly. -
2003 Yamaha Warrior 350 No power to ignition switch
Frank Angerano replied to Smitty2662's topic in Yamaha ATV Forum
Also check your neutral safety switch. -
96 Polaris not charging when running
Frank Angerano replied to Fish Killen Machine's topic in Polaris ATV Forum
And if you are hesitant about taking the battery of of the bike you can do the test with the battery on the bike as well. Simply take a voltage reading on the battery with the bike off and start it up and do the same. You should read about 12+ volts with the bike off. With the bike running you should read 14+ volts. -
96 Polaris not charging when running
Frank Angerano replied to Fish Killen Machine's topic in Polaris ATV Forum
No it won’t hurt the bike. It’s to determine if your battery is getting voltage back from the engines internal charging system. Fuses on that bike should be located around the battery but shouldn’t be difficult to locate. What model and size is the bike? If you have the manual you can locate the fuses. -
96 Polaris not charging when running
Frank Angerano replied to Fish Killen Machine's topic in Polaris ATV Forum
You need to test the charging system components, stator coil, regulator, the manual will tell you what the readings should be. A standard ohms test will tell you what’s going on. Also look for the easy stuff like damaged wires, blown fuses. Make sure that the battery itself is not bad also and that there is an accessory that’s not draining the battery. Plow ? Lights ? Also: You should have voltage on the positive and negative battery terminals when the bike is running without the battery in place and a tester clipped on to the battery leads. -
Makes sense