
Frank Angerano
-
Posts
3,925 -
Joined
-
Last visited
-
Days Won
209
Content Type
Profiles
Forum
Gallery
ATV Magazine
Events Calendar
Downloads
Store
Community Map
Everything posted by Frank Angerano
-
Good stuff right there. Fire starring skills on point. Gatorade and sausages .... not so much lol. But that place looks like a blast to ride. Where do you find these places ?
-
Nice work. That black seal is the O ring. It’s probably crushed a bit and that’s why it leaked. Obviously your changing the boot since it has holes in it correct? Get some carb cleaner spray and spray it on that dirt and wipe it clean. pop in the new O ring seal then add a drop of grease on the splines before you put it back together and your good to go. Just make sure you tighten the four nuts in a crisscross configuration so it seats evenly, I like to put a drop of lock tight on the threads.
-
Have you checked the regulator/rectifier?
-

1998 Kawasaki Bayou wiring help
Frank Angerano replied to Andrew Baker's topic in Kawasaki ATV Forum
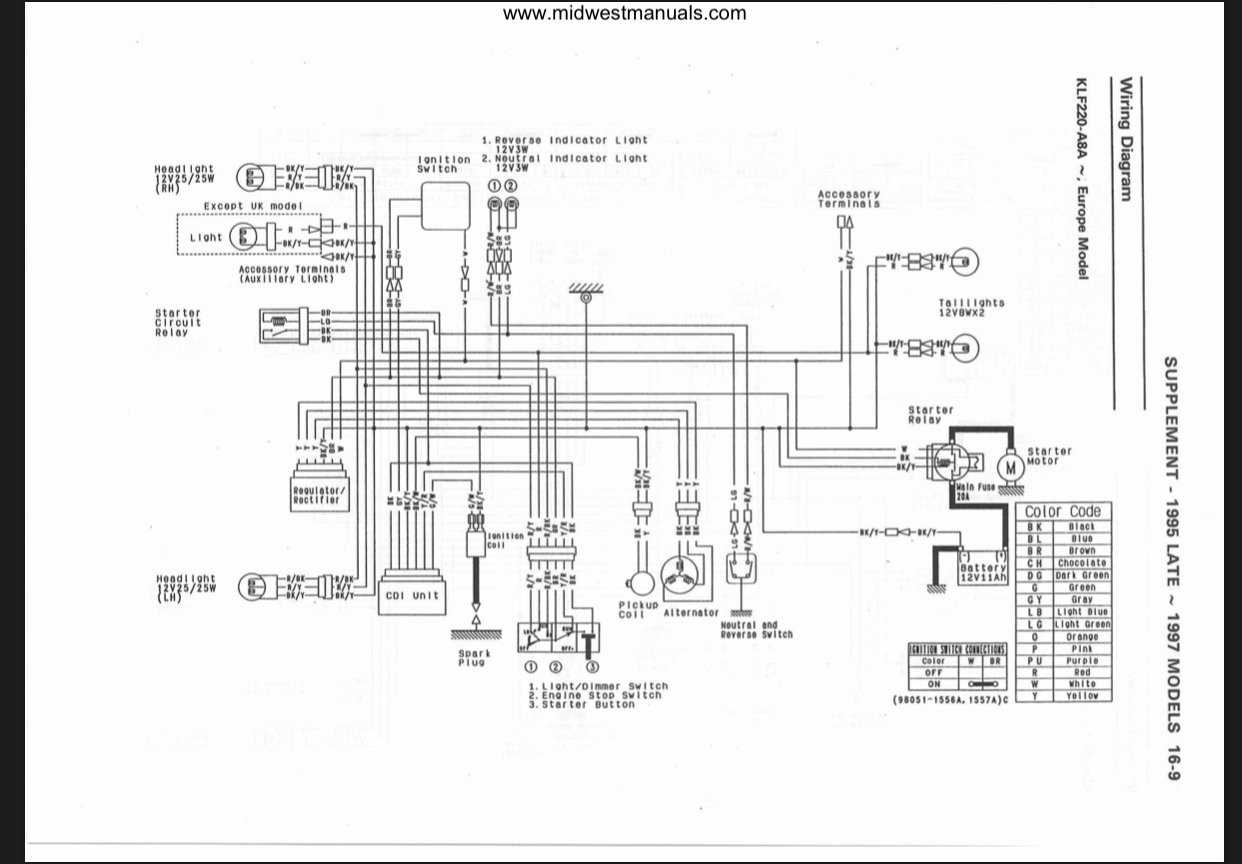
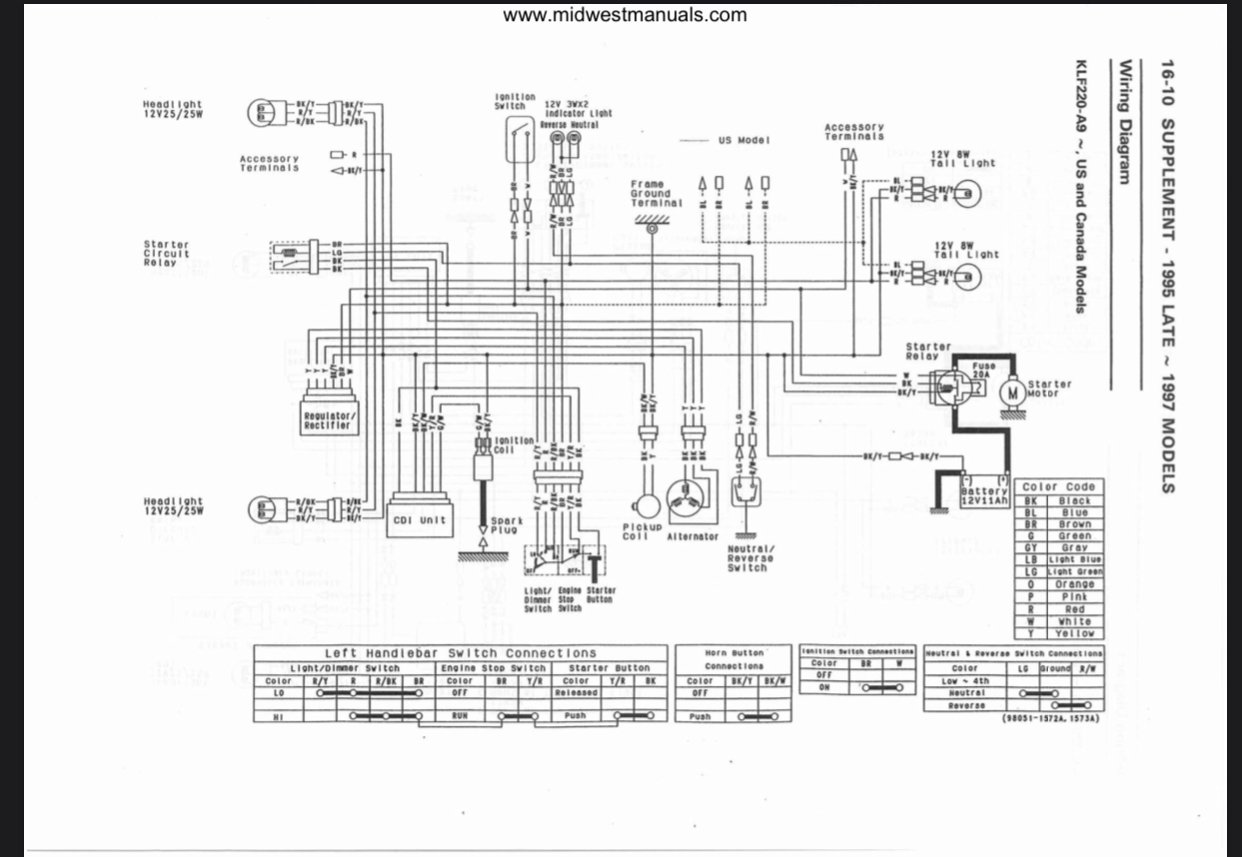
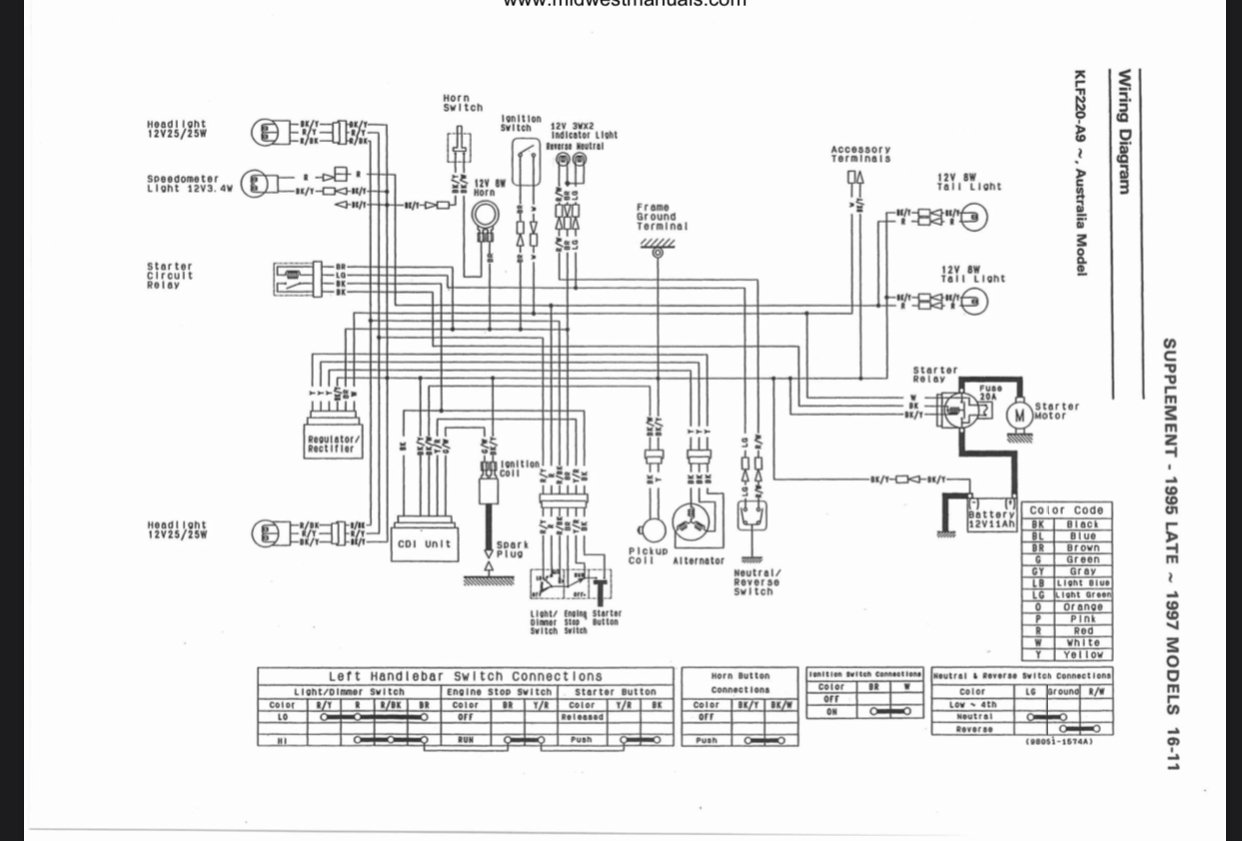
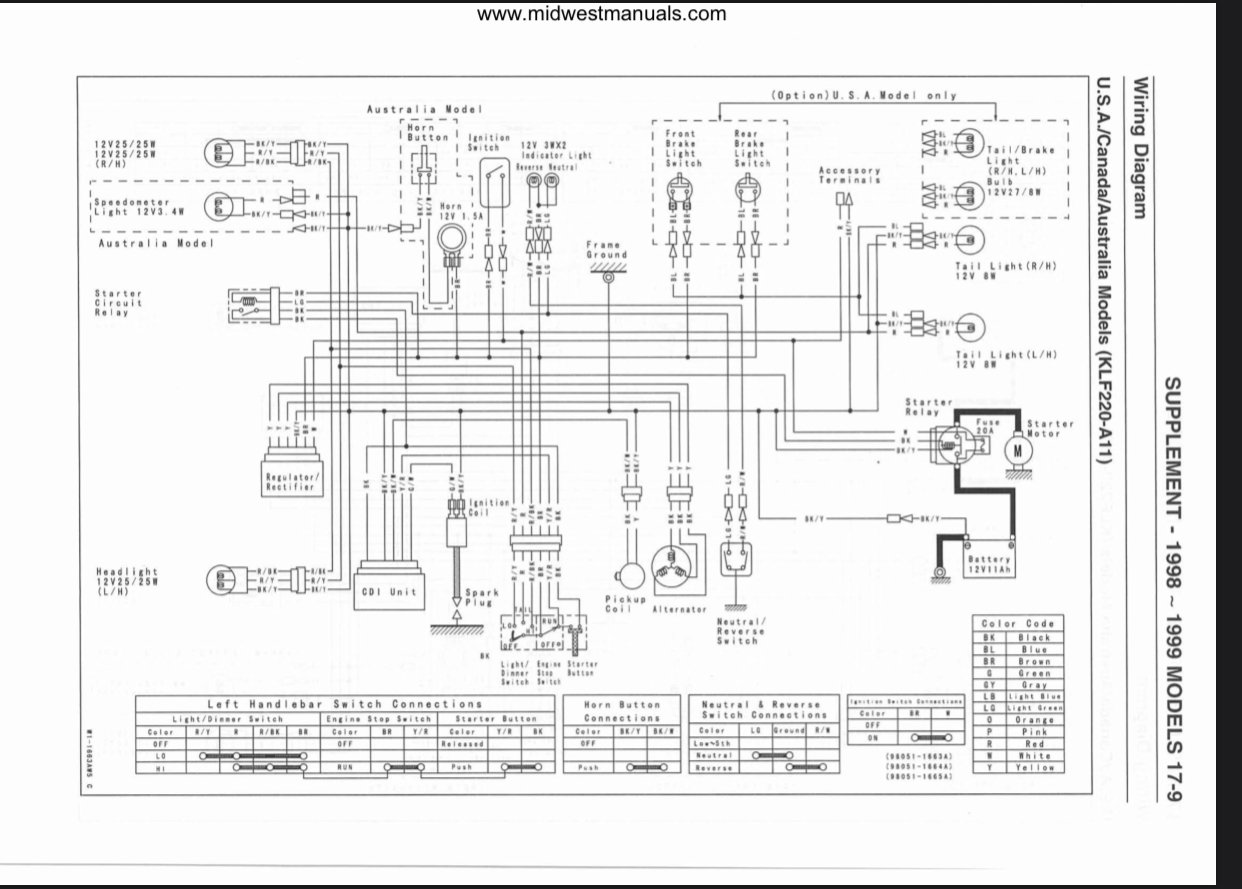
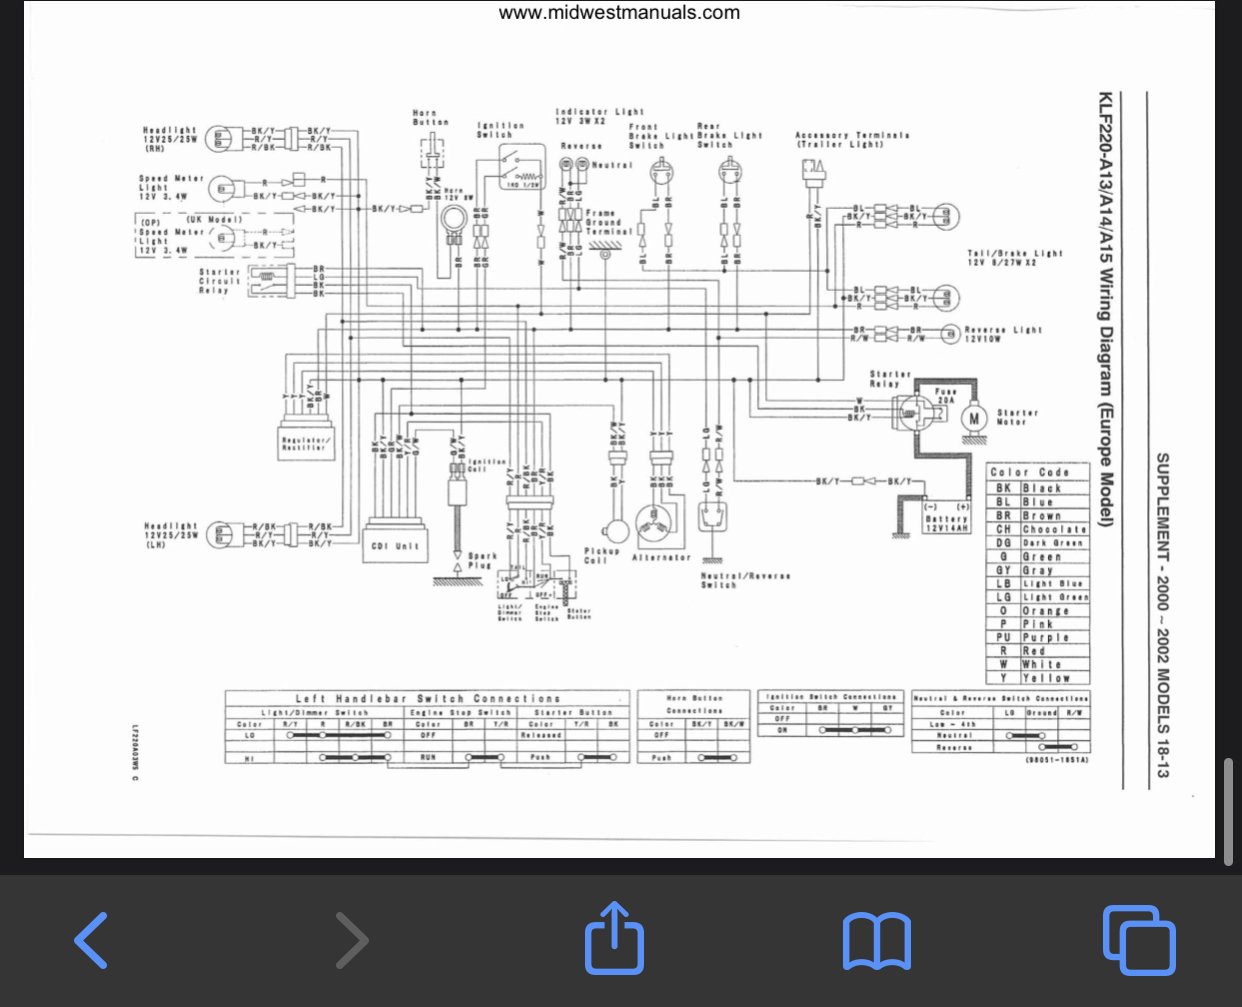
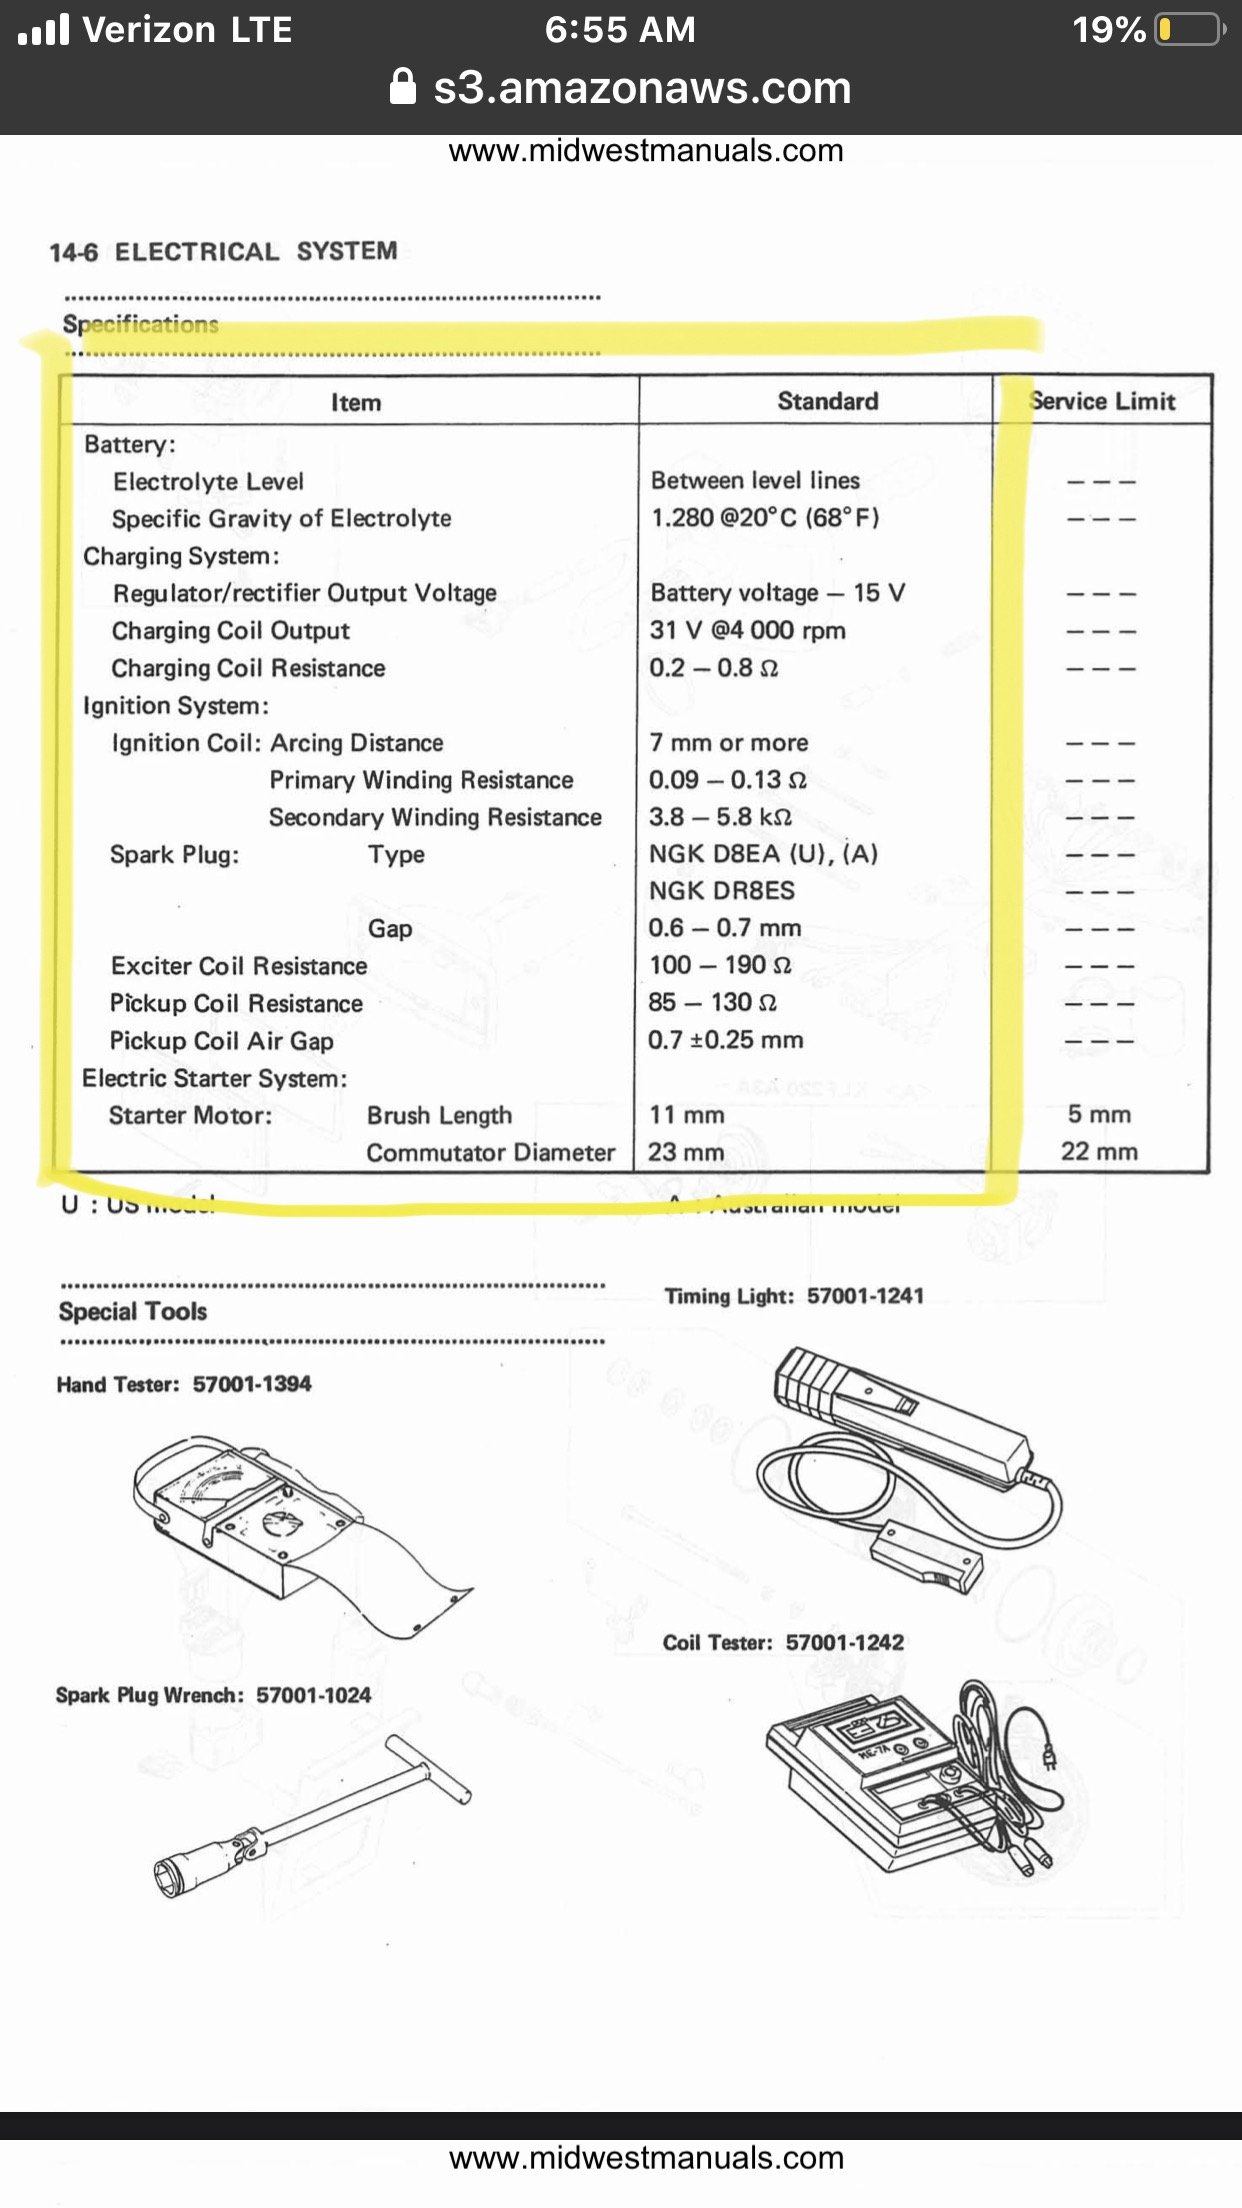
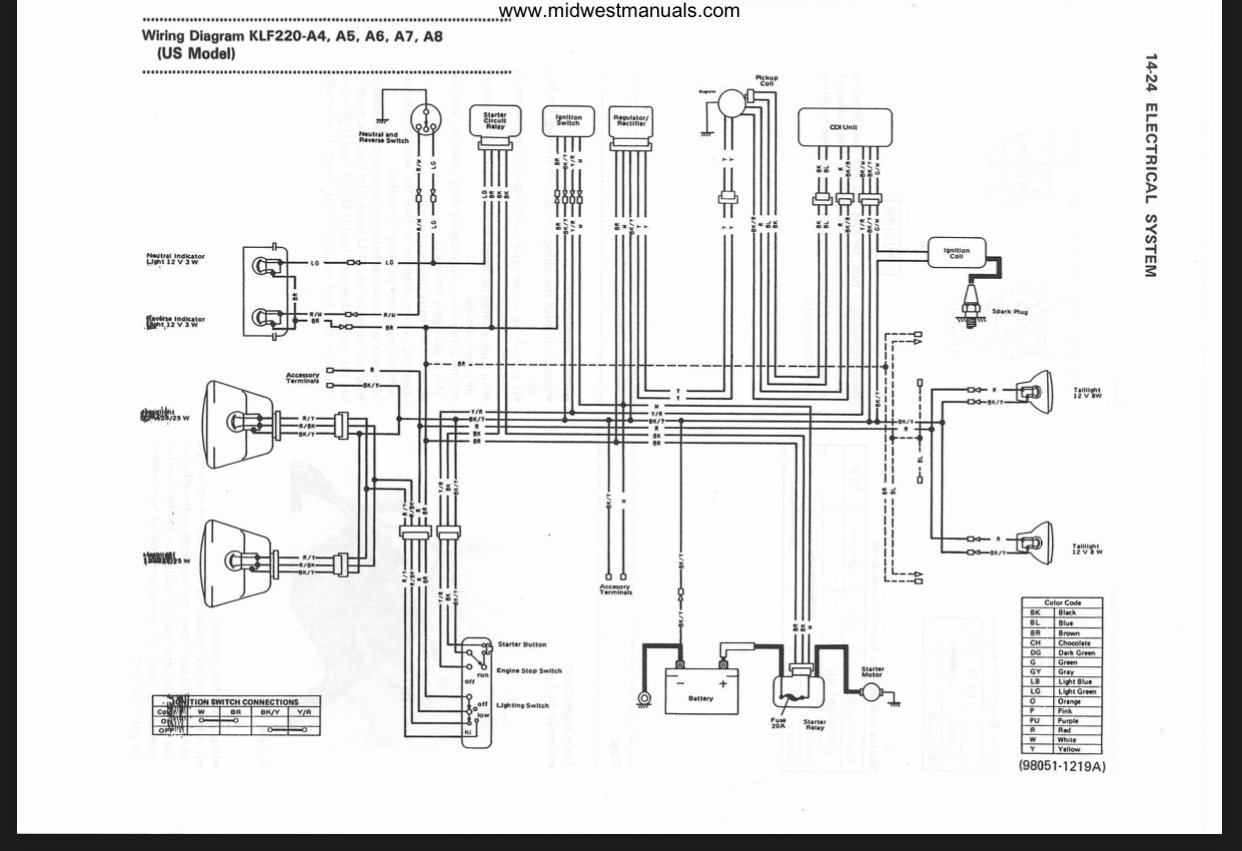
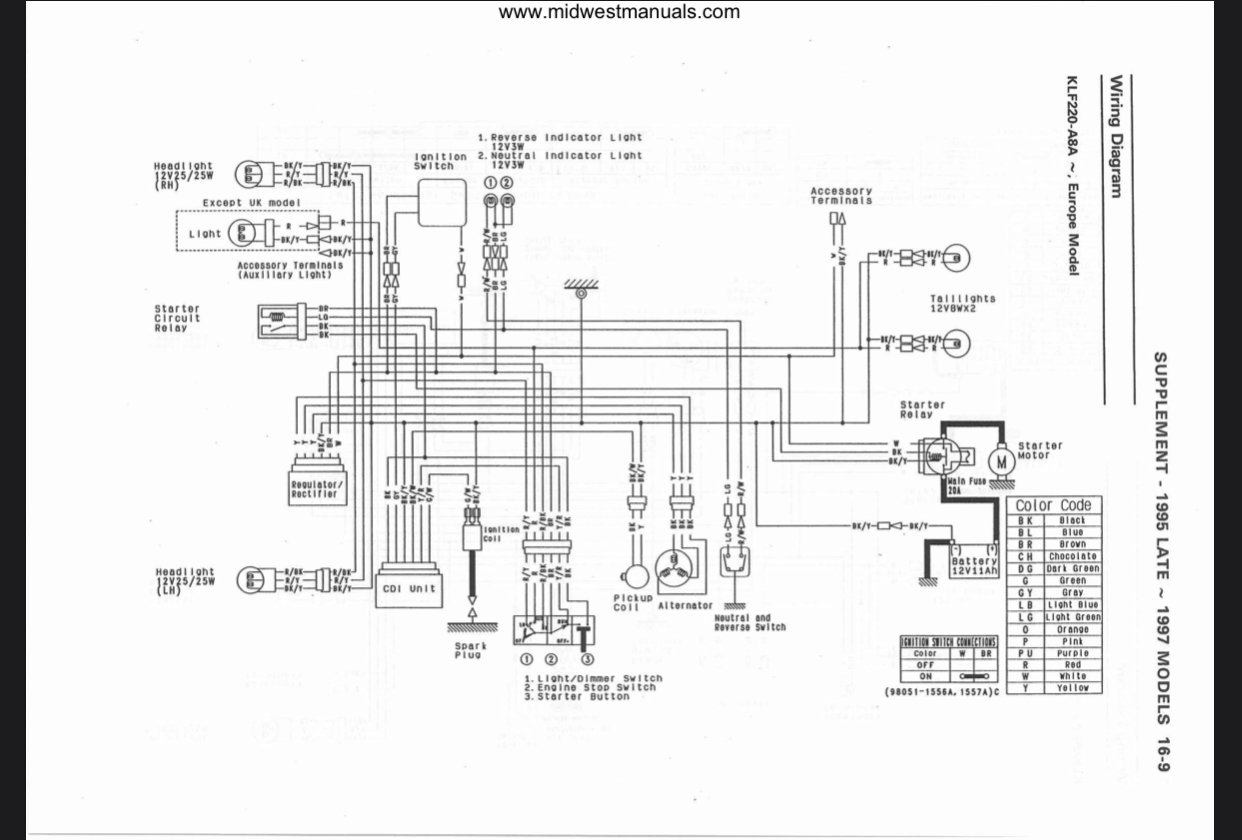
Sorry it took so long I’m up hunting and it’s hard to get a good signal up here and the time to look. Attached is a page for the ranges of all the coils etc. Also all the diagrams I could find. It’s about 6 of them and because you don’t know exactly what bike it is yours is then your going to have to compare each diagram until you find a match. Can you see the vin number clearly ? If so then post it. Maybe we can find out more.
-
1998 Kawasaki Bayou wiring help
Frank Angerano replied to Andrew Baker's topic in Kawasaki ATV Forum
If it’s new it should be fine. What you should get is a reading on ohms setting, if not then there is a problem. I am looking at diagrams for you. I will be in touch. -
1998 Kawasaki Bayou wiring help
Frank Angerano replied to Andrew Baker's topic in Kawasaki ATV Forum
Ok I’m looking now -
1998 Kawasaki Bayou wiring help
Frank Angerano replied to Andrew Baker's topic in Kawasaki ATV Forum
it will be fine. Just need to figure out what diagram fits your atv. Can you post sole pics of the cdi and the ignition. Make sure there aren’t any wires that your not seeing that may be disconnected? -
1998 Kawasaki Bayou wiring help
Frank Angerano replied to Andrew Baker's topic in Kawasaki ATV Forum
This is the US diagram. Sorry about that mix up. You might have them wrong cdi if that’s what you purchased or that atv is the Europe model which I doubt.
-
1998 Kawasaki Bayou wiring help
Frank Angerano replied to Andrew Baker's topic in Kawasaki ATV Forum
I just realized that diagram is the Europe model. Hang on a sec -
1998 Kawasaki Bayou wiring help
Frank Angerano replied to Andrew Baker's topic in Kawasaki ATV Forum
Here’s the diagram
-
1998 Kawasaki Bayou wiring help
Frank Angerano replied to Andrew Baker's topic in Kawasaki ATV Forum
That grey wire goes from the cdi to the ignition switch. -
1996 Kawasaki Mojave KSF250 No Spark
Frank Angerano replied to Chris2018's topic in Kawasaki ATV Forum
No worries, that’s what we are here for! keep us posted. -
Quadzilla XLC300 Noise and Shift Issue
Frank Angerano replied to Andrew Paul's topic in Suzuki ATV Forum
Welcome to Quadcrazy! My guess is third gear is probably shot. Unless the shifter is blocked by something I would assume it’s an internal problem. This would only be corrected by pulling the engine and splitting it open. As far as any mods/new engines I would probably stay with my existing engine and just repair it. If this type of repair is beyond your capabilities then send the engine out to be repaired. -
Good stuff.
-
Pressure washer ! Small one like we spoke about a week or so ago.
-
1999 Artic Cat 500 ATV bogs down and backfires
Frank Angerano replied to Bruce Madsen's topic in Arctic Cat ATV Forum
Only thing I can think of on the simple side would be a dirty carburetor or stuck choke, maybe poor fuel delivery from the tank. Second thing would be electrical. The spark could be breaking down so it could be a bad rectifier or ignition coil, maybe water inside the kill switch or ignition switch, a break in the wire harness maybe where you have an intermittent short. You can do some easy testing on some of the electrical parts other then the cdi. lastly I would check the timing to make sure it hasn’t jumped a tooth or two on the cam sprocket. Based on the backfiring it’s a symptom of timing but hit the simple stuff first before you start digging deep. Honestly and I don’t want to sound repetitive we have had members here that swore the gas was fine and the plug was good and after a second look it turned out to be just that. Hopefully this helps you out. -
$34 is a great price and it’s a direct fit. I added one to my rancher last year. The previous owner left a cigar on the seat and it burnt the cover. My older project bikes I like to make myself.
-
1999 Artic Cat 500 ATV bogs down and backfires
Frank Angerano replied to Bruce Madsen's topic in Arctic Cat ATV Forum
Agreed with @Ajmboy could be a foiled plug or a dirty carburetor as well as bad gas. -
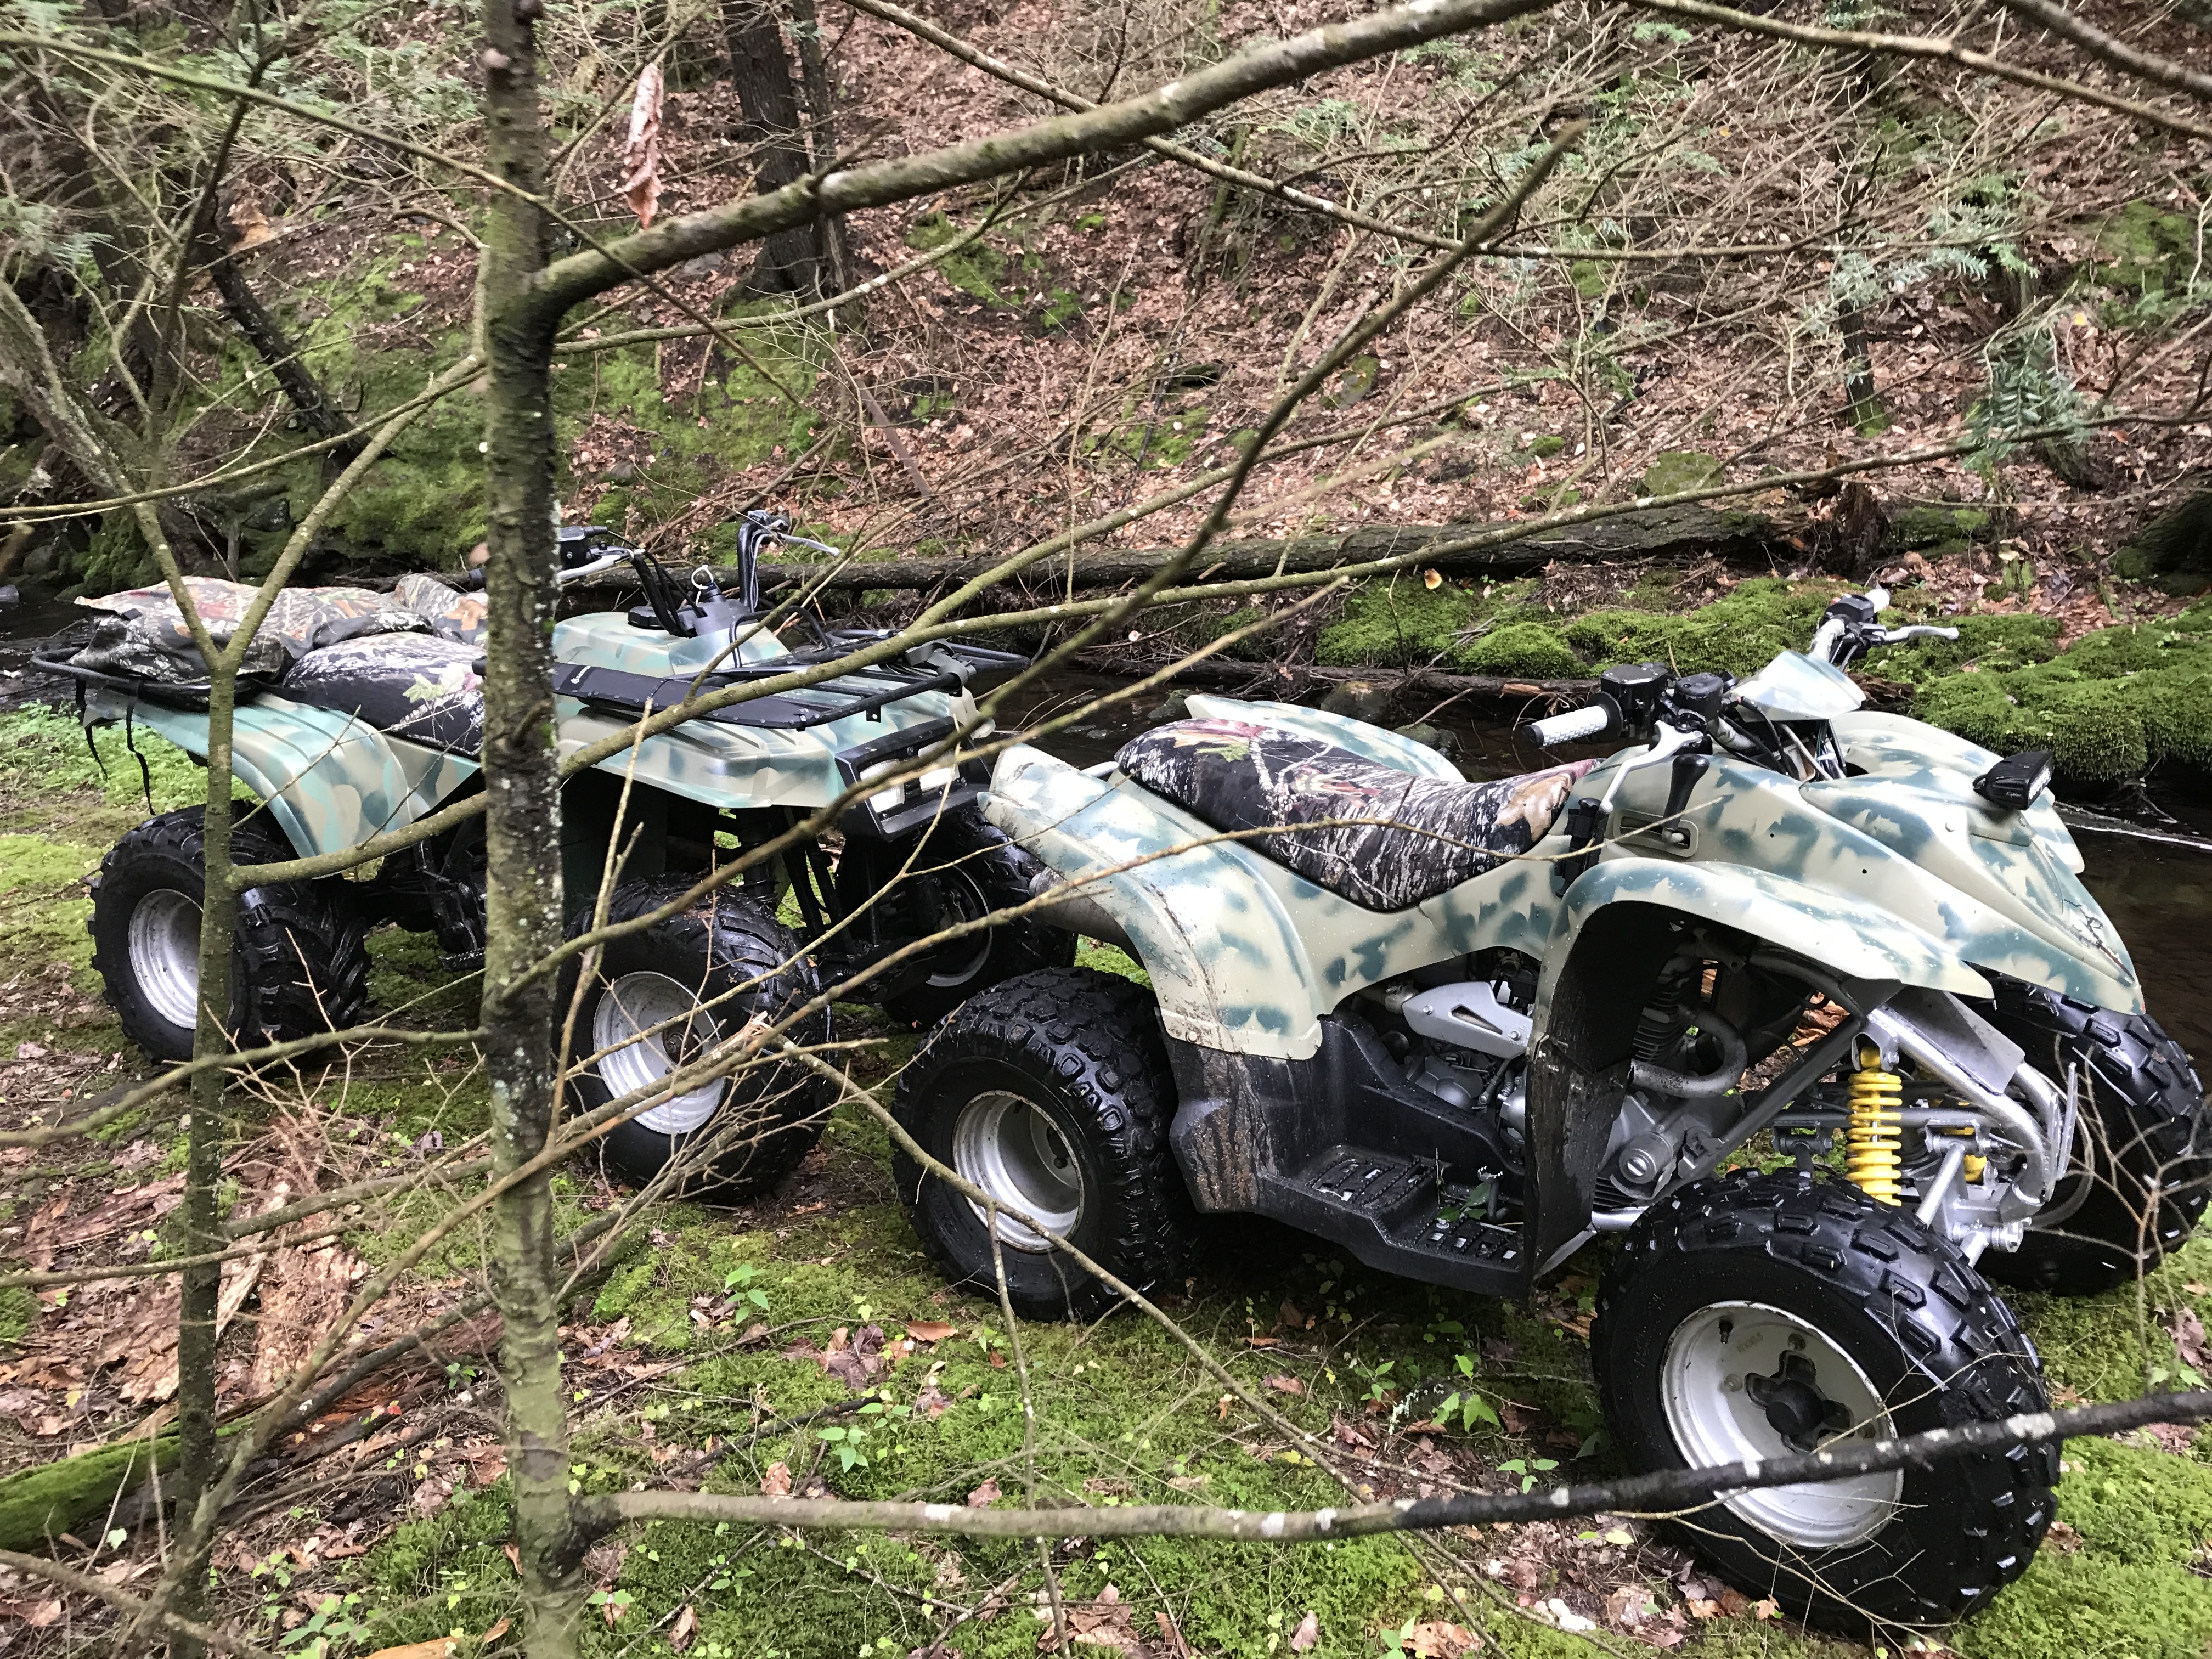
Good stuff brother. Nice work, try and stay away from them branches. Ride safe and good luck hunting this year. Be sure to post some pics.
-
I was there at one point. Right now I have four atv’s and one dirt bike. Going to get rid of at least one quad and the dirt bike.
-
Wow that sounds scary, by the topic it sounded like YOU got impaled!!! The lever/shifter prob just got bent. It should run fine with it bent. Juts make sure there is nothing blocking the shifter so it goes completely into the gear you want. That is the hand shifter on the left side by the fender correct ? When your ready to repair it then remove it from the machine and heat it up and bend it back to where it was. If your not sure what it looked like before it was bent then look the part up and it will give you an idea of what it looked like. You can also buy another shifter just to be safe.
-
I can’t help but to look as a drive now. I see sh** all the time. I actually pressure washed the bear tracker and fired it up. She runs good, took it out for a spin last night. I think I’m going to bring her up to the new property and leave it up there for the hunting season. Time to install the lift kits and bigger rims and tires on the ranchers so I need a little room.
-
1996 Kawasaki Mojave KSF250 No Spark
Frank Angerano replied to Chris2018's topic in Kawasaki ATV Forum
I don't know why the jets are the same but my guess over all would be the air/fuel mixture screw being worn. Put the oem rebuild kit in from ex caliber and see what happens. -
2004 Yamaha Grizzly Foot Rest Rusted Broken
Frank Angerano replied to Ajmboy's topic in Yamaha ATV Forum
That’s a smart move having that extra foot rest. Wiring fixable ? -
Wow! Very nice!!!!!!!!