-
Posts
3,925 -
Joined
-
Last visited
-
Days Won
208
Content Type
Profiles
Forum
Gallery
ATV Magazine
Events Calendar
Downloads
Store
Community Map
Everything posted by Frank Angerano
-
This is a good question asked by @Johnny Chancellor. I put it in a new topic so it does not get lost. We all know we need a cdi box but I bet a lot of the members here don’t know how it works. This is a good explanation of a cdi box including what it does, how it works and what “cdi” stands for. Ive posted two links here. Feel free to add to the list! https://www.elprocus.com/capacitor-discharge-ignition-cdi-system-working/ https://en.wikipedia.org/wiki/Capacitor_discharge_ignition
-

1991 Honda Fourtrax 300 no lights, no start
Frank Angerano replied to Mark Walters's topic in Honda ATV Forum
Welcome to Quadcrazy, I would check the rectifier and see what’s going on. It’s possible that it’s bad causing a voltage issue. Then I would check the voltage at the battery and see what you have there including cranking if you can get it to crank. You may be right on a bad ignition. Double check the the ground cable(black) where it bolts up to the frame from the wire coming off the battery. Wiggle the key also while this is going on to see if it starts. If so then while it’s running wiggle the key to see if it acts up again. -
It can’t be the right part. There has to be a cross reference issue etc. I would double check your numbers. 18 to 26 mm not clicking. The TPS is a very temperamental part so should get numbers re checked and the calibration tool as well from Amazon so it’s installed properly.
-
If you have hydraulic lifters then no there would not be a timing chain. I was assuming based on the bike. If that’s the case then it would possibly be collapsed lifters. Oil pressure would not be a reason for that kind of slack but you still need to make sure it’s pumping to the head.
-
It can jump. Don’t let the sprocket fool you. If you look at some of the other posts you will find that timing chains stretch and chain tensioners break.
-
Have you checked the timing is lined up and has not jumped a few teeth on the sprocket. Your going to have to bring the flywheel to the T mark and then expose the sprocket on the top end so you can see the marks that line up the timing. Just make sure you verify the flywheel is on the T mark. Sometimes it can be deceiving due to other marks on the flywheel.
-

Honda Fourtrax bring back from the grave
Frank Angerano replied to JacobSlabach's topic in Honda ATV Forum
Is a rocker for that bike that much ? The bike looks good. I would say go for it. If you go to flip it then that tick is going to be a turn off to the buyer. -

Yamaha Warrior clutch/carb/exhaust issues
Frank Angerano replied to JacobSlabach's topic in Yamaha ATV Forum
Correct ! -

Yamaha Warrior clutch/carb/exhaust issues
Frank Angerano replied to JacobSlabach's topic in Yamaha ATV Forum
Got ya, work work work and no play is no fun! But you can’t have toys work out the work! -

Honda Fourtrax bring back from the grave
Frank Angerano replied to JacobSlabach's topic in Honda ATV Forum
Absolutely agree w @scotty2hotty01 . Spark first then the carb. You could have fouled the plug as well. Check the spark with a new plug first. Go from there. -

Yamaha Warrior clutch/carb/exhaust issues
Frank Angerano replied to JacobSlabach's topic in Yamaha ATV Forum
Looks great kid. Nice work. Keep it up. -
I’ve never had any luck with aftermarket cheap cdi units. Always like the oem cdi when it comes down to it. The Chinese ones look great plug right in but are worthless. Ive been lucky with caltrec stator coils though. So far used a few and they’ve been good. Thats a great carburetor you put on. Prob cost a bit! $$$ but well worth it.
-

Wiring for my 2002 Polaris Scrambler 90
Frank Angerano replied to Brian Simmons's topic in Polaris ATV Forum
https://rover.ebay.com/rover/0/0/0?mpre=https%3A%2F%2Fwww.ebay.com%2Fulk%2Fitm%2F222707939483 This relay would work. I’ve attached some images of it along with the wiring. You would have to buy a few connectors. They are called “steak on’s” four females. 3 of them for 14 gauge wire and one for 10 gauge wore. -
Nice set up. Can’t wait to see how she runs.
-
That looks amazing!
-

Wiring for my 2002 Polaris Scrambler 90
Frank Angerano replied to Brian Simmons's topic in Polaris ATV Forum
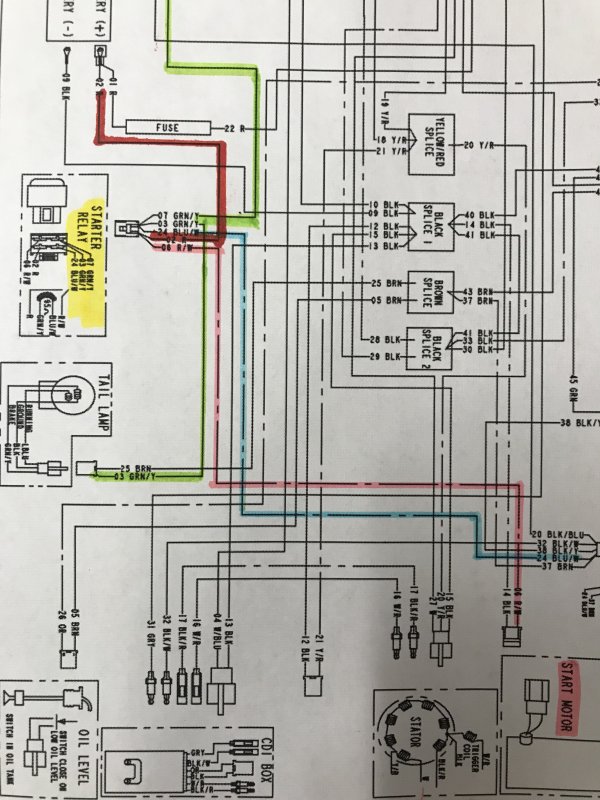
I know who you are Mr Brian Simmons! Lol I’m trying to help you so take a deep breath and take a look at the diagram I highlighted for you. The relay your going to need is the starter relay. That’s what appears to be missing based on the pictures and the diagram/wire colors for the bike. Color code: green = green wire yellow stripe pink = red wire white stripe blue = blue wire white stripe red = red wire small red wire goes to the relay and then to the battery. Red wire with a red stripe goes from the relay to the starter. Blue wire with white stripe comes from the handle bars left side and goes to the relay. Check that control left hand and trace it back it should be he wire you have shown. green with yellow stripe comes out of the relay and splits to the tail light and to the brake switch on the left handle bar. Take a look at the diagram, study it and take your time. Your also going to need a relay and plug assembly. I will take a look and see where you can find one. -

Wiring for my 2002 Polaris Scrambler 90
Frank Angerano replied to Brian Simmons's topic in Polaris ATV Forum
I’m going to sort some wires out for you on the diagram. This will help you out. In the mean time are there any relays that are there that are cut or a place where one was ? The wires your showing me are for a start circuit relay. Not the starter relay but the start circuit. It looks bypassed. -
Use a pair of needle nose vice grips and grab the sides of the screws on the carburetor. I’ve done that and had great success. And keep in mind that this may not be a air fuel issue and just a starved fuel condition caused by the float not filling the bowl, the needle jet E clip may not be set in the right groove. An air starvation at the intake as well. Heck it could be electrical for all we know. So process of elimination is going to be key here and keeping your cool Bc this can be a frustrating thing. So walking away for a few days is not a bad thing.
-
I laughed my as* off on the spark testing process. Well at least spark is good! So that small brass plug with the two small button holes in it. That’s a tamper proof cap. You can buy the right tip at any hardware store or make one up by grinding the middle of a screw driver out to look like a two prong screw driver that fits with adjusting as your grinding. Or a small very pointed needle nose pliers. Unscrew that and the air/fuel screw should be underneath it. If you unscrew it all the way and it has the needle attached then it’s the actual air fuel screw itself. That would suck because it’s going to be a bi*** to adjust while the bike is running but your going to have to modify that angle screwdriver with a grinder to fit the holes and go that route. The air/fuel screw should be set right around 2-1/4 turns out from a snug tight position. So try that first and run the bike and see how it goes. Also double check the float level. While the carburetor is off the bike take the bowl/float cover off. Hook a clean hose up to the fuel connection on the carburetor. Hold the carburetor straight as if it were on the engine and blow into the hose. Air should come out of the bottom of the carb where the float pin is. As your blowing air raise the float up and see how far up the float goes before the air stops. It should be about 3/4 way up. If it’s closing sooner then it needs to be adjusted. See how that works out and get back.
-
Side by side ahh ok. Never seen SXS before as an abbreviation. A four seater less then 51” I think I’ve seen some that narrow but they were more of the utility type not sporty. Check out this review page. You can click on each of the links on each manufacturer for the specs. The maverick is 50” https://www.utvguide.net/50-inch-trail-capable-utvs/
-
I’m assuming your referring to a 6x6 ? I’ve only seen a few come by here and there and look cool as heck but it’s a once in a while post. They do accommodate up to six or four people As far as the 4 seater well there are many types and brands that you would not need a 6x6 for. But if your hell bent on that take a look at Polaris Good luck
-
That’s great to hear. Pass it down and pay it forward.
-
Ok got it now. I was just wondering because you seem very knowledgeable on the engine side of things.
-
Listen to me, you have nothing to loose brother. Go for it and let’s see how it goes. Worst case you keep looking for a new casing in the mean time. However when are you going to start looking for a quad ?


